How to use Nolira
A step-by-step guide to the three Nolira apps: Nolira Desk on a Windows computer, and Nolira Team on iPhone and Android. One step at a time, with a picture for each.
Look for the orange numbers on each picture. Number 1 on the picture is step 1 in the list below it, number 2 is step 2, and so on. Do the steps in that order. The pictures show a demo salon called Salon Melati. Every name, phone number and amount in them is made up.
Part 1
Before you start
What Nolira is, which app to use, and what you need before you sign in for the first time.
Three apps, one salon
Nolira keeps your salon's bookings, bills, cash drawer, stock and staff in one place. You can use it in three ways. All three show the same salon, so a booking made on one appears on the others.
- 1
Nolira Desk is for the Windows computer at the front counter. The receptionist and the owner use it for everything: bookings, bills, the till, stock, staff and reports.
- 2
Nolira Team on iPhone is for staff and owners on the move: today's visits, walk-ins, bills, customers and approvals.
- 3
Nolira Team on Android does the same as the iPhone app, on an Android phone.
Where to get the apps today: Nolira Desk is not on the Microsoft Store yet, so we set it up with you directly. Nolira Team has been sent to the App Store and Google Play for review and is not in either store yet. This guide will say when that changes.
What you need to sign in
You need three things. Keep them somewhere safe.
- 1
Your salon code. It is the short name of your salon, the same one in your booking link. Salon Melati's is salon-melati.
- 2
Your email address. The owner uses the email they registered with. Staff use the email the owner invited.
- 3
Your password. Staff choose their own password from the invitation email. Nobody else, not even Nolira, can see it.
Forgot your password? Press Forgot your password? on the sign-in screen and follow the email. You also need an internet connection.
Part 2
Nolira Desk on Windows
The front counter's app. Open it from the Nolira Desk icon on the computer. The menu on the left takes you to every screen.
- Sign in
- Find your way around
- See the day's bookings
- A customer arrives
- Book an appointment: the treatment
- Book an appointment: who and for whom
- Book an appointment: the time
- Book an appointment: save it
- The booking is on the calendar
- Cancel a visit
- Add a walk-in
- Serve a walk-in
- Find a customer
- Take payment: the Checkout screen
- Take payment: start the bill
- Take payment: who did it
- Take payment: add what they had
- Take payment: the money
- Take payment: the receipt
- Cancel a bill that was started by mistake
- The cash drawer
- Close the drawer at the end of the day
- Packages
- Memberships
- Pay and commission
- Commission rules
- Stock on the shelves
- Move stock between outlets
- Shelves and stores
- Invite a staff member
- Where they work and what they do
- What each role may do
- Your menu of treatments
- Products you sell
- Headings on the menu
- Chairs and rooms
- Reports
- Outlets
- Opening hours and rules
- Days you are shut
- Who did what
Sign in
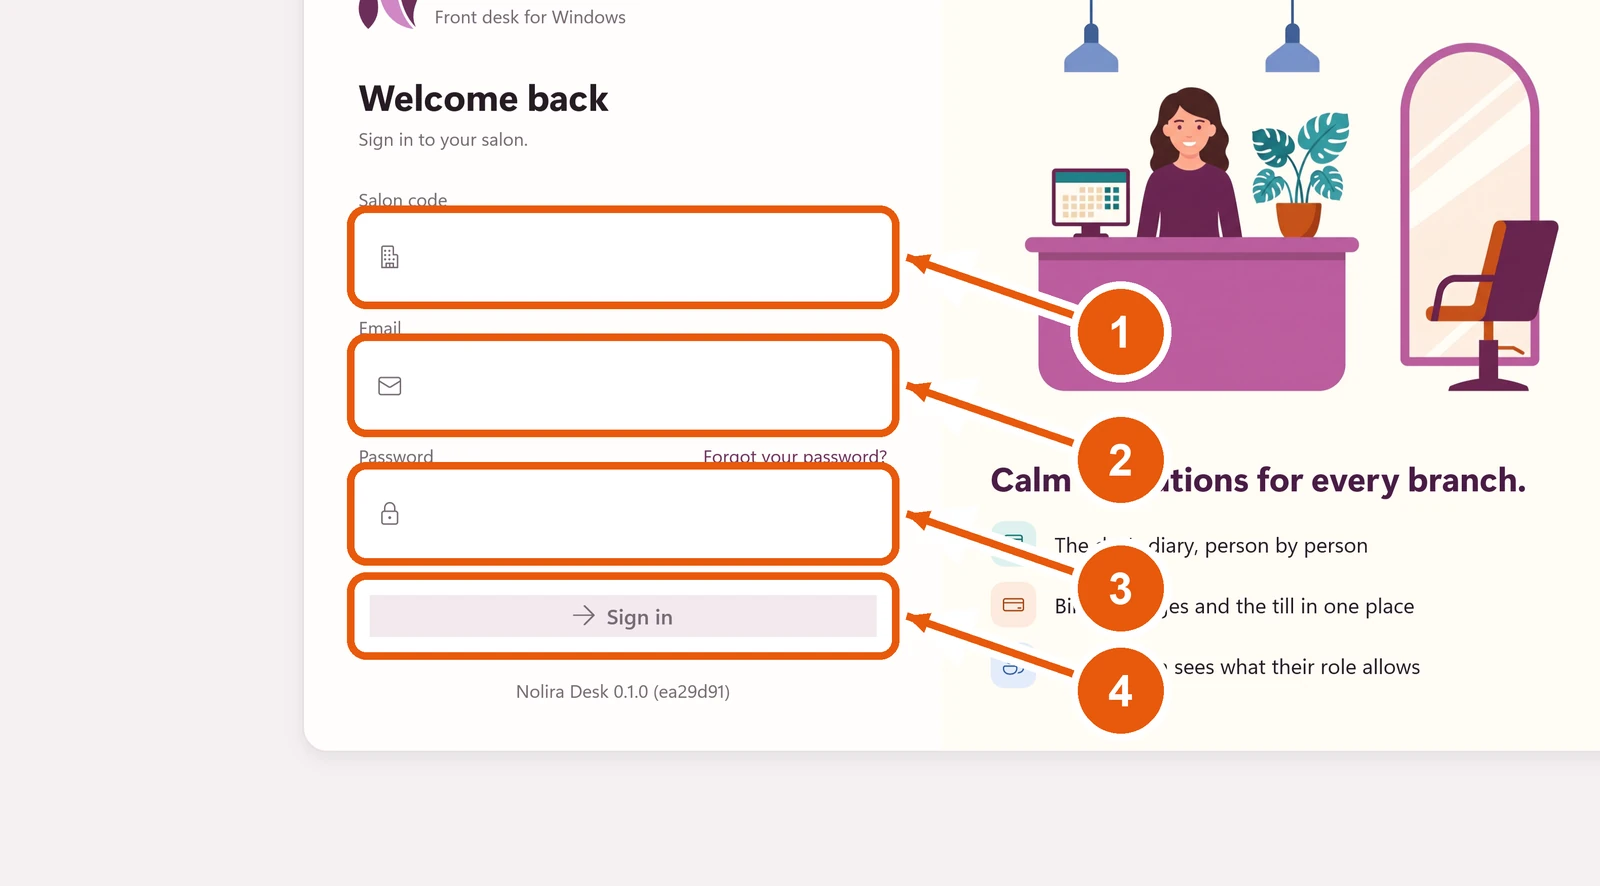
- 1
Click the Salon code box and type your salon code.
- 2
Click the Email box and type your email.
- 3
Click the Password box and type your password.
- 4
Click Sign in.
Desk remembers you. Next time it opens straight to your salon.
Find your way around
After signing in you see Overview: today's takings, today's visits, and anything that needs somebody.
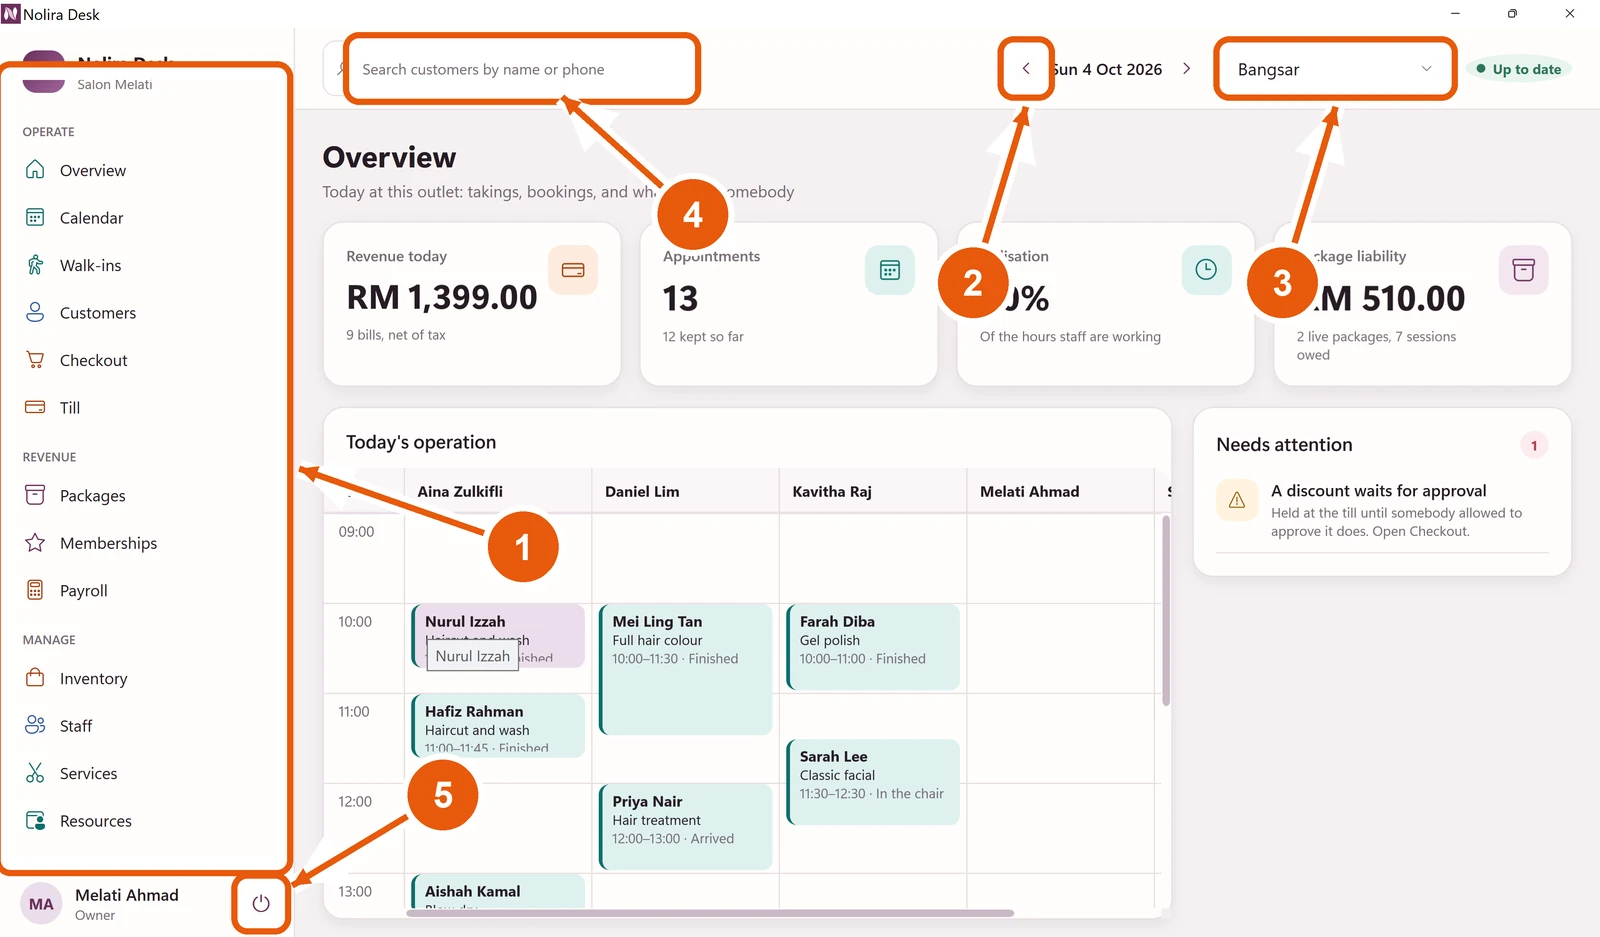
- 1
The menu. Click a name to open that screen. Scroll it down to see more.
- 2
The day. Use the arrows to look at yesterday or tomorrow.
- 3
The outlet. If your salon has more than one, choose which one you are looking at.
- 4
Search for a customer by name or phone number from any screen.
- 5
Sign out, when you leave the computer for someone else.
Up to date, at the top right, means Desk is talking to Nolira. If it says something else, check the internet.
See the day's bookings
Click Calendar in the menu. Each column is one person. Each box is one visit, with the customer, the treatment and the time.
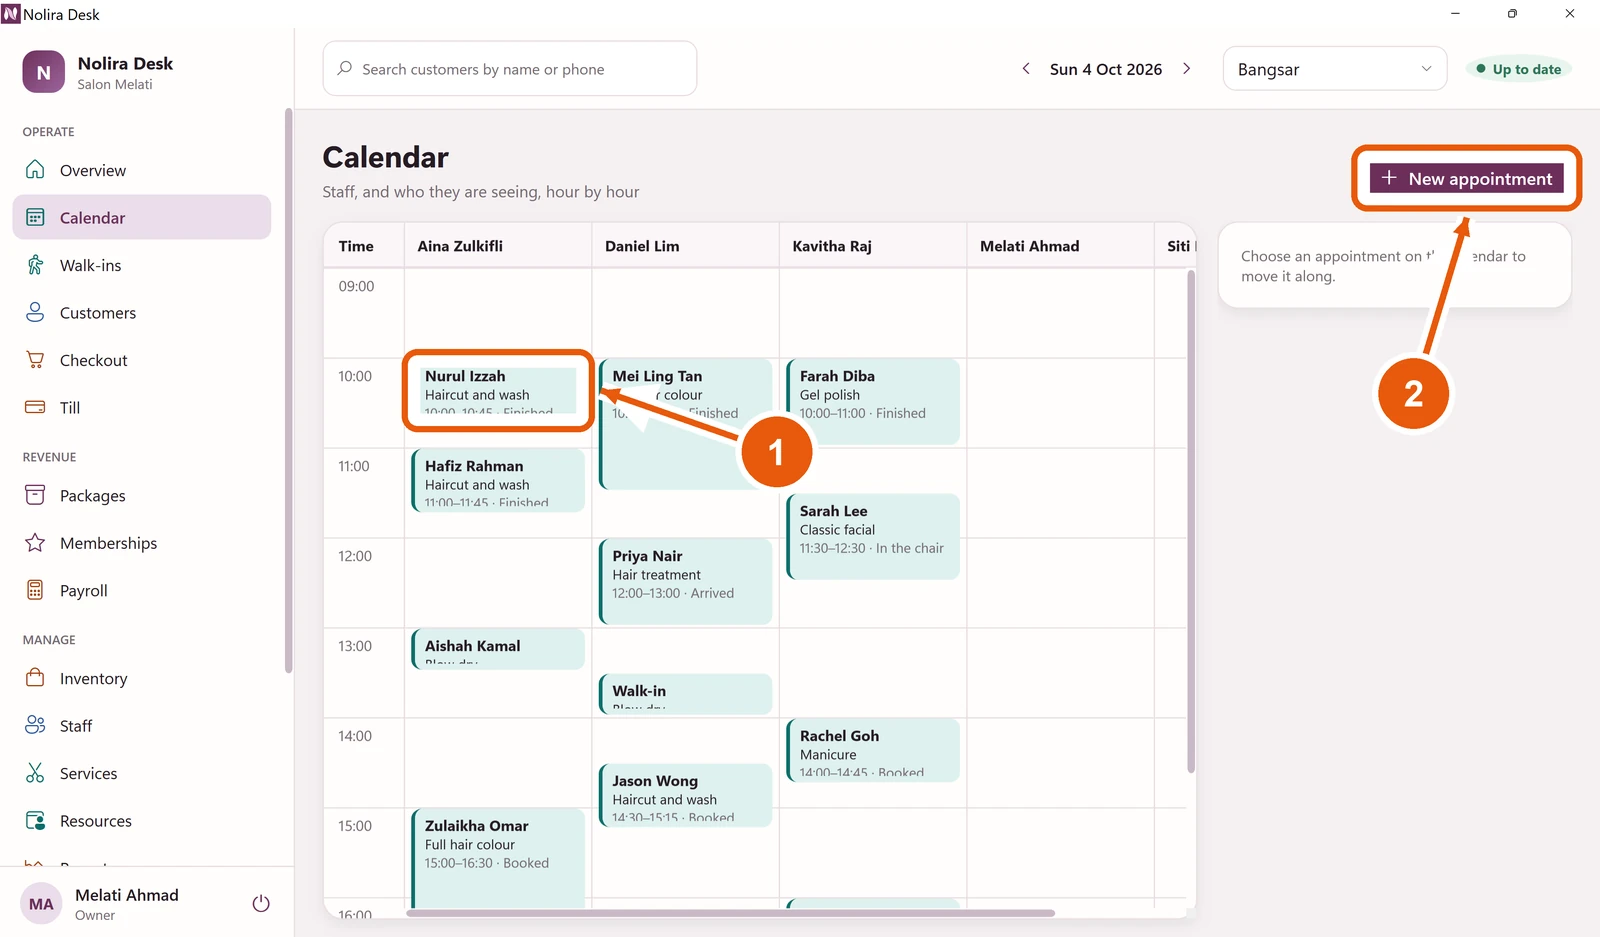
- 1
Click a visit to see it and move it along.
- 2
Click New appointment to book someone in.
A customer arrives
Each visit moves through the day: Booked, Confirmed, Arrived, In the chair, Finished. The button on the right always shows the next step.
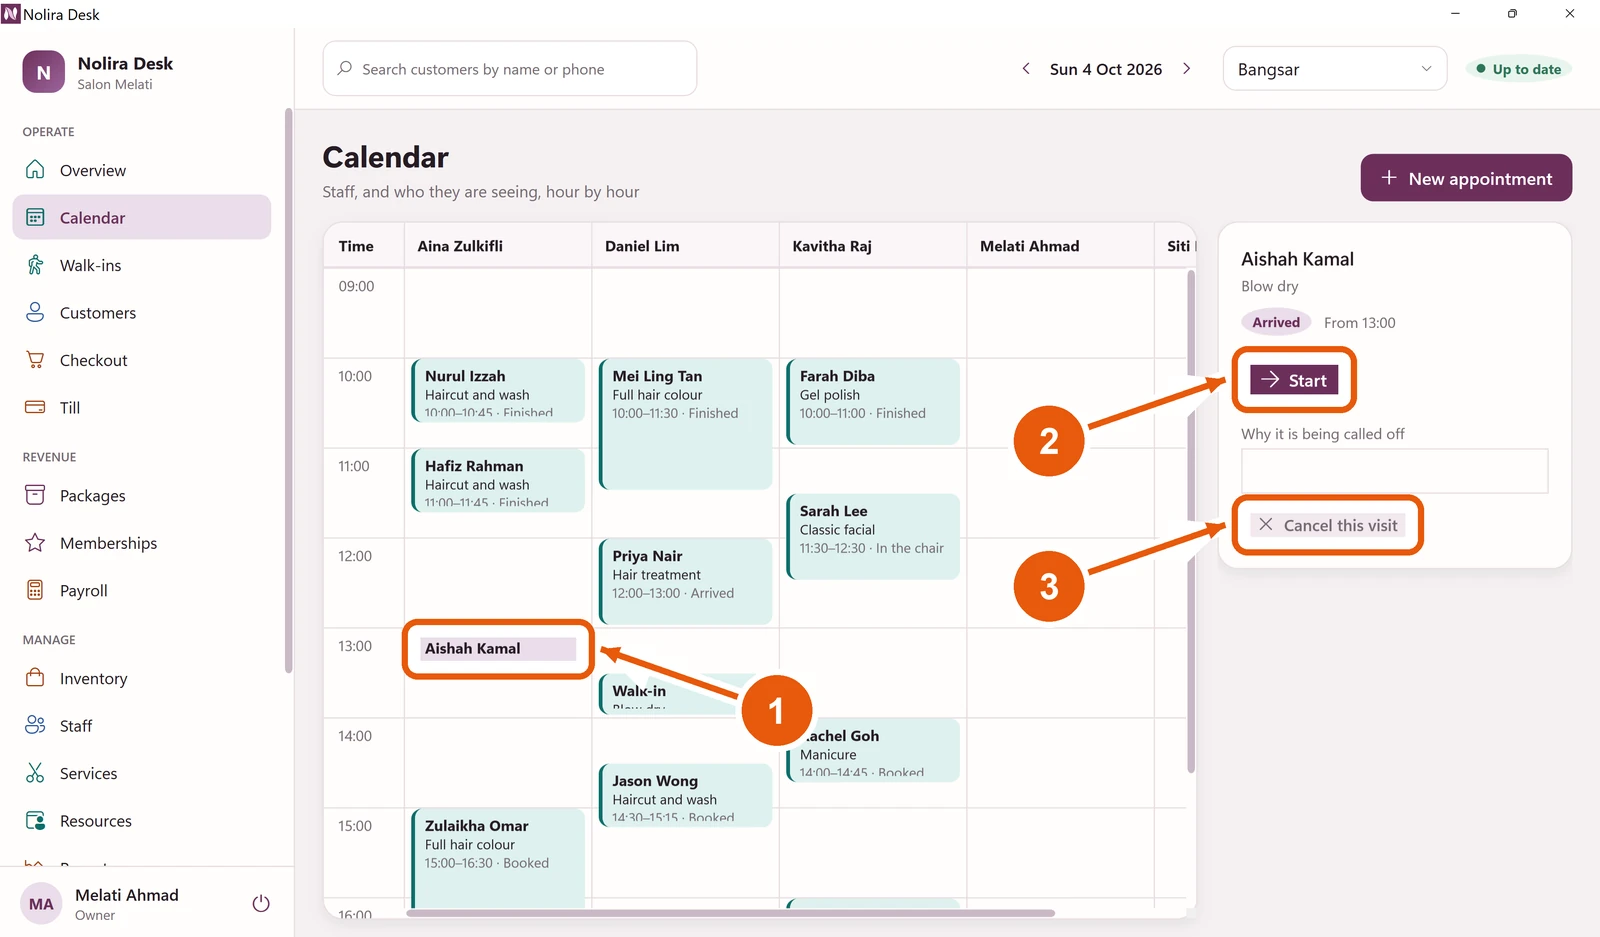
- 1
Click the customer's visit on the calendar.
- 2
Click the purple button on the right. It says what happens next: Confirm, then Arrived when they walk in, Start when the treatment begins, and Done when it ends.
- 3
If the visit is not going ahead, see Cancel a visit below.
Book an appointment: the treatment
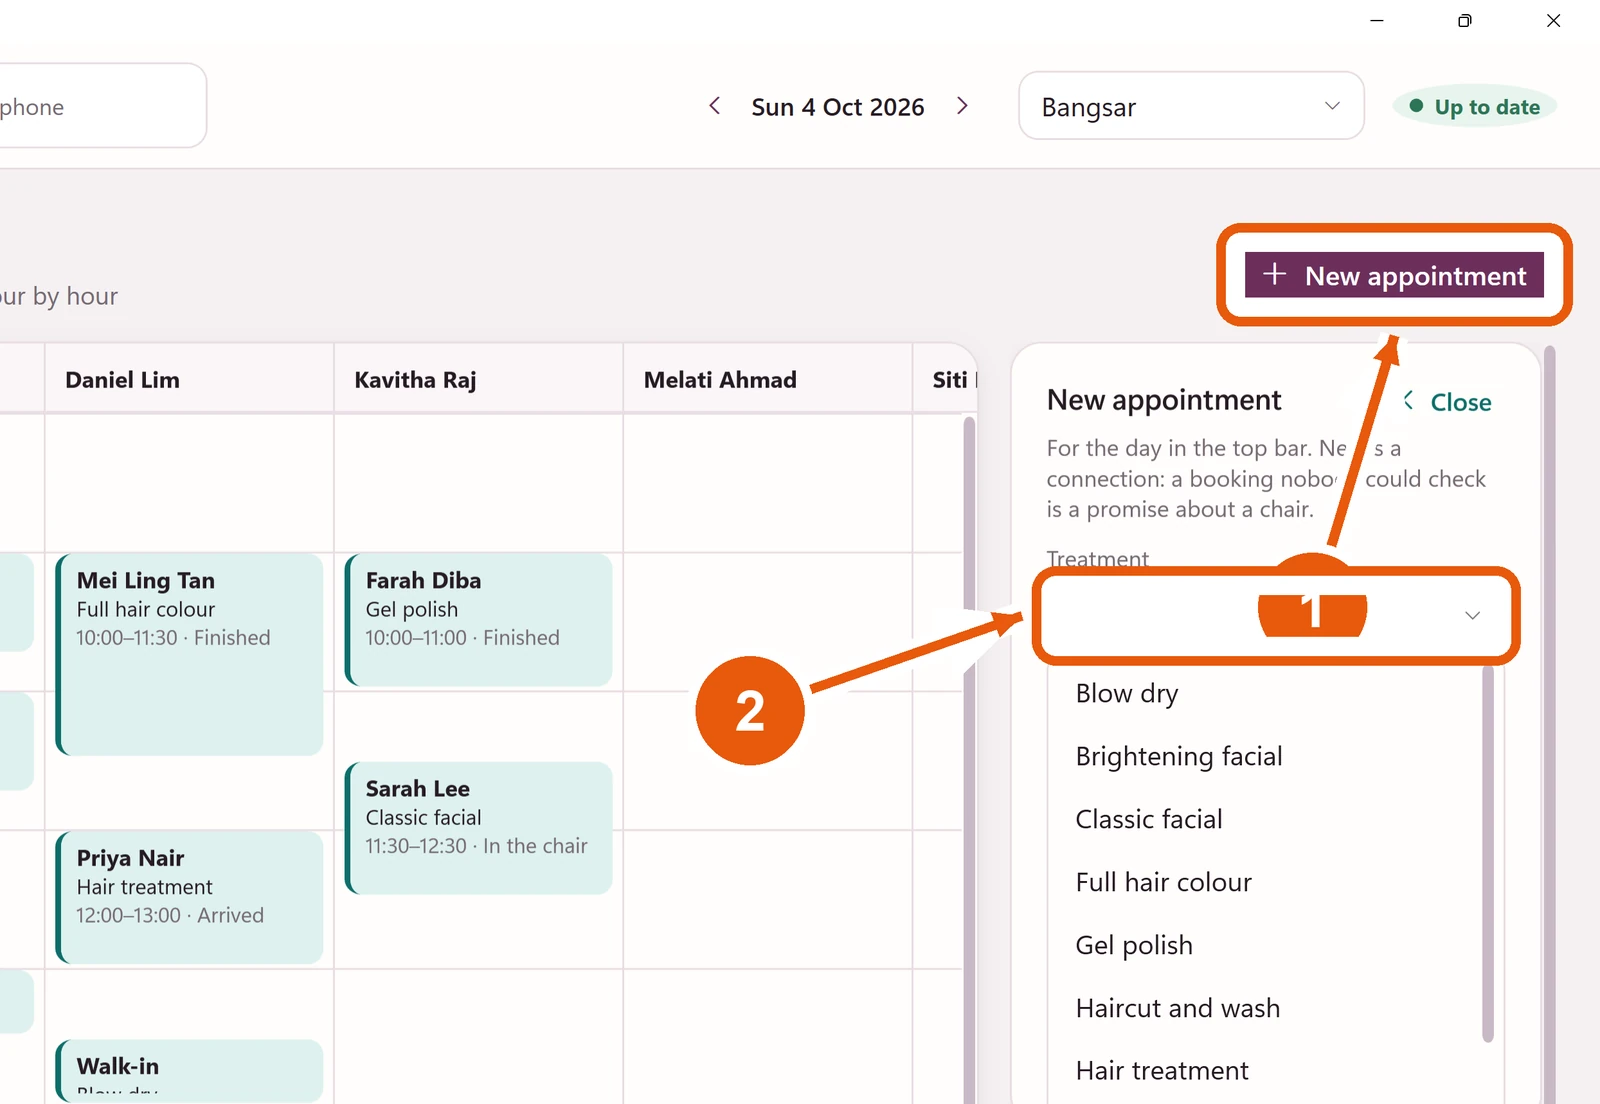
- 1
Click New appointment. A form opens on the right.
- 2
Click Treatment and choose what the customer wants.
The booking is for the day shown at the top. Change the day first if the customer wants another day.
Book an appointment: who and for whom
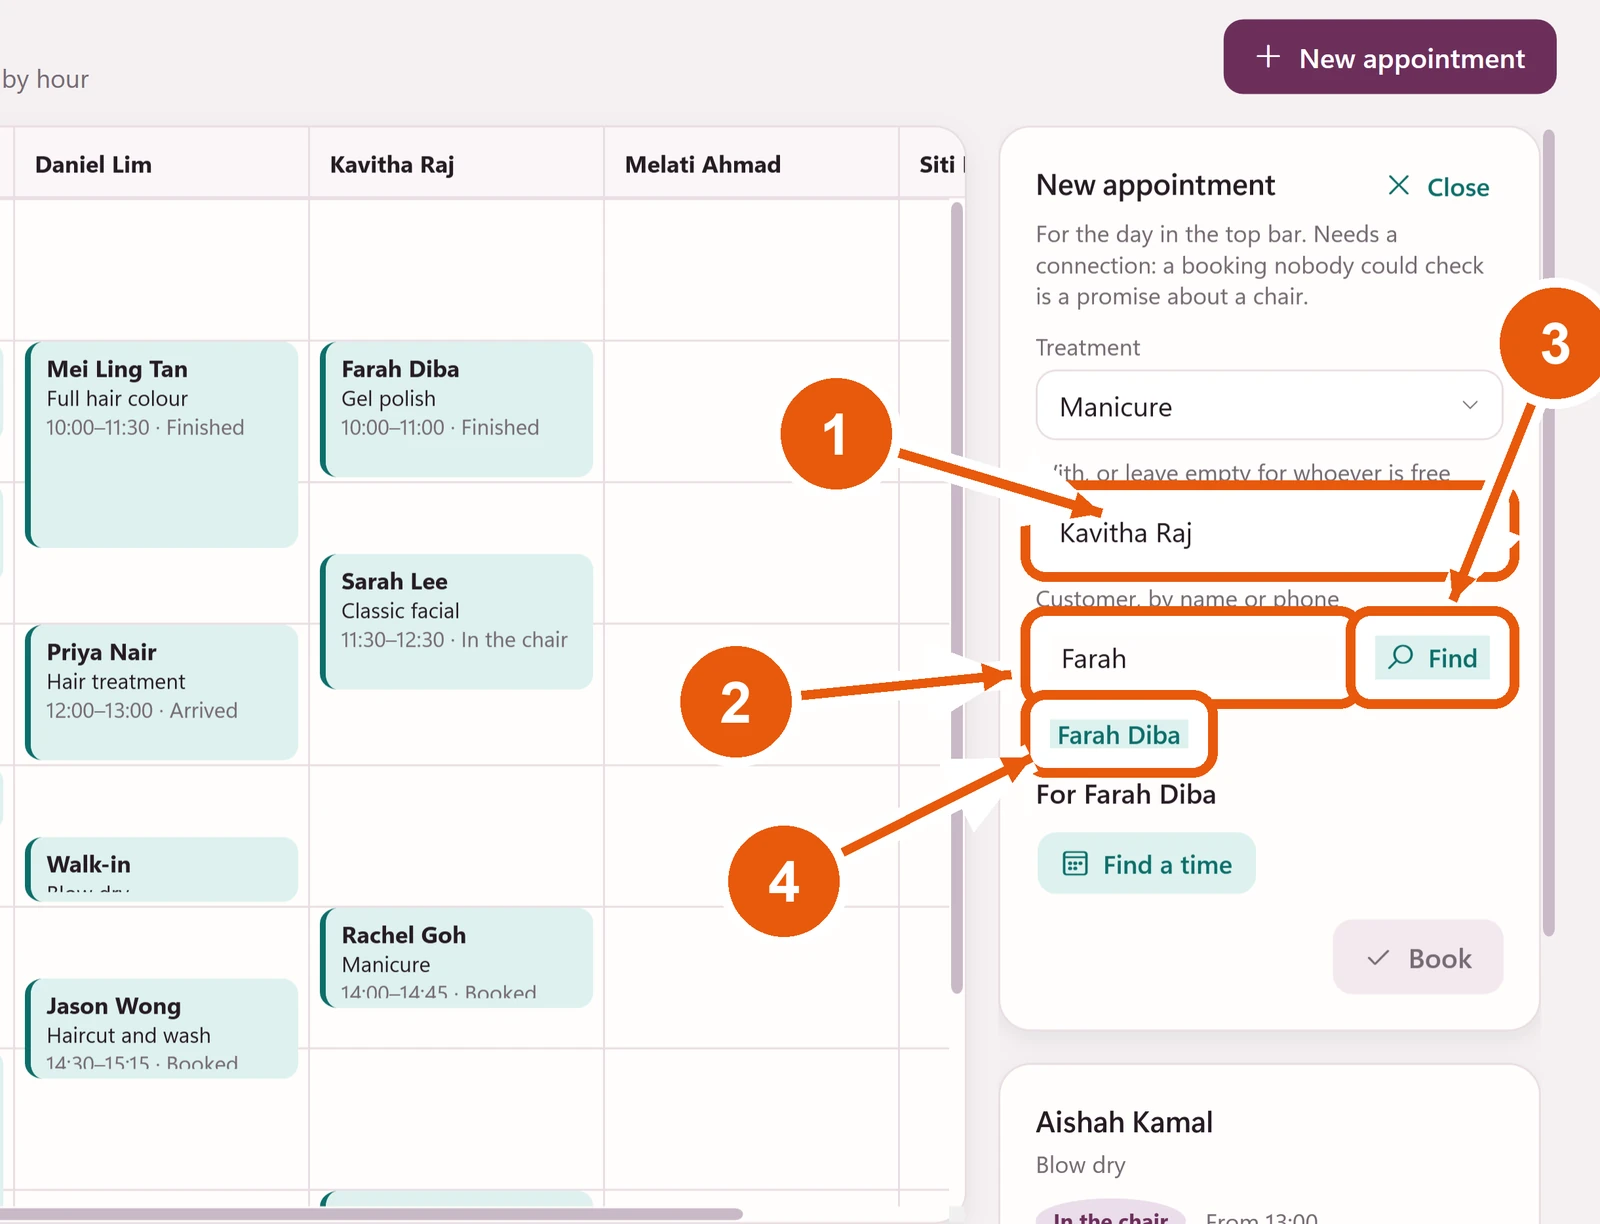
- 1
Under With, choose the staff member the customer asked for. Leave it empty for whoever is free.
- 2
Type the customer's name or phone number.
- 3
Click Find.
- 4
Click the customer's name in the list. Their name then shows after For. If only one person matches, Desk chooses them for you.
Booking someone who is not a customer yet? Leave the name box empty. The visit is then booked as a walk-in.
Book an appointment: the time
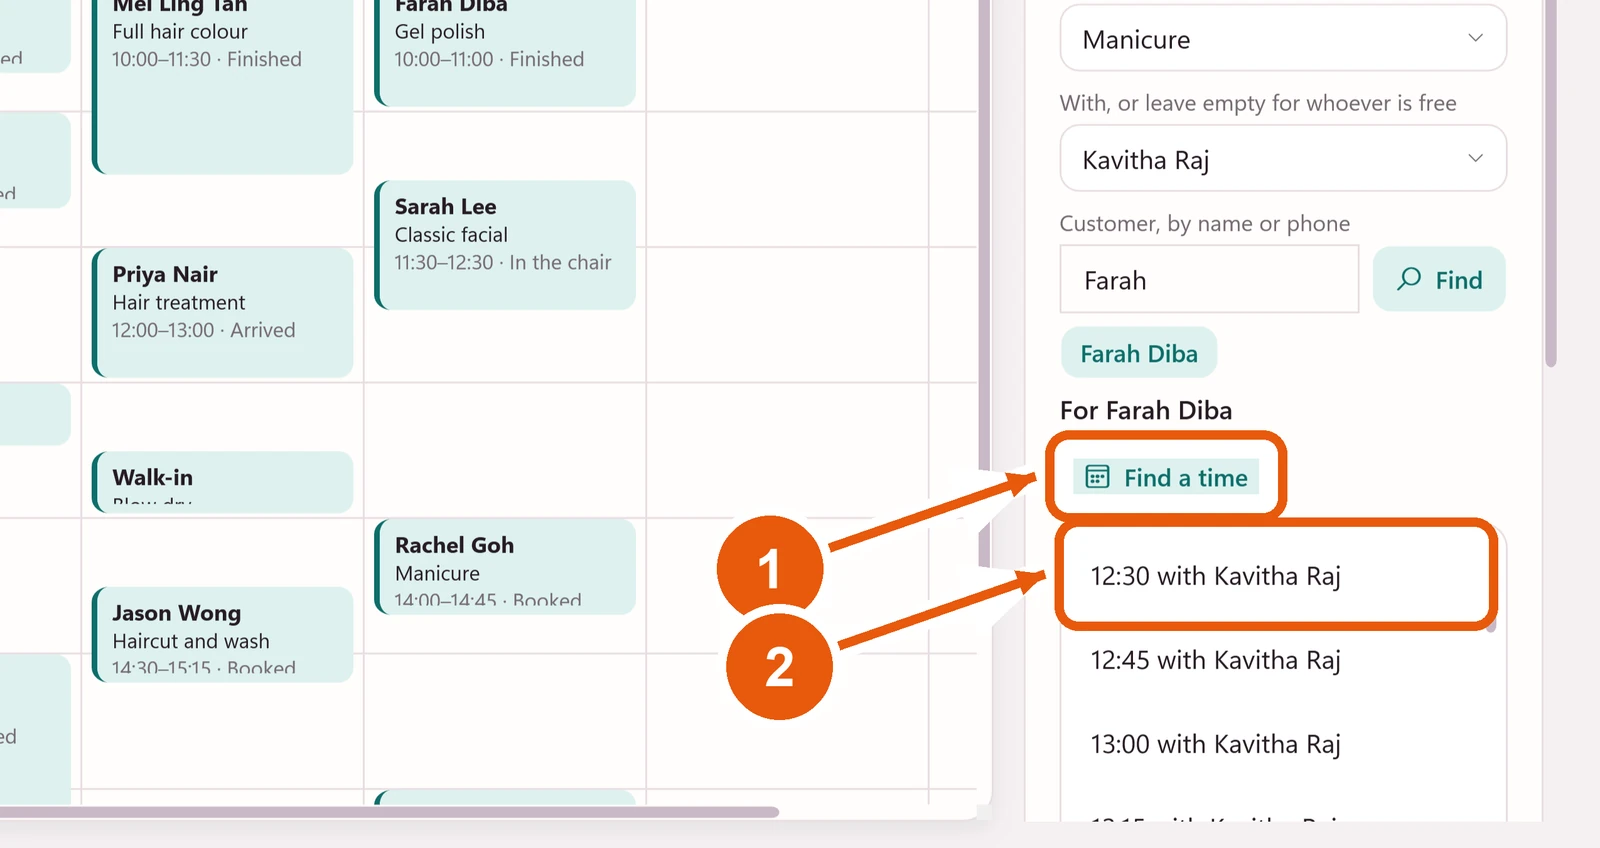
- 1
Click Find a time. Nolira lists every time that is free.
- 2
Click the time the customer wants.
Book an appointment: save it
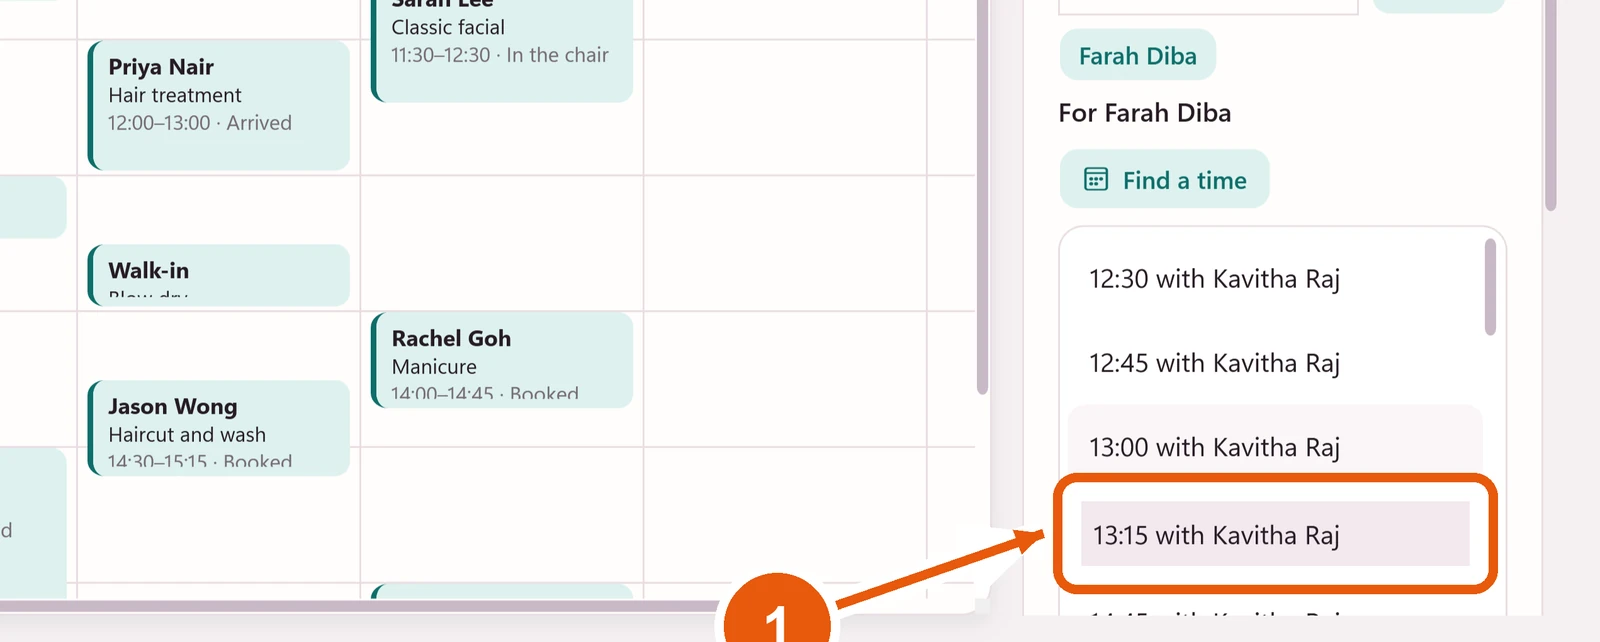
- 1
Check the time you chose is highlighted, then scroll the form down and click Book.
The booking is on the calendar
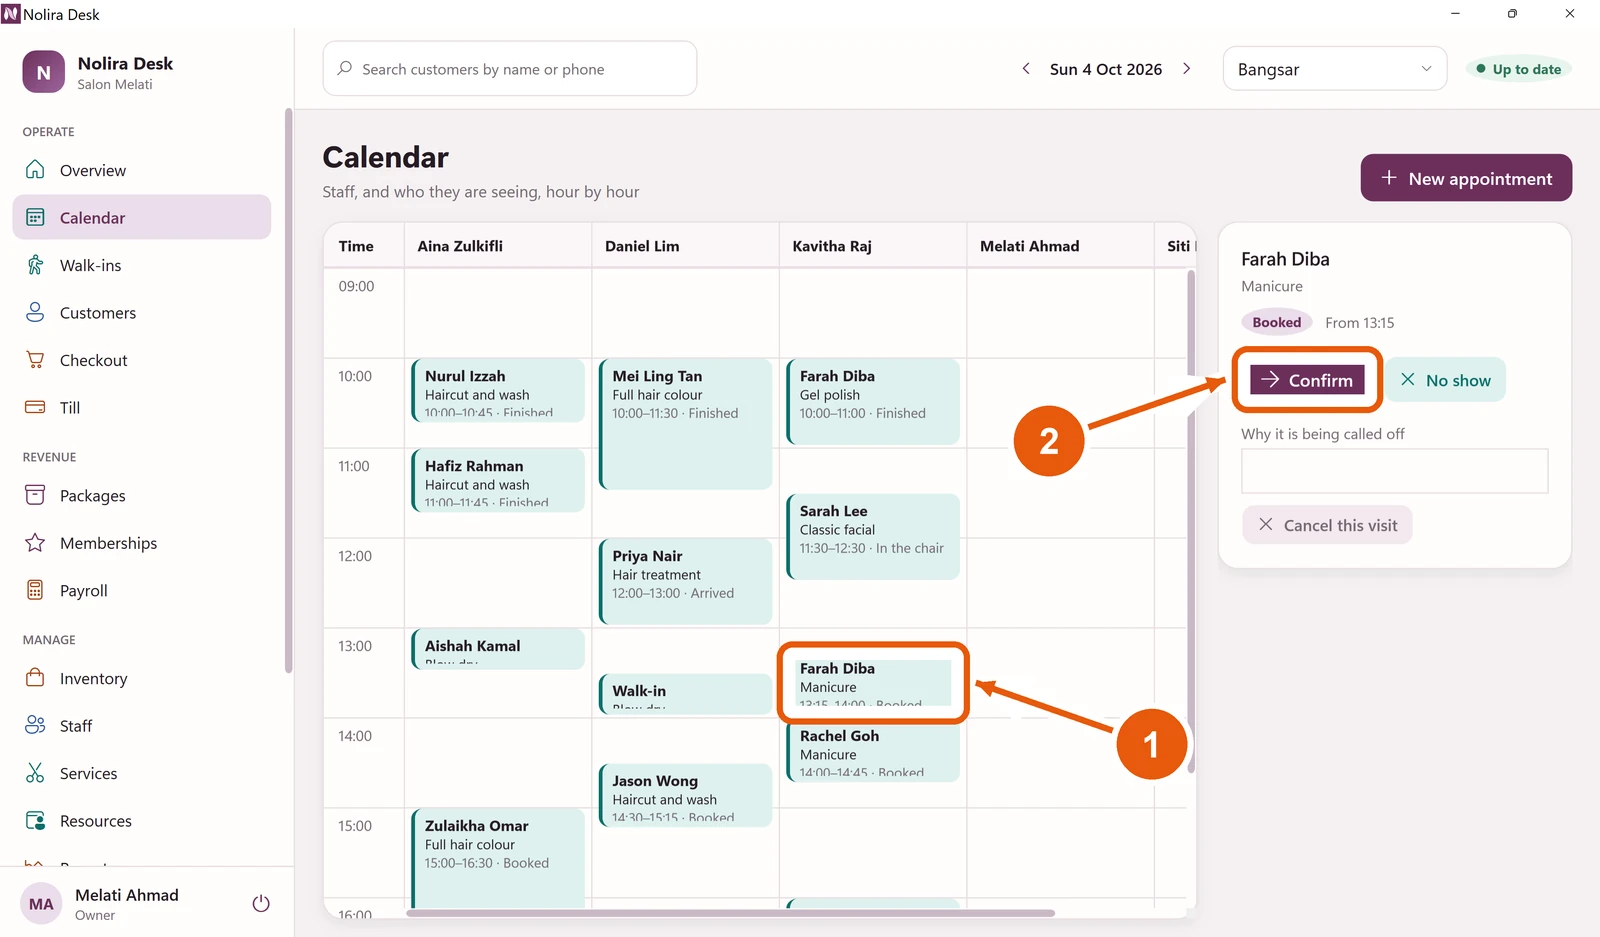
- 1
The new visit appears on the calendar and is chosen for you.
- 2
Click Confirm once the customer has said they are coming.
Cancel a visit
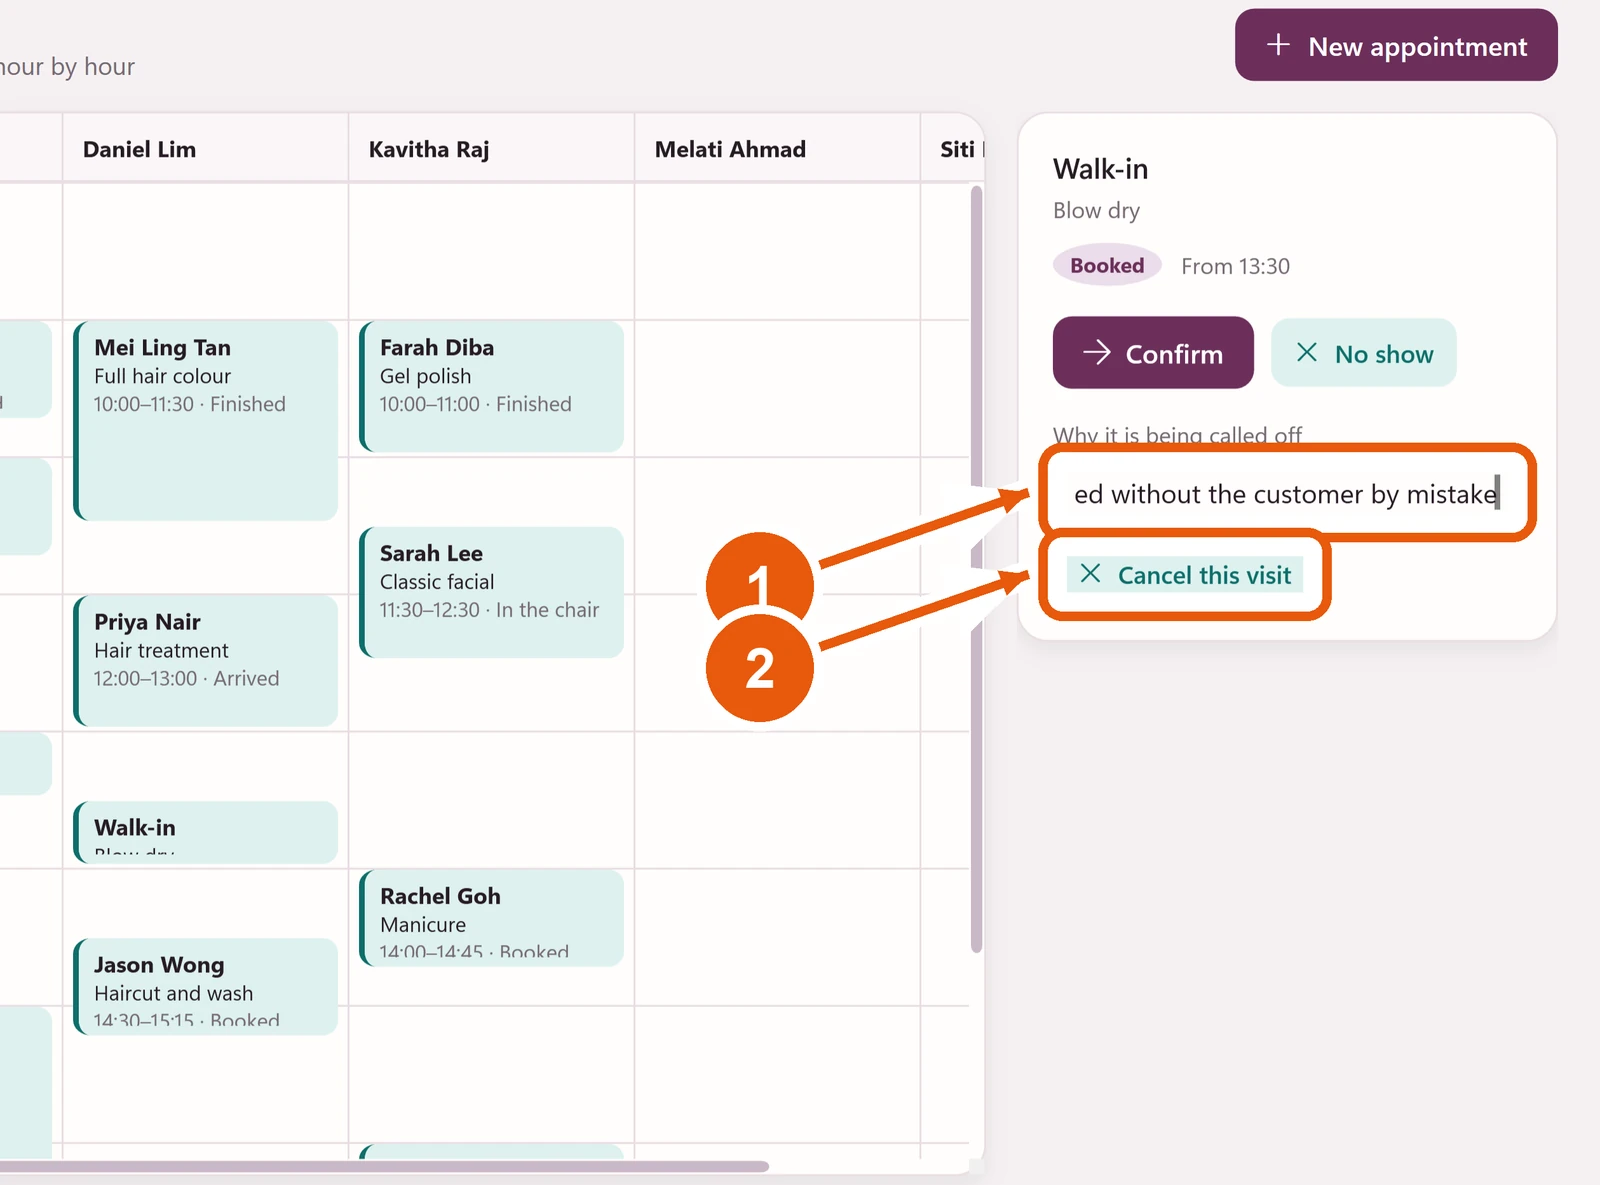
- 1
Click the visit, then type why it is being cancelled, for example Customer is sick.
- 2
Click Cancel this visit.
If the customer simply did not come, click No show instead. Nolira keeps both, so you can see later who often misses visits.
Add a walk-in
A walk-in is a customer without a booking. Click Walk-ins in the menu.
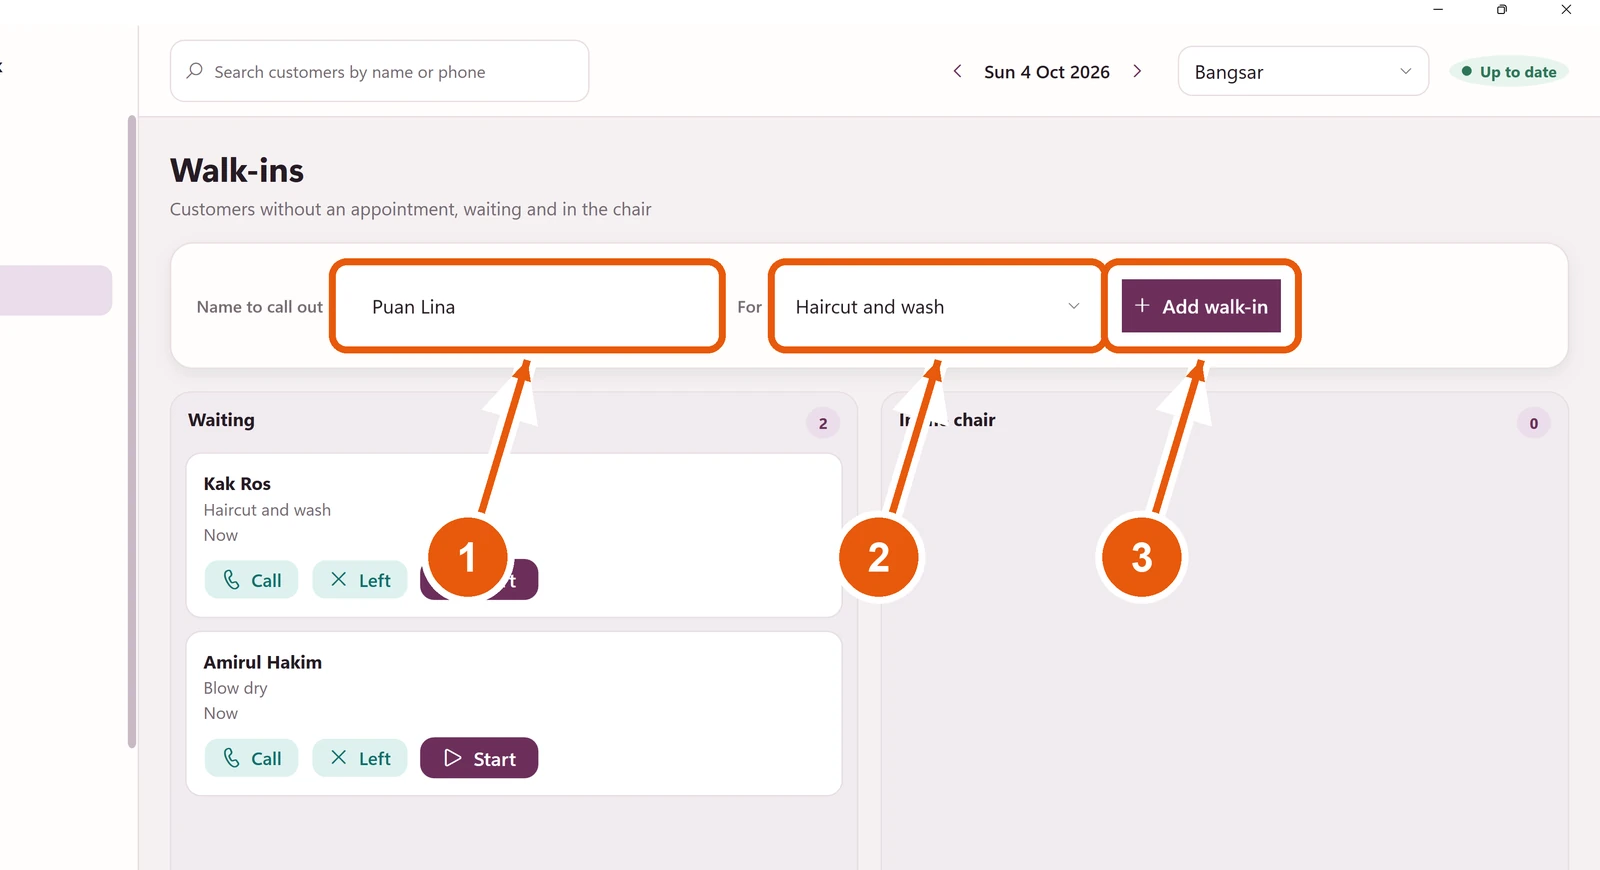
- 1
Type the name you will call out.
- 2
After For, choose the treatment they want.
- 3
Click Add walk-in. They join the end of the queue.
Serve a walk-in
Each card shows how long they have waited, and who will do the treatment.
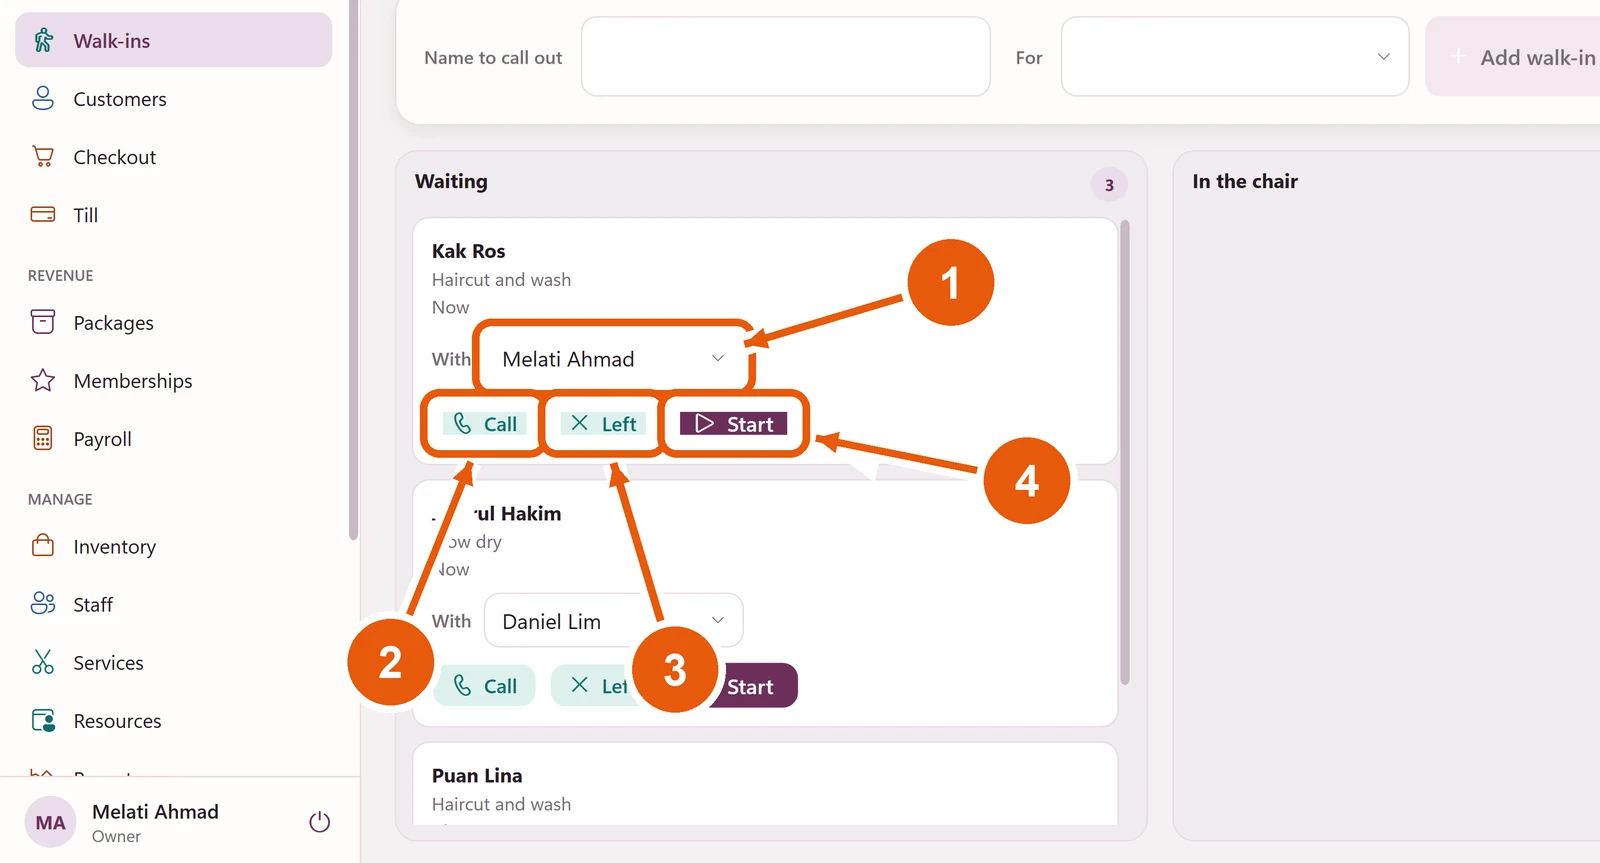
- 1
Under With, choose who will do the treatment. Desk suggests whoever they asked for, or whoever will be free first.
- 2
Click Call when it is their turn and you call their name.
- 3
Click Left if they gave up and went home.
- 4
Click Start when the treatment begins. They move to In the chair. Click Done when it is finished.
Find a customer
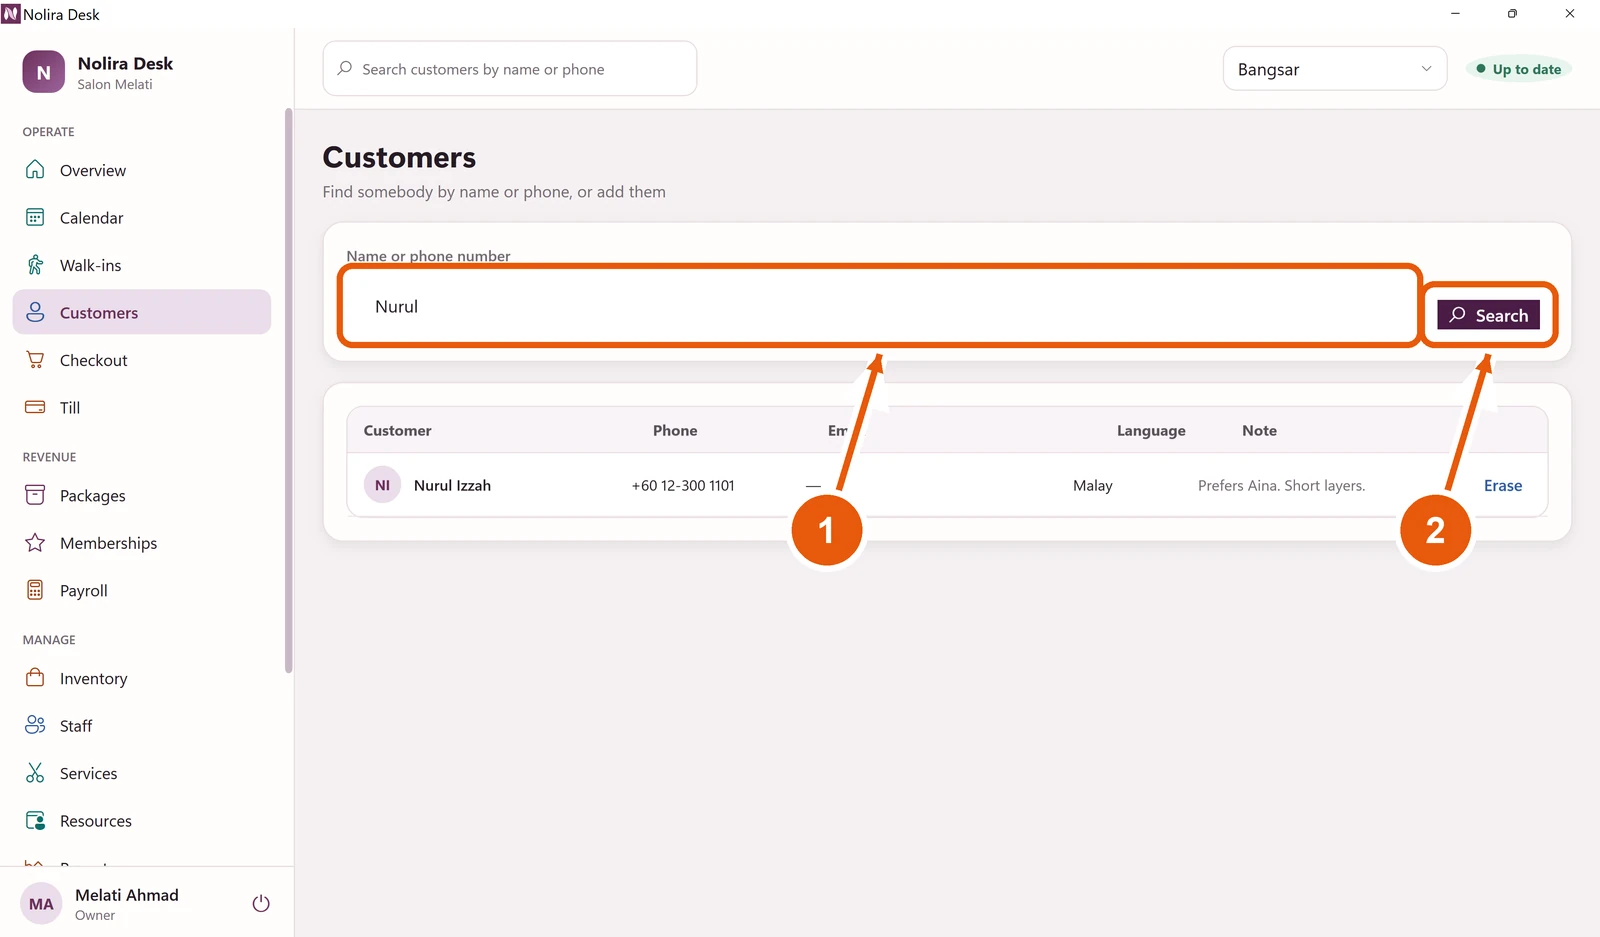
Click Customers in the menu.
- 1
Type part of the name or phone number.
- 2
Click Search. Their phone, language and note appear.
Write in the note what helps you serve them, for example Prefers Aina. Do not write health details there.
Take payment: the Checkout screen
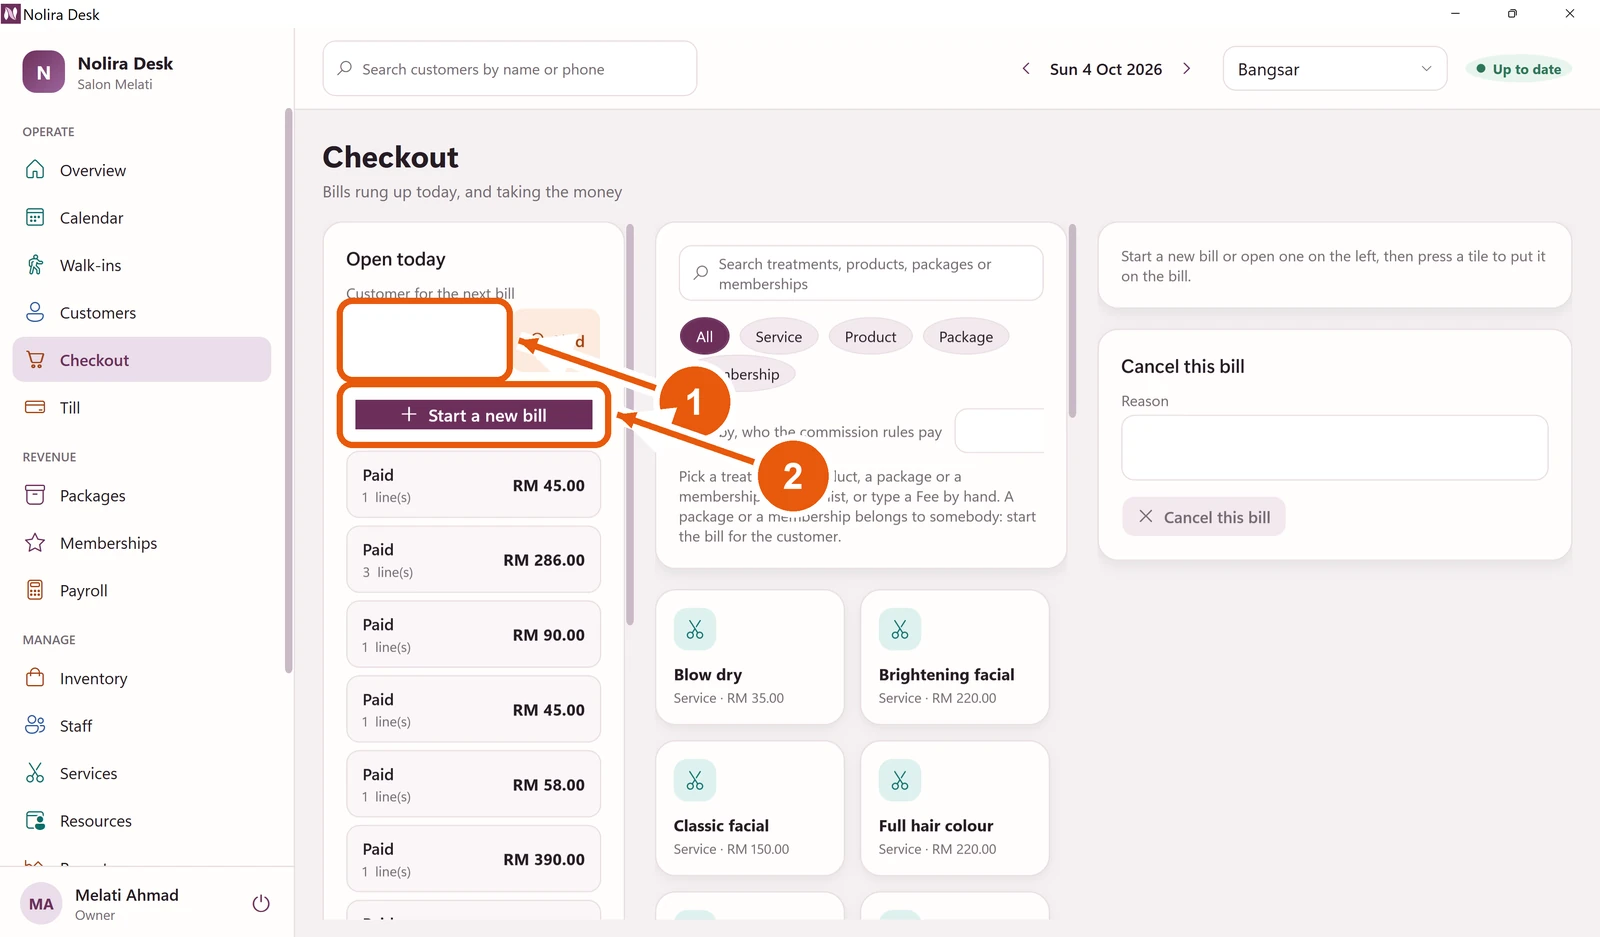
Click Checkout in the menu. On the left are today's bills. In the middle are the treatments and products. On the right is the bill you are working on.
- 1
The box for the customer's name or phone.
- 2
Start a new bill opens an empty bill.
Take payment: start the bill
- 1
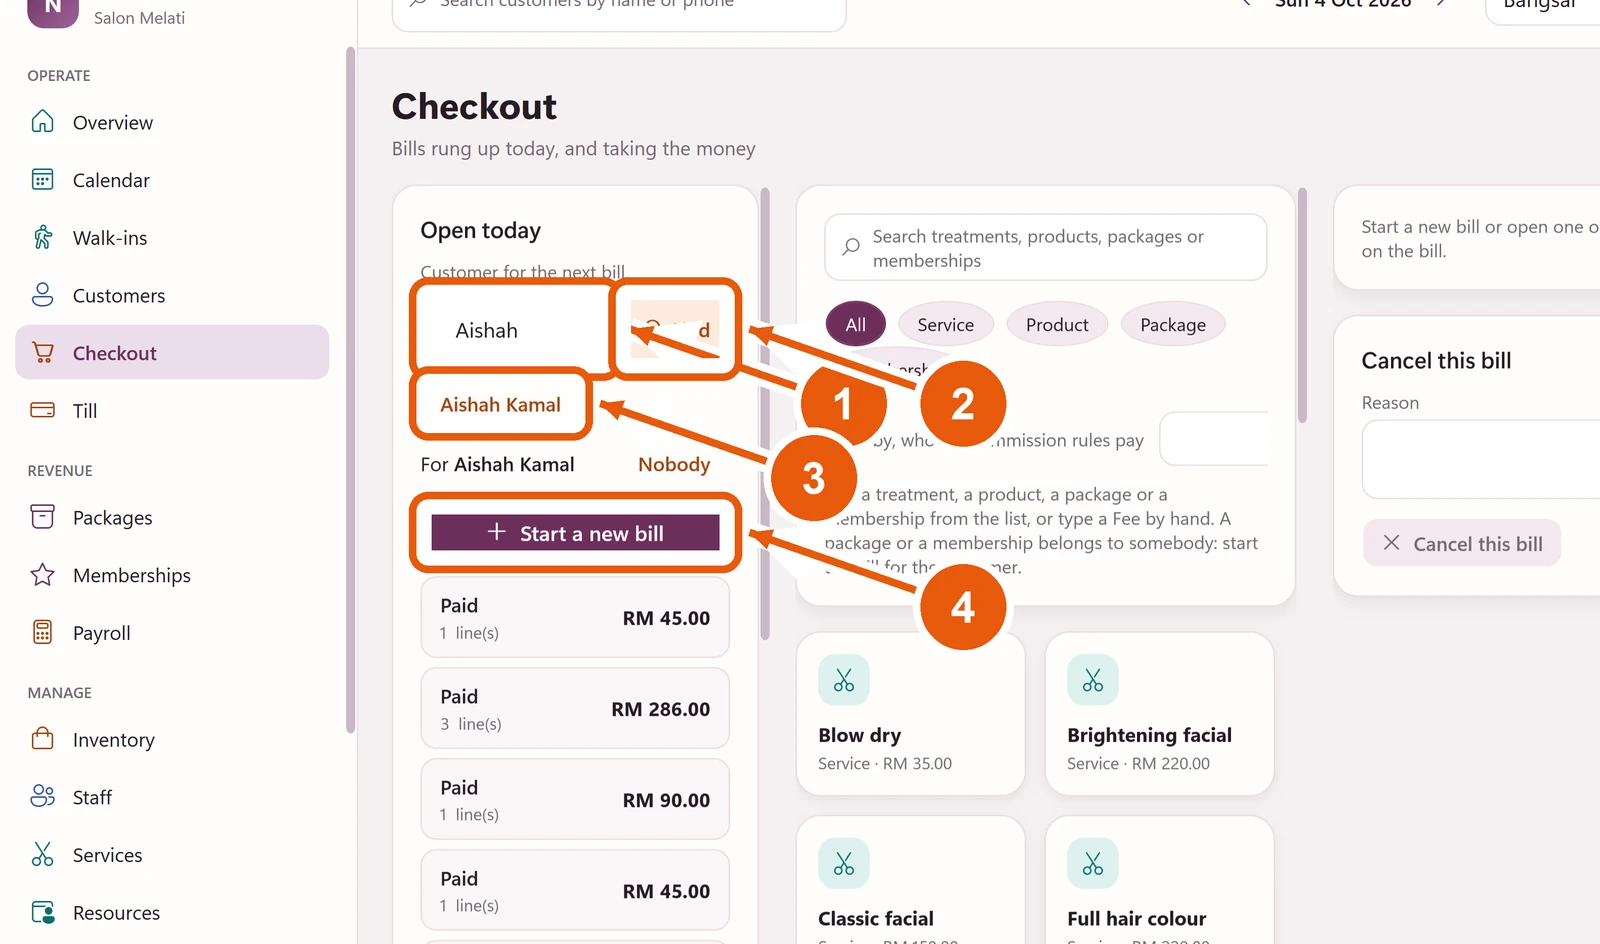
Type the customer's name or phone number.
- 2
Click Find.
- 3
Check the right customer is chosen: their name shows after For. If several people match, click the right name.
- 4
Click Start a new bill.
A package or a membership belongs to a customer, so always start their bill with the customer's name. For someone you do not know, click Nobody.
Take payment: who did it
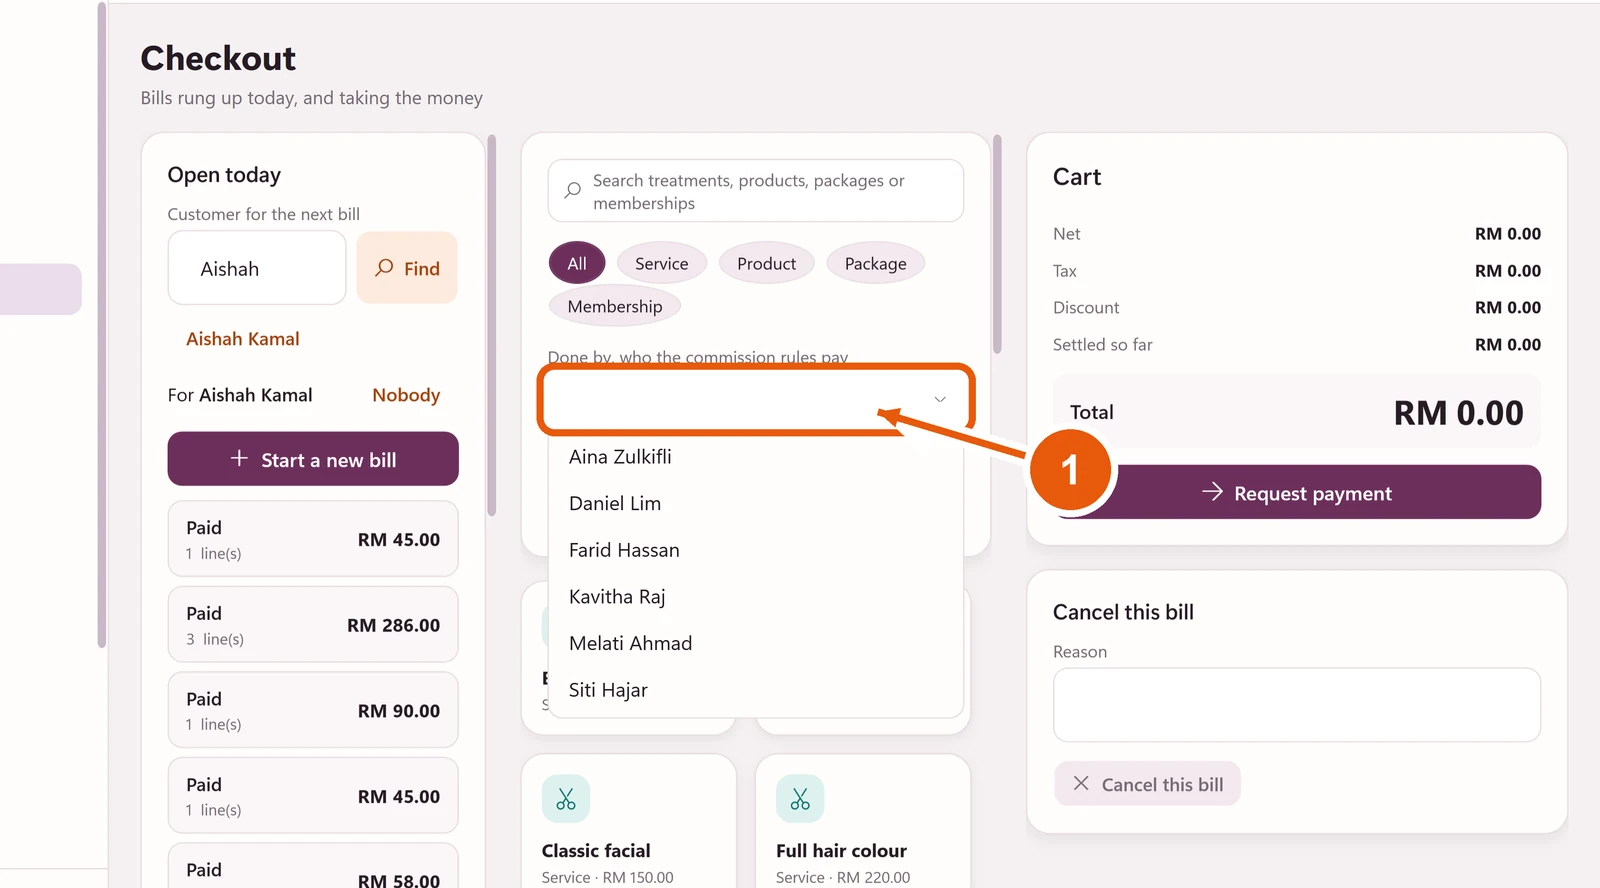
Before adding a treatment, say who did it. Their commission depends on it, and Desk will not add a treatment until someone is chosen.
- 1
Click Done by and choose the staff member.
Take payment: add what they had
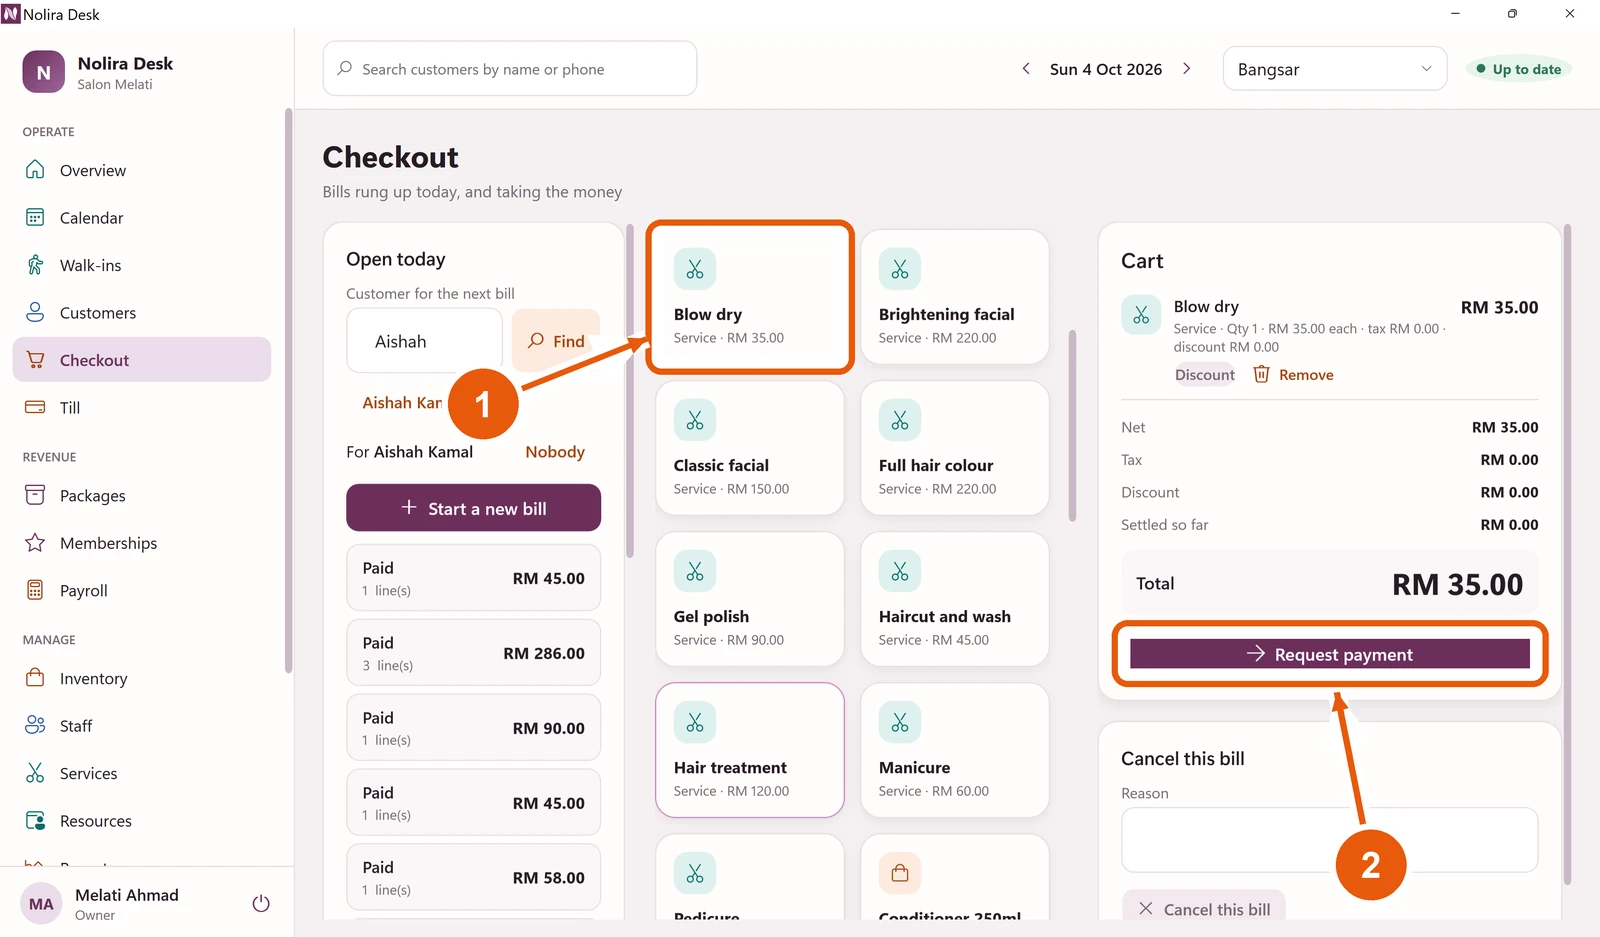
- 1
Click the treatment or product. It goes on the bill on the right. Click again to add another.
- 2
When everything is on the bill, click Request payment.
Take payment: the money
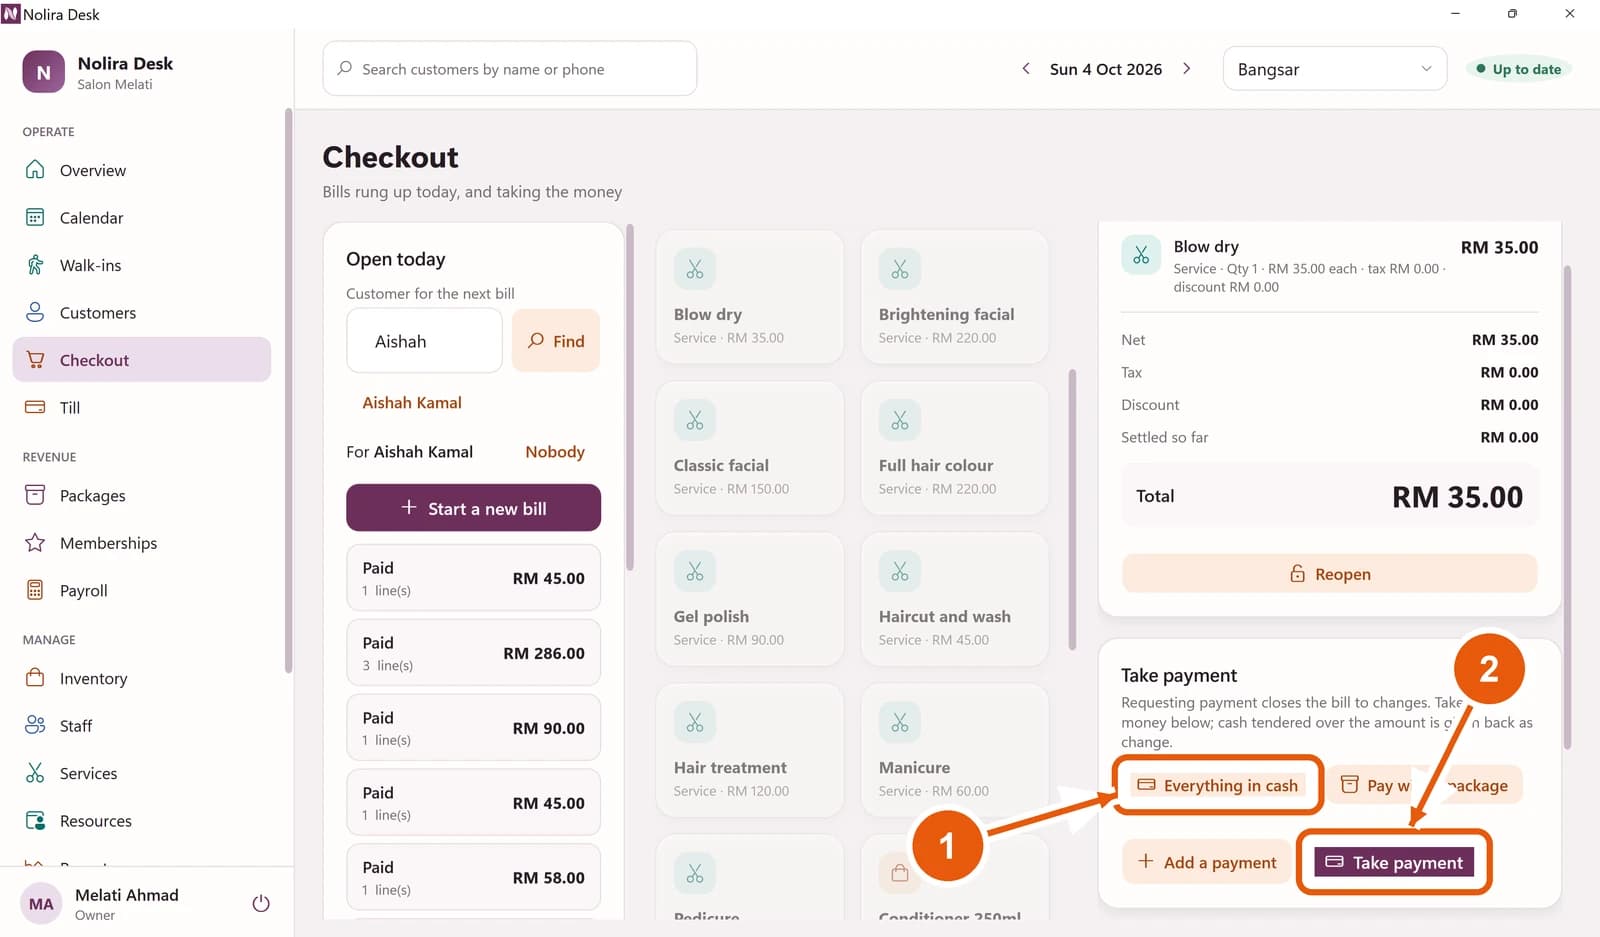
- 1
Click Everything in cash if they pay it all in cash. For card or QR, click Add a payment and choose the method.
- 2
Click Take payment. The bill is paid and the receipt is ready.
If a discount is more than you are allowed to give, the bill waits for a manager to approve it. The manager can do it on their phone.
Take payment: the receipt
The receipt number appears, with the change to give back.
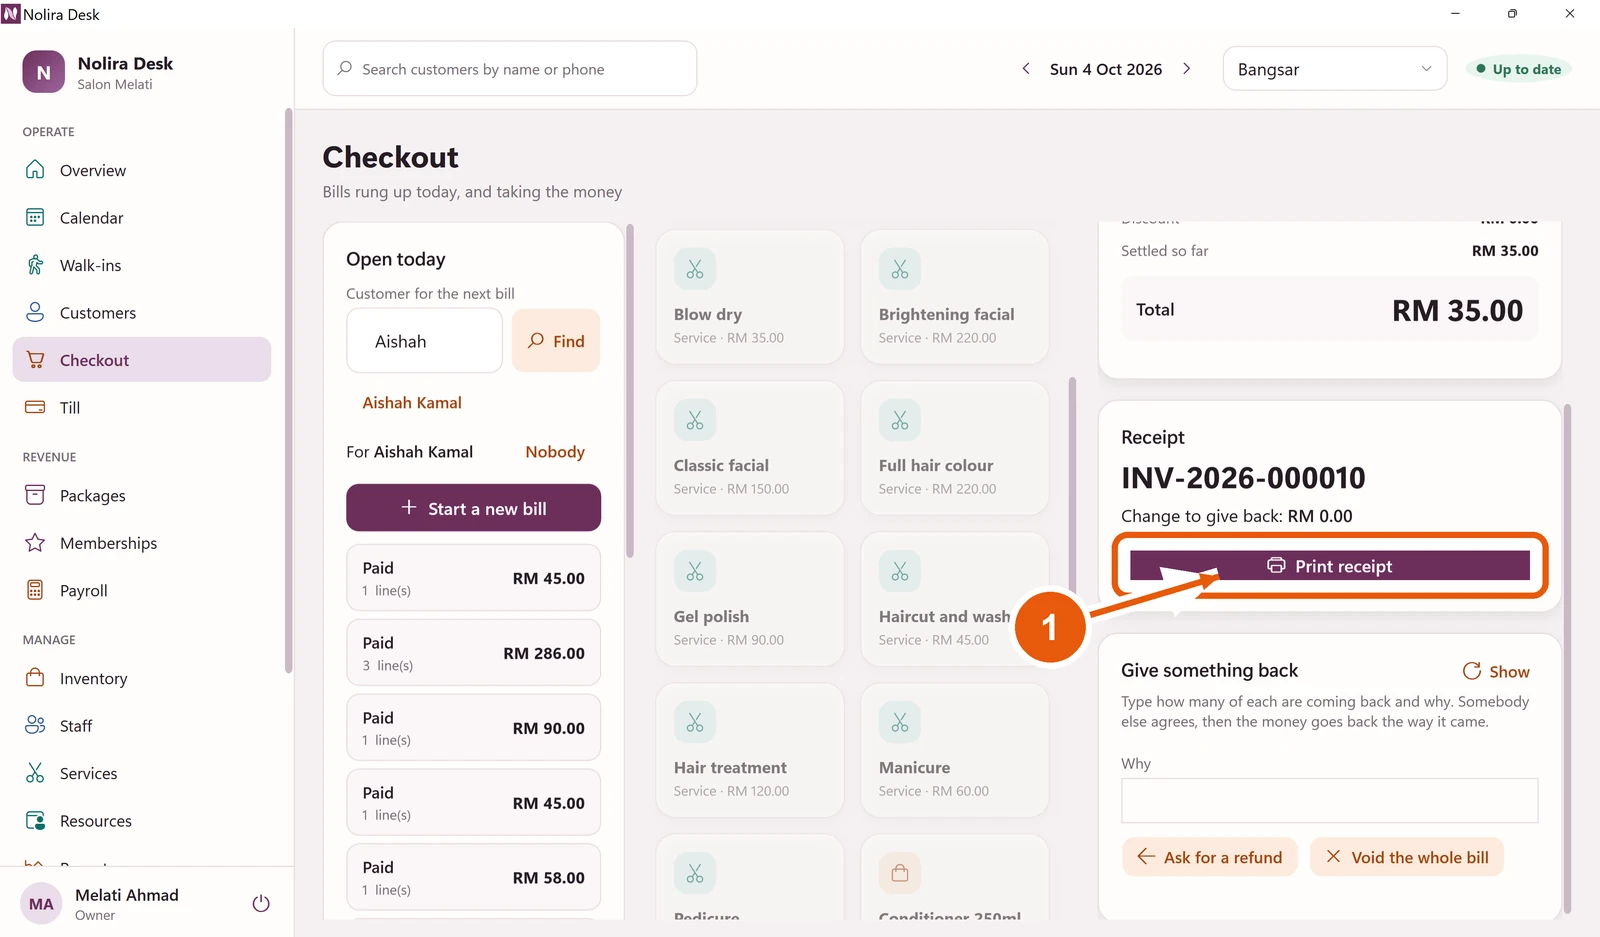
- 1
Click Print receipt to print it for the customer.
To give money back later, write why under Give something back and click Ask for a refund. Someone else, such as a manager, has to agree before the money goes back.
Cancel a bill that was started by mistake
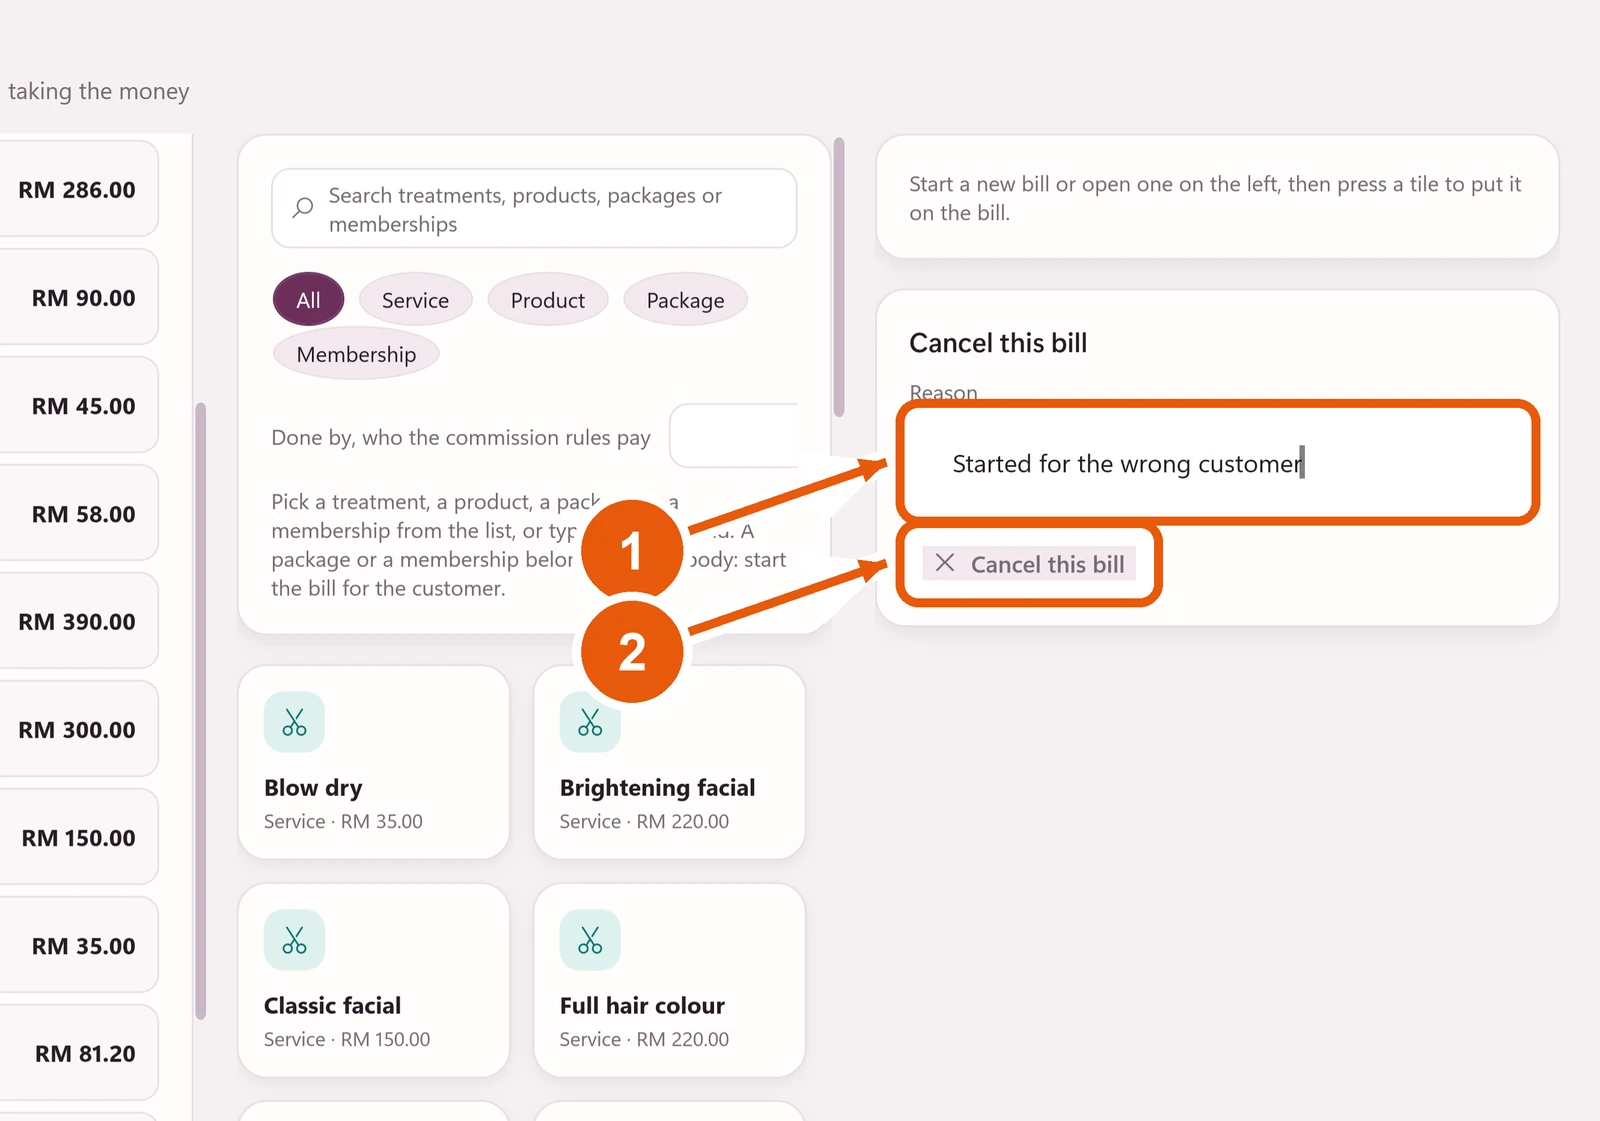
- 1
Open the bill, then type why it is being cancelled.
- 2
Click Cancel this bill.
A paid bill cannot be cancelled. Money given back is a refund, and a manager has to agree to it.
The cash drawer
Click Till in the menu. Open shows the drawer is in use today. Expected cash is what should be in it now.
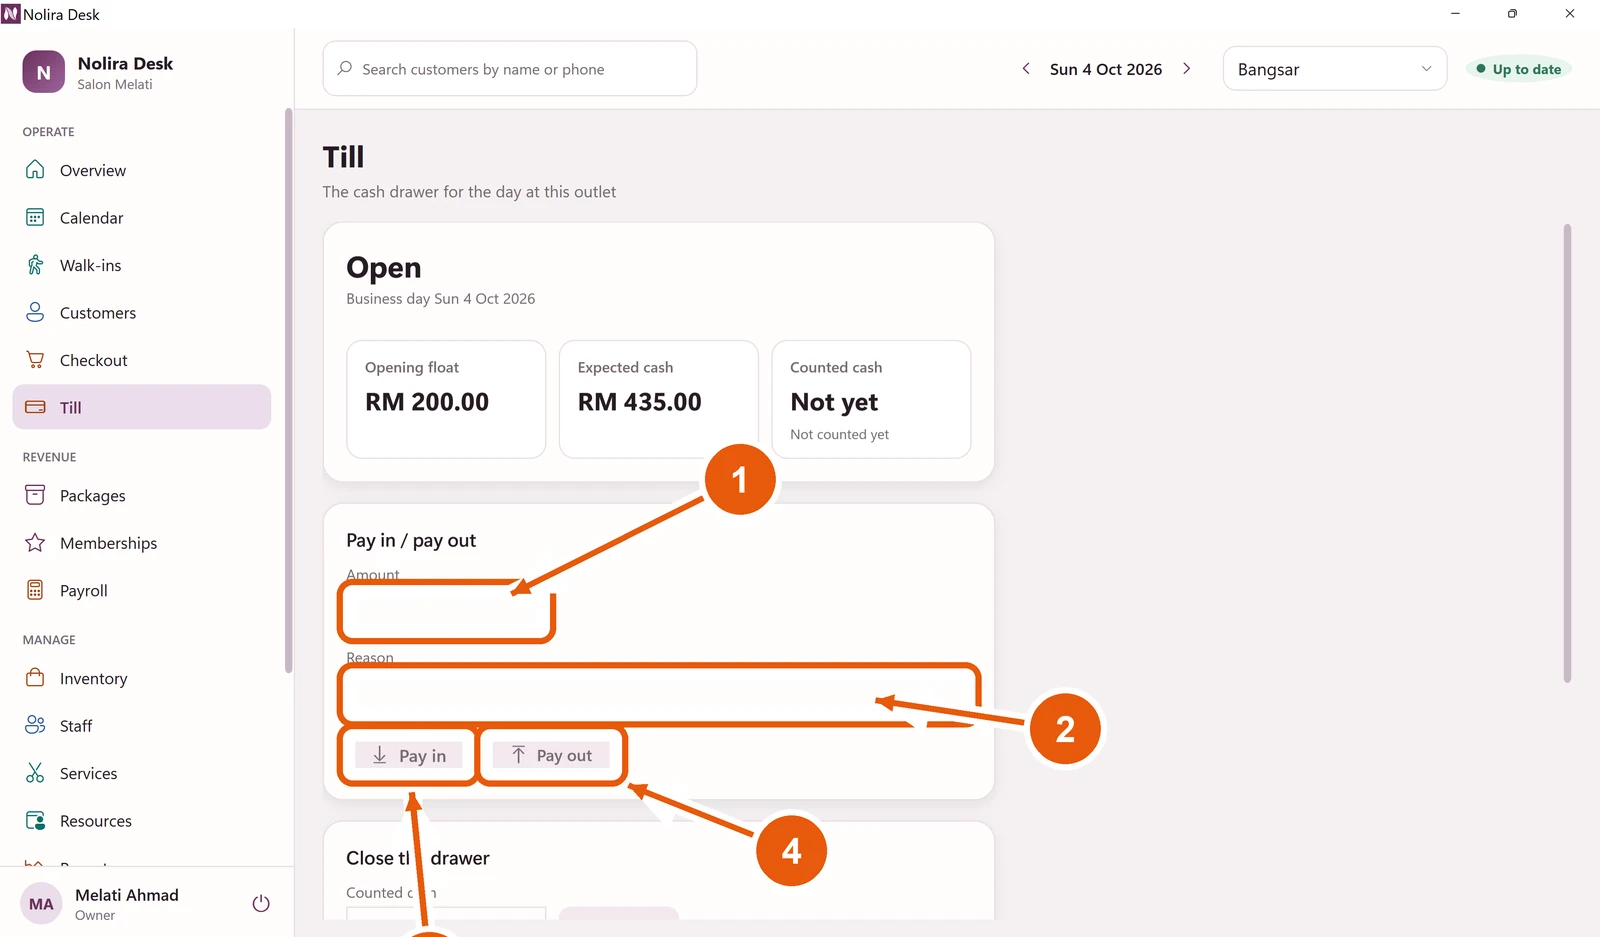
- 1
Type the amount taken in or out.
- 2
Type why, for example Milk for the pantry.
- 3
Click Pay in when you put money into the drawer.
- 4
Click Pay out when you take money out.
Close the drawer at the end of the day
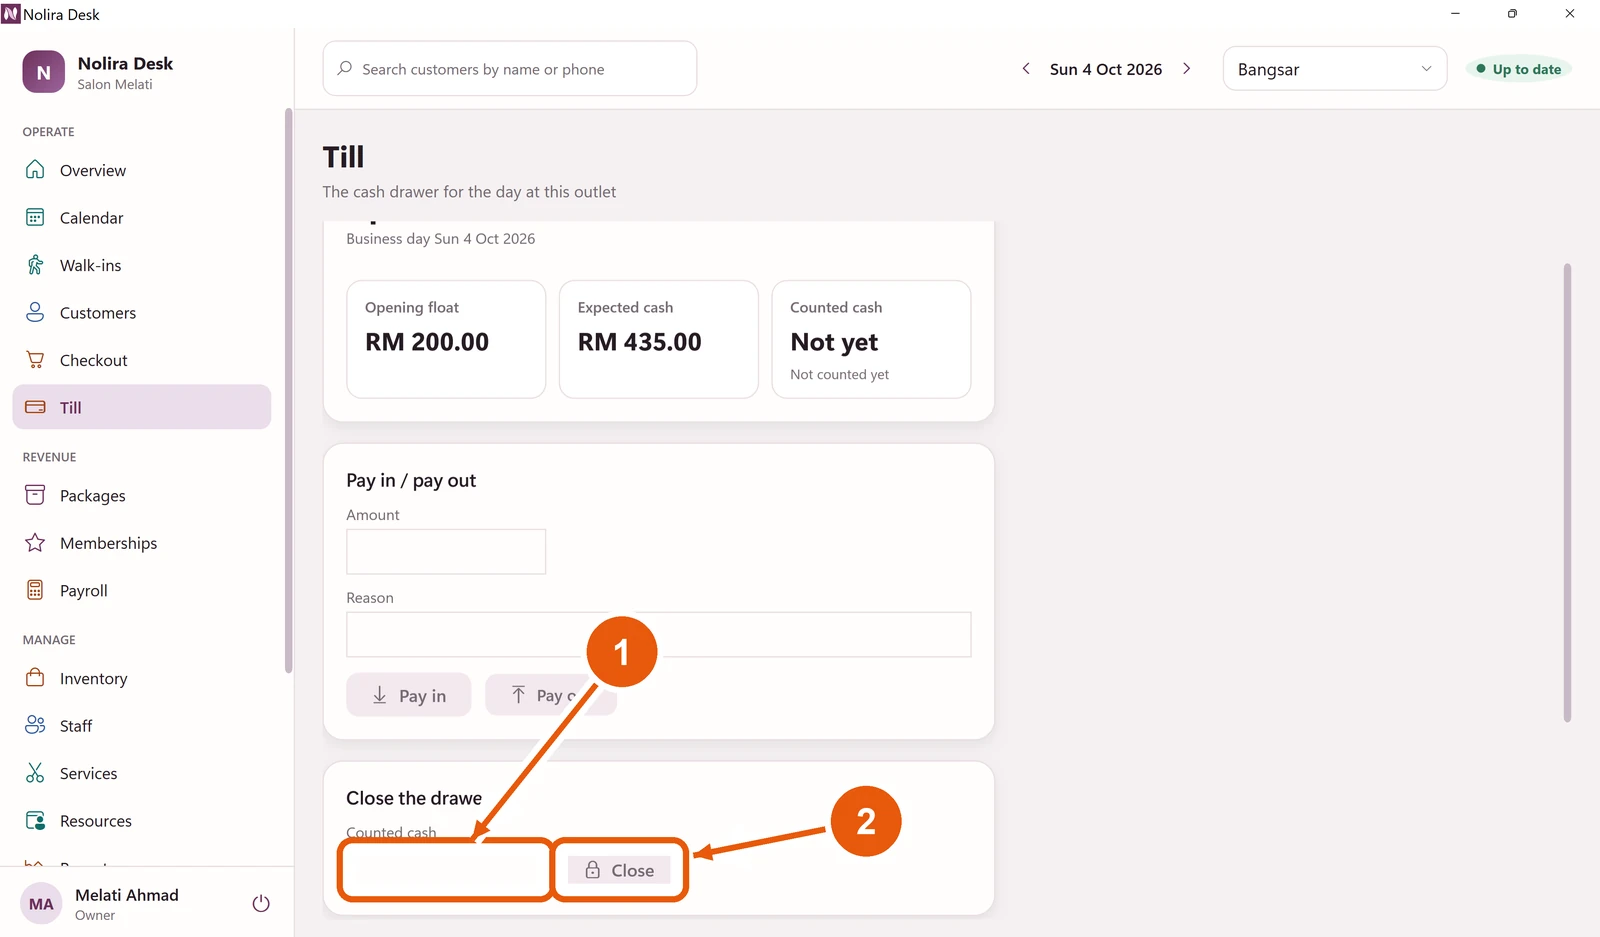
- 1
Count the cash in the drawer and type the total.
- 2
Click Close. If the count is different from what was expected, a manager is asked to look at it.
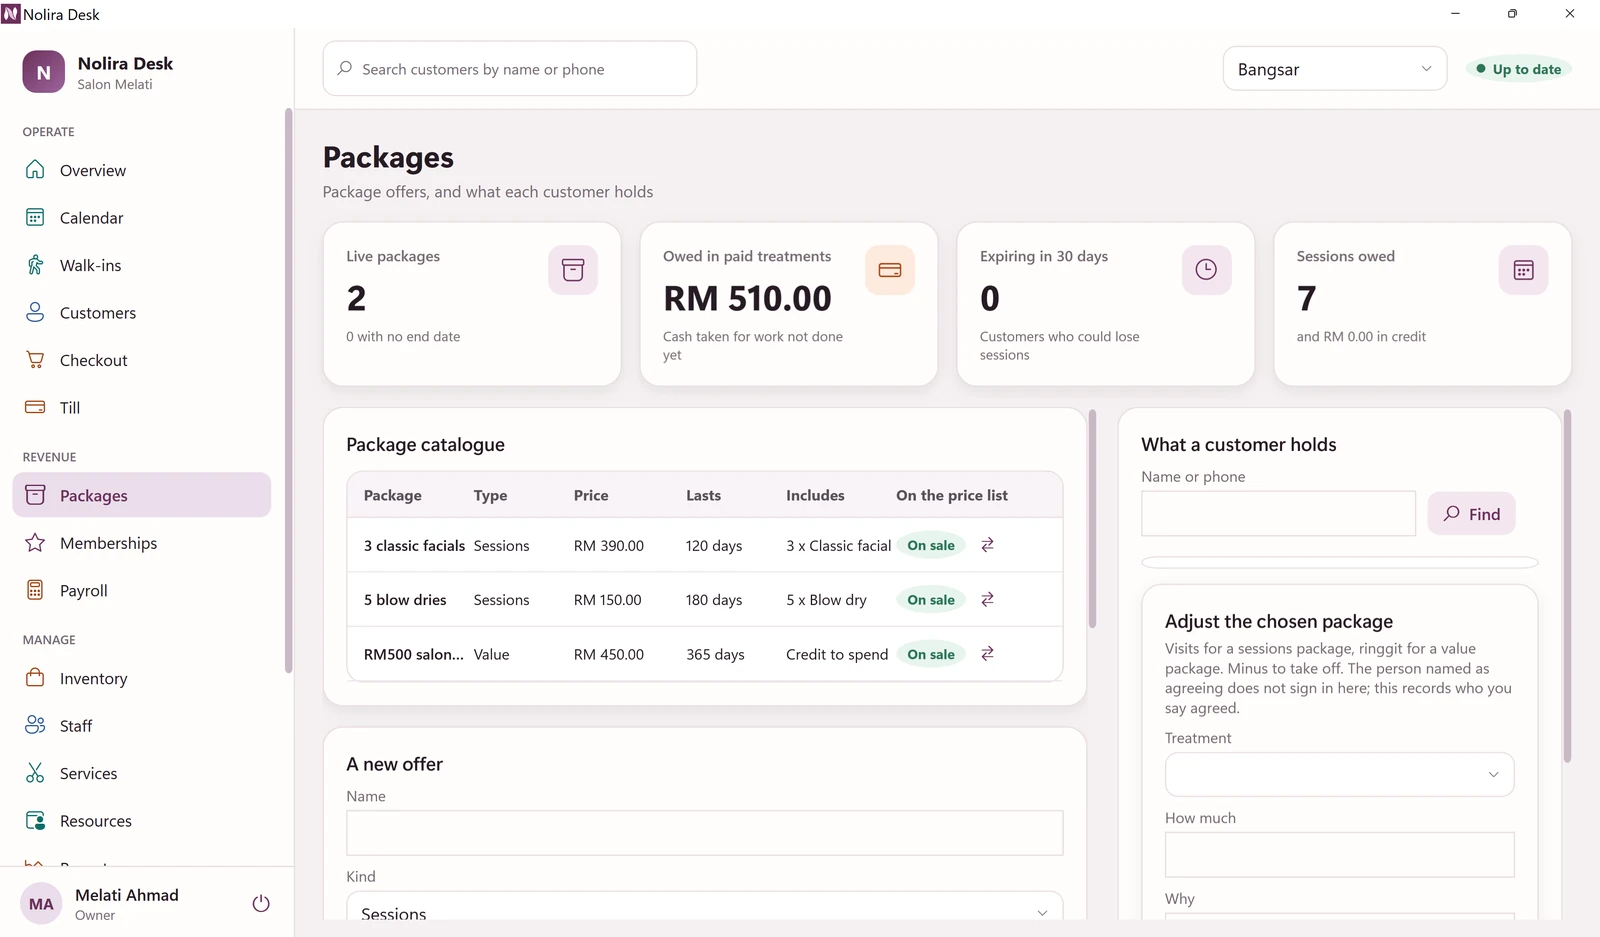
Packages
A package is paid for in advance: a number of sessions, or credit to spend. Click Packages to see what is on sale and what each customer has left. To sell one, put it on the customer's bill in Checkout.
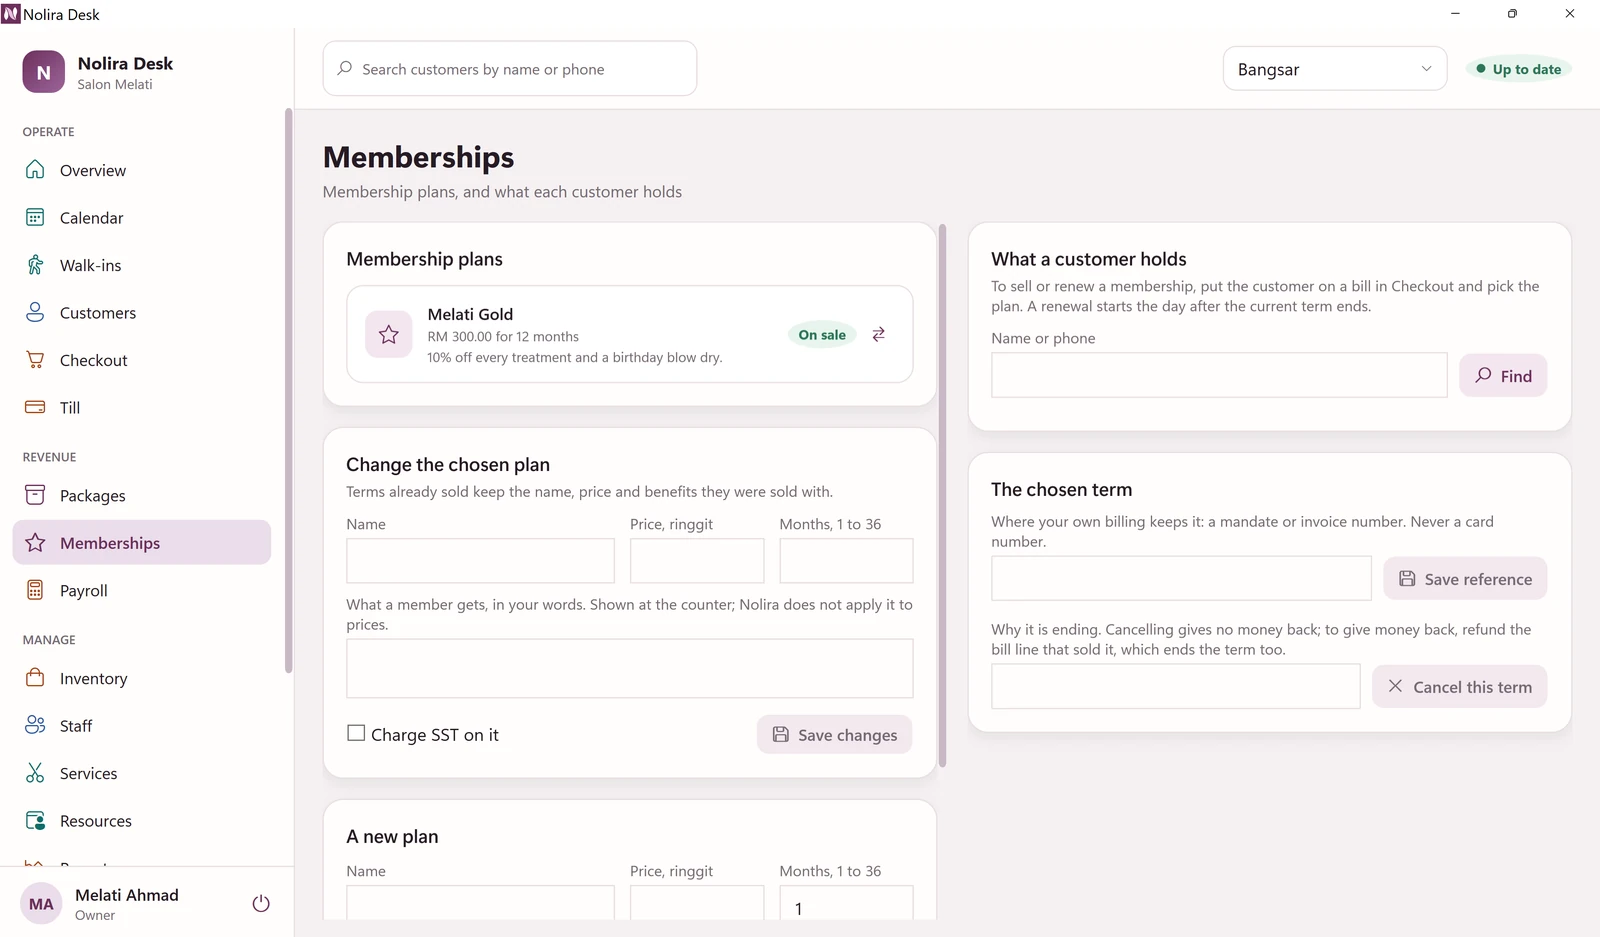
Memberships
A membership is paid for a number of months and gives its holder the benefits you write. Click Memberships to see the plans and who holds one. To sell one, put it on the customer's bill in Checkout.
Pay and commission
Click Payroll. A pay run collects the commission each person earned in a period. Choose the first and last day, then open the run.
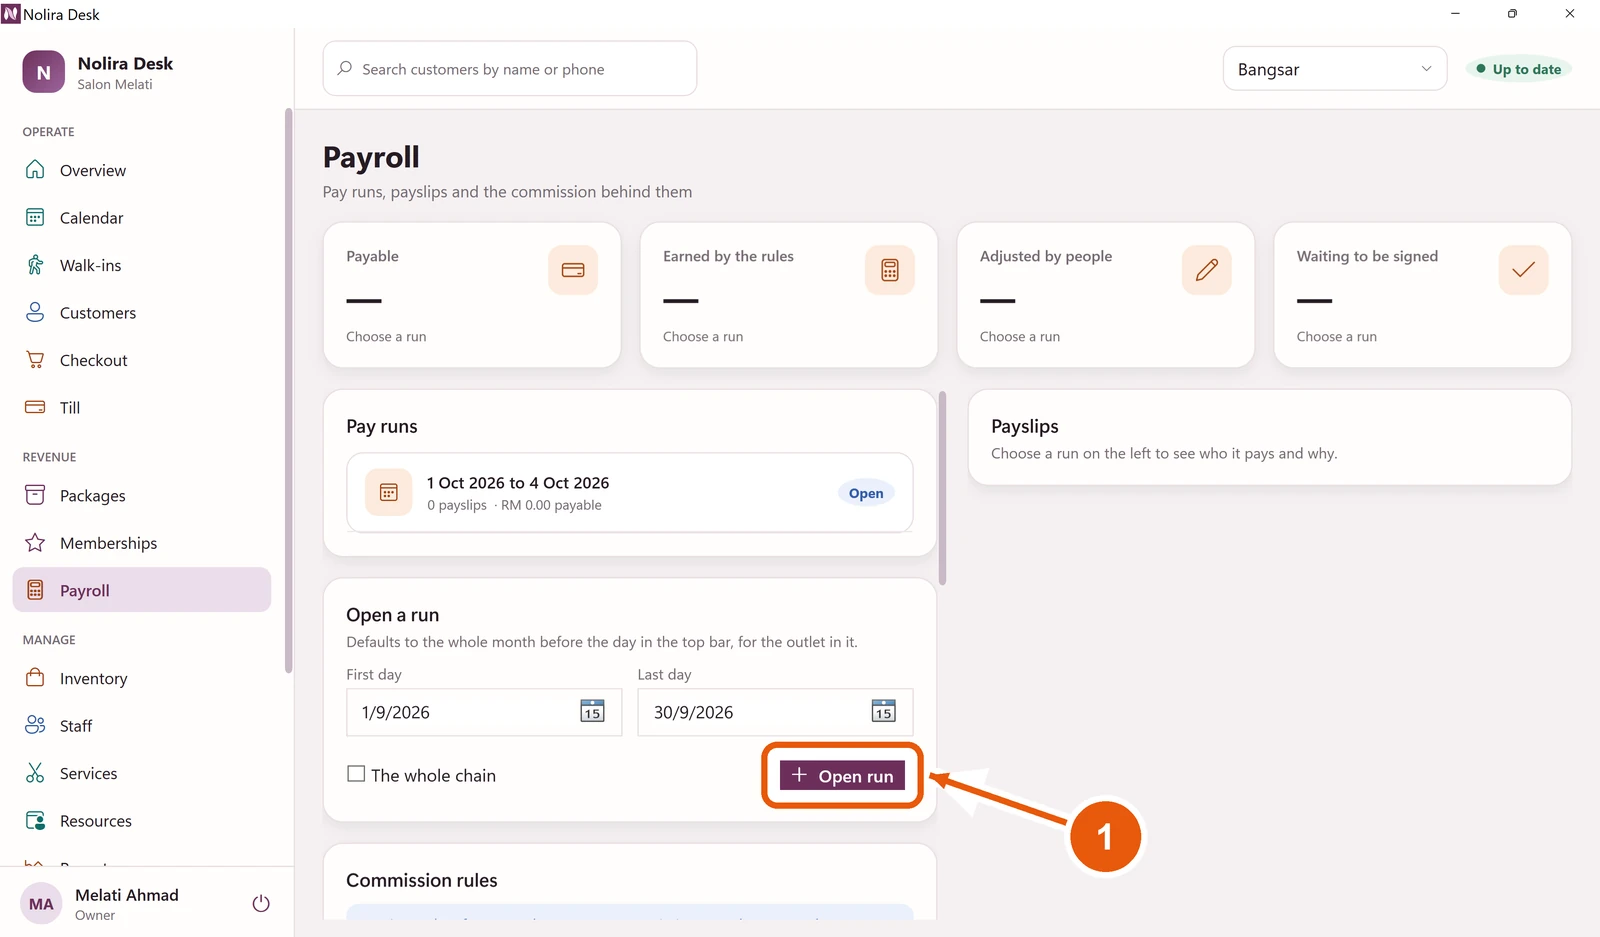
- 1
Click Open run.
A run can only be closed after its last day has passed.
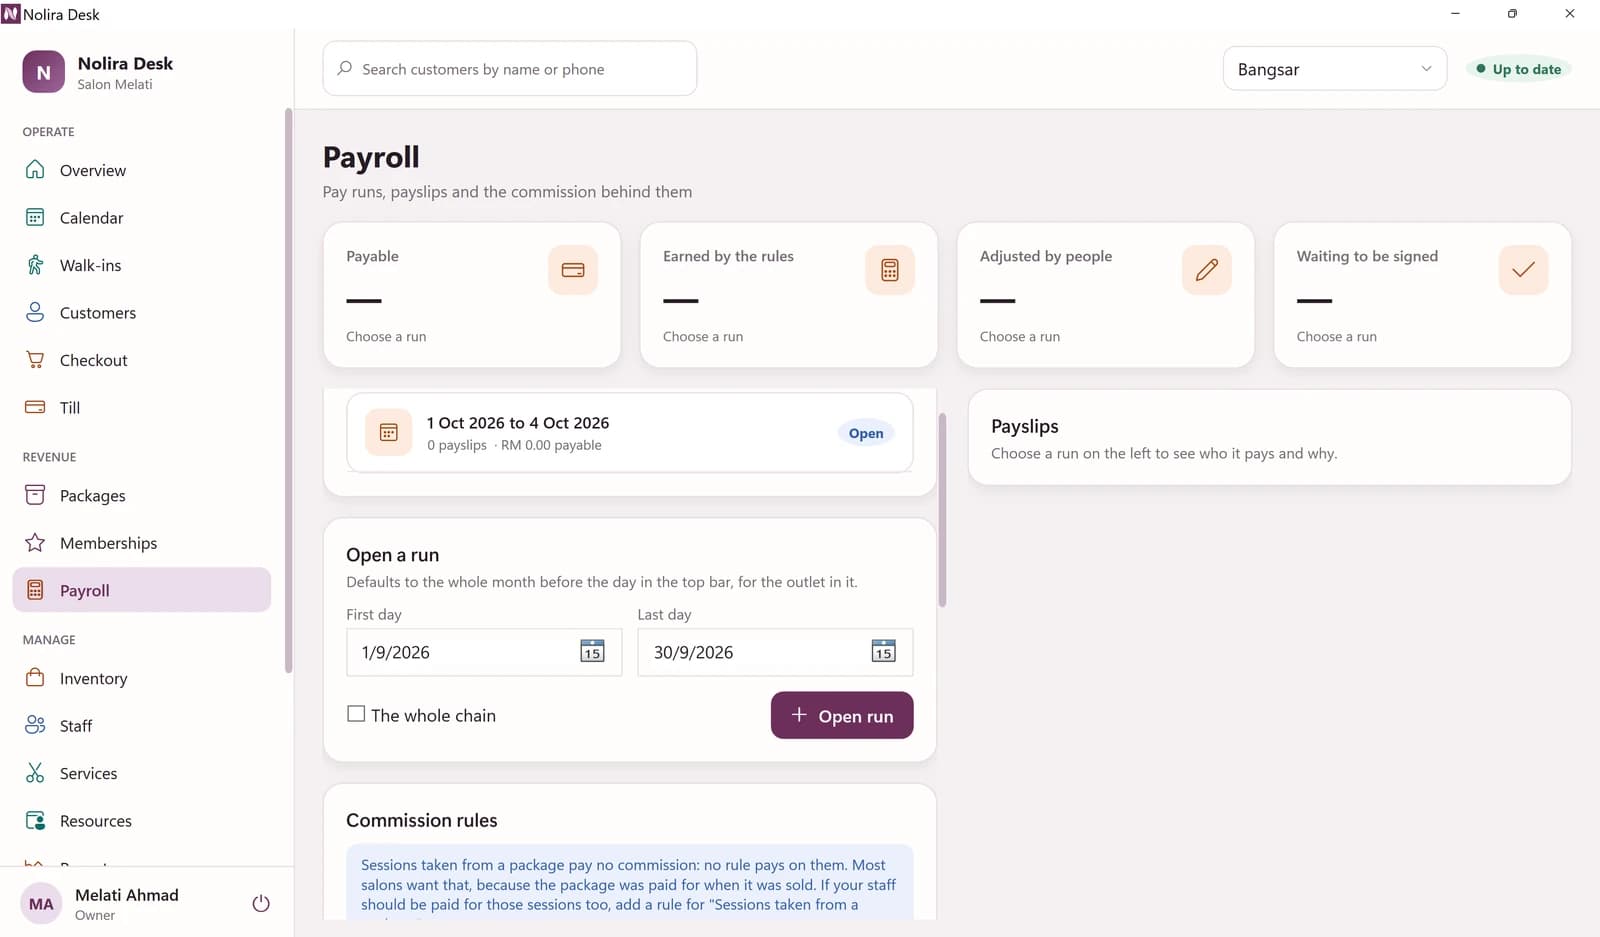
Commission rules
Scroll down Payroll to the rules: what each treatment or product pays, and to whom.
Stock on the shelves
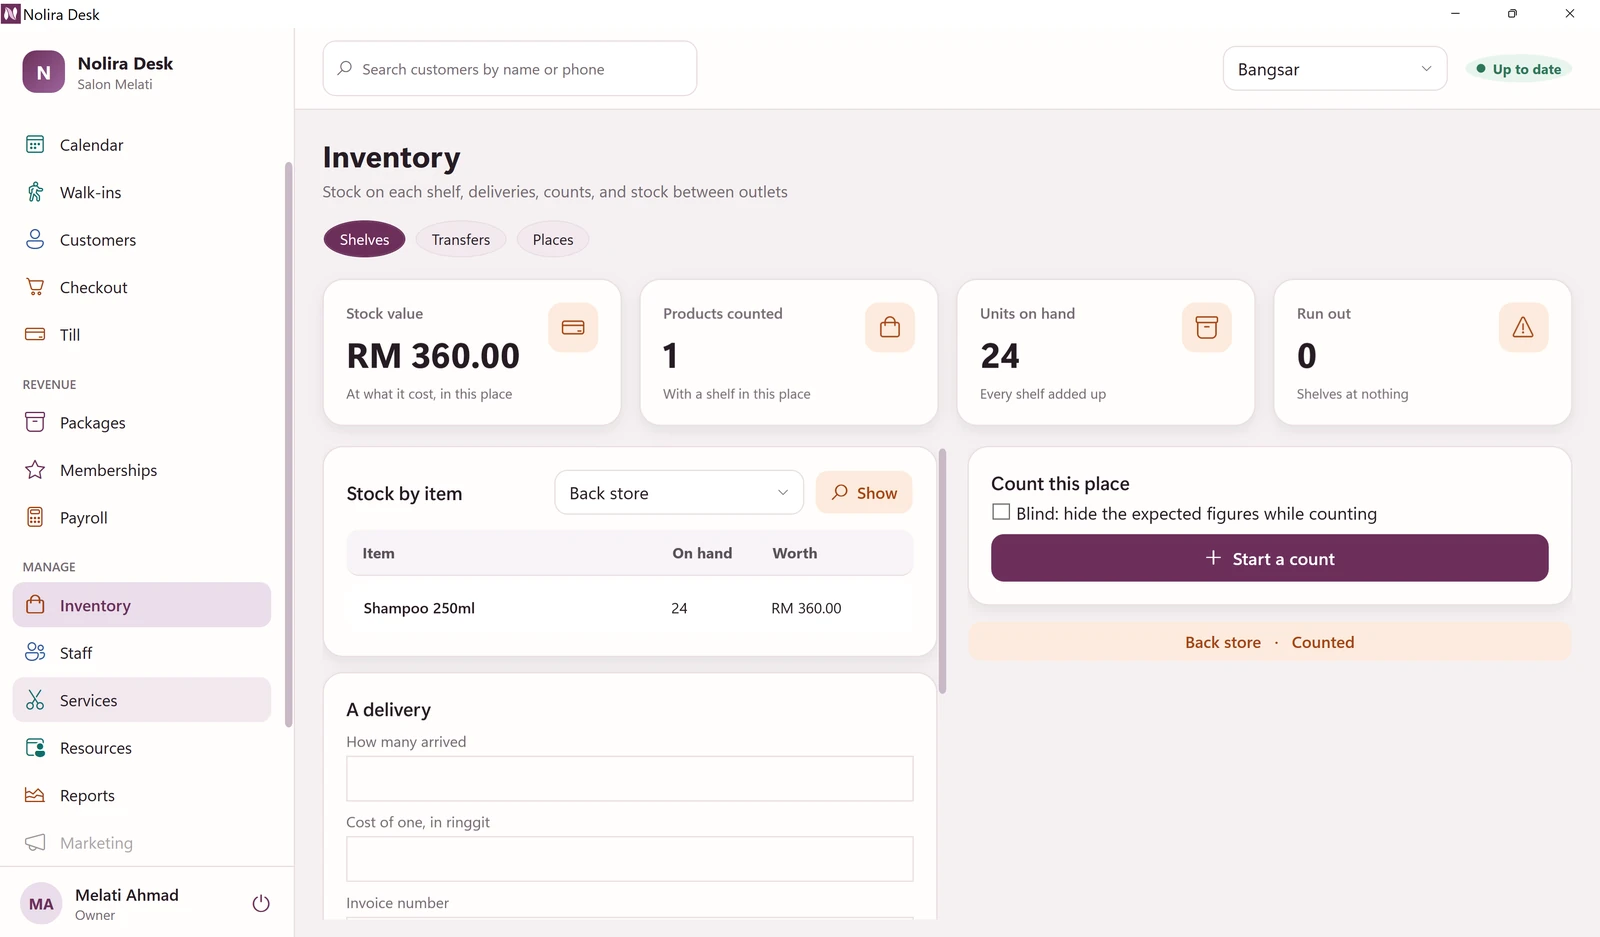
Click Inventory. Shelves shows what is on each shelf and what it is worth. Record a delivery under A delivery, and count a shelf with Start a count.
Move stock between outlets
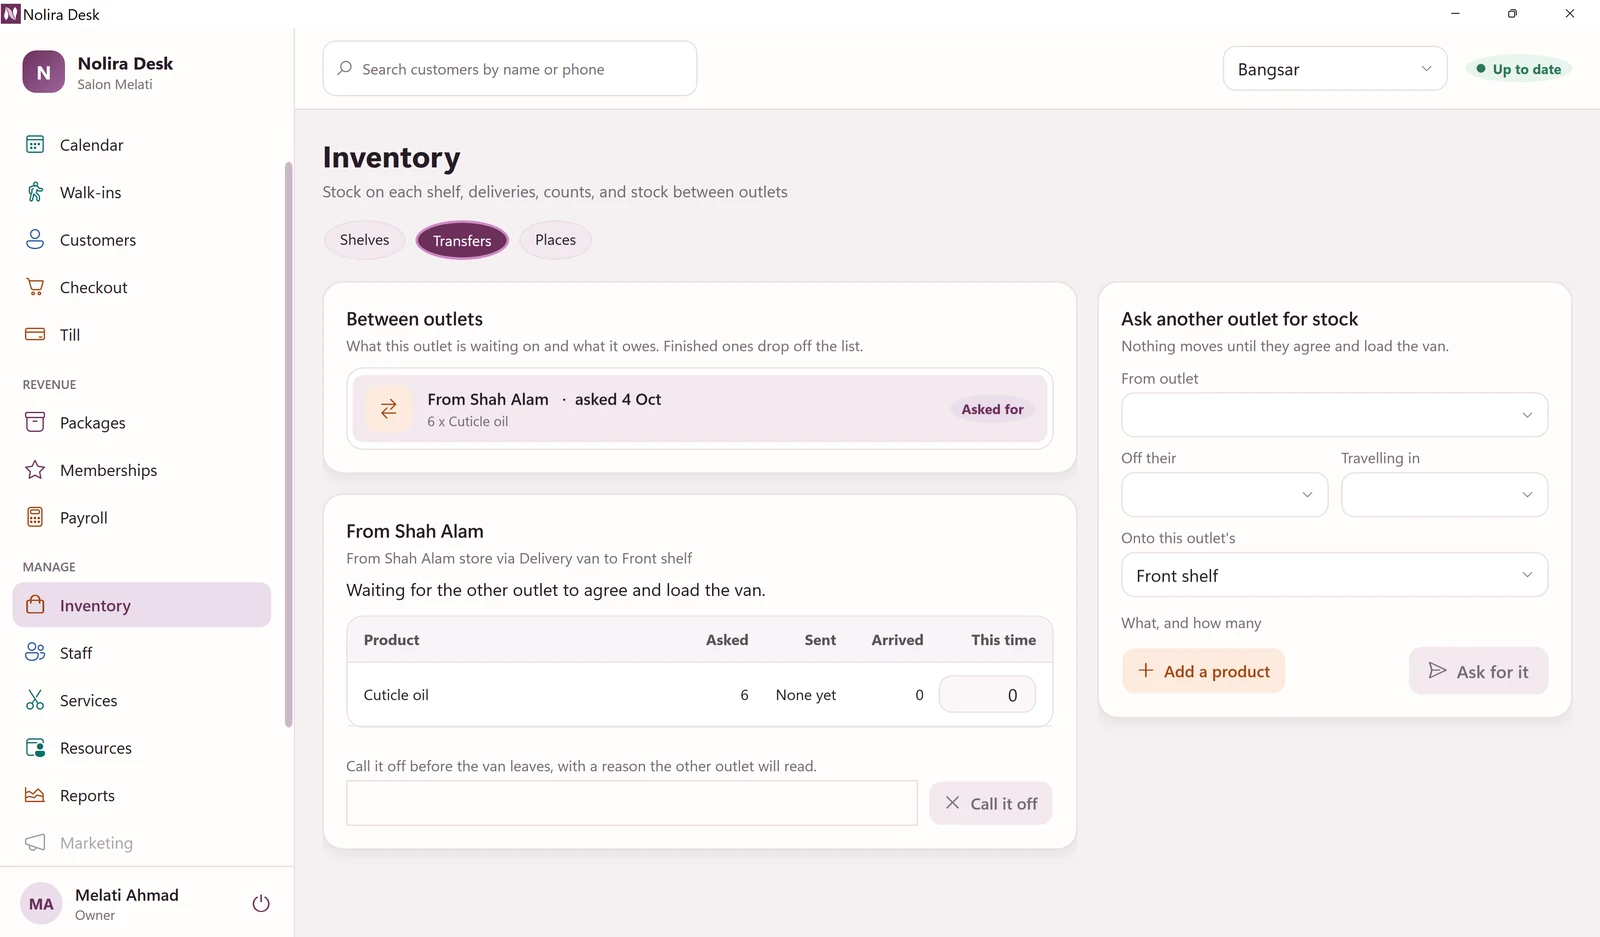
Click Transfers to ask another outlet for stock. The other outlet agrees and loads it, then you count it in when it arrives.
Shelves and stores
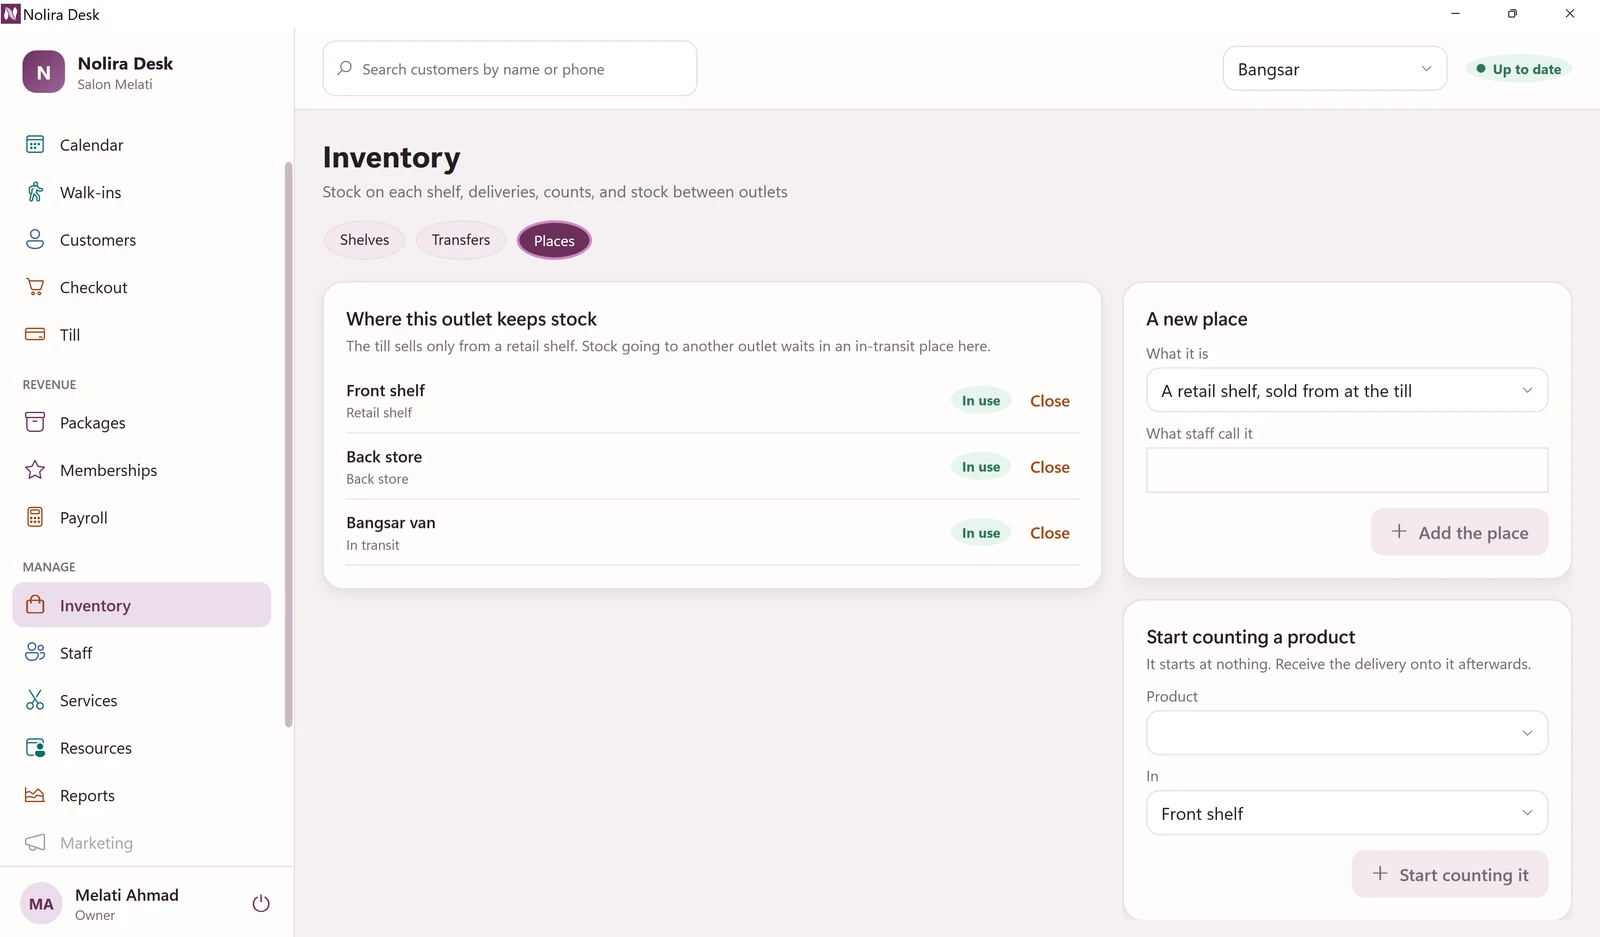
Click Places to add a shelf, a back store or a van. The till only sells from a retail shelf.
Invite a staff member
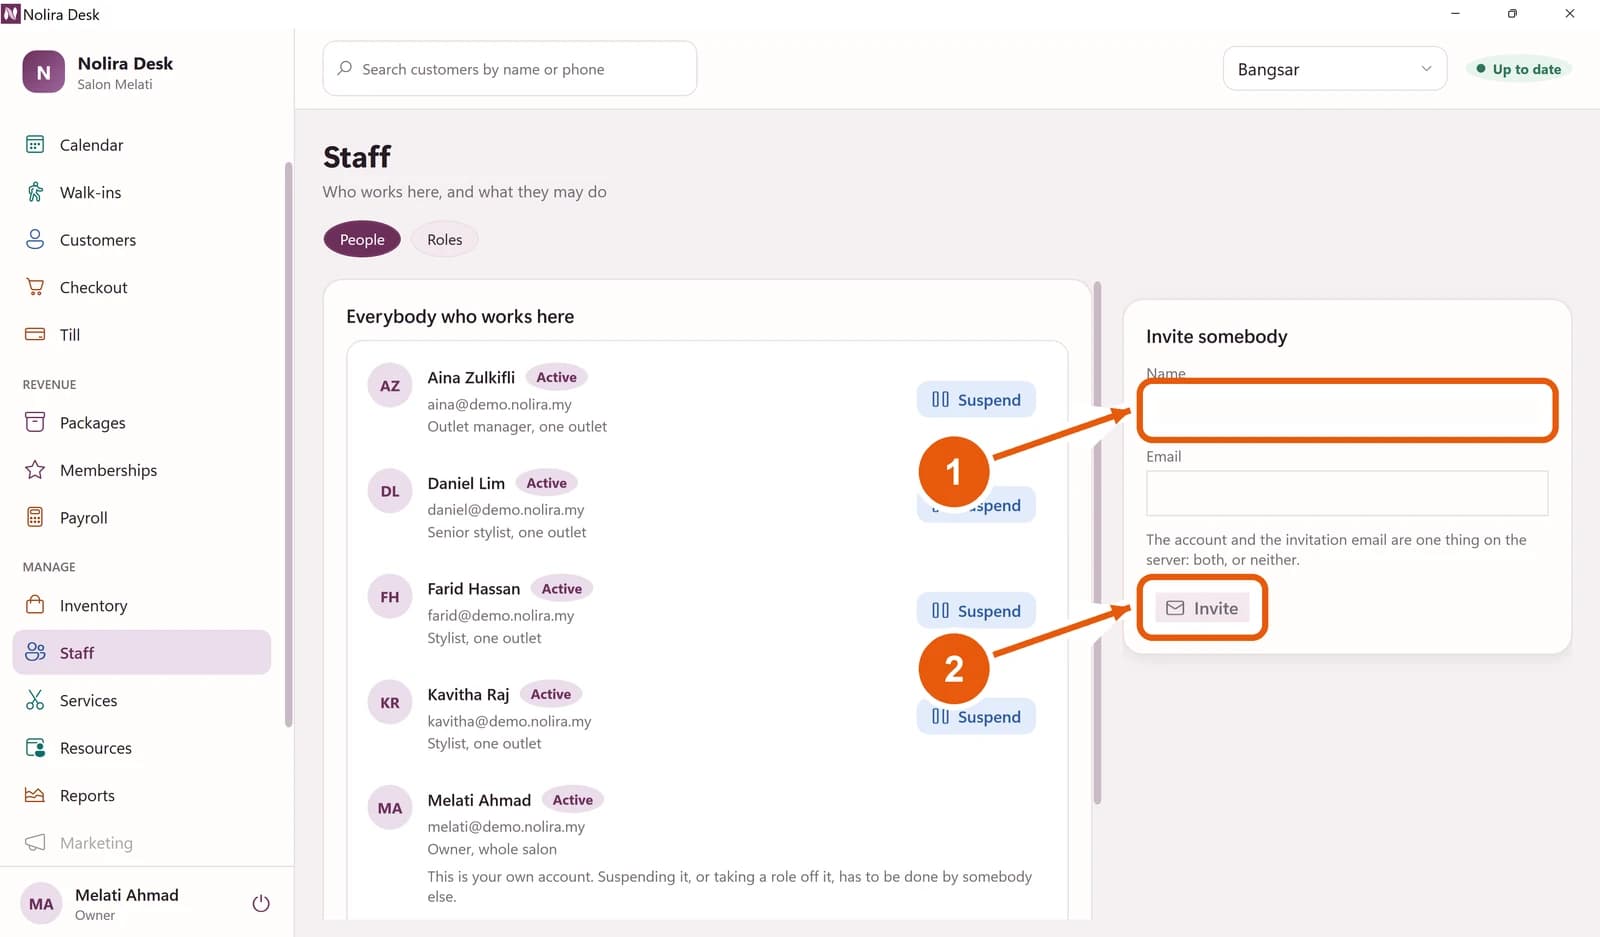
Click Staff. Everyone who works here is on the left.
- 1
Type their name, then their email below it.
- 2
Click Invite. They get an email to choose their password.
Where they work and what they do
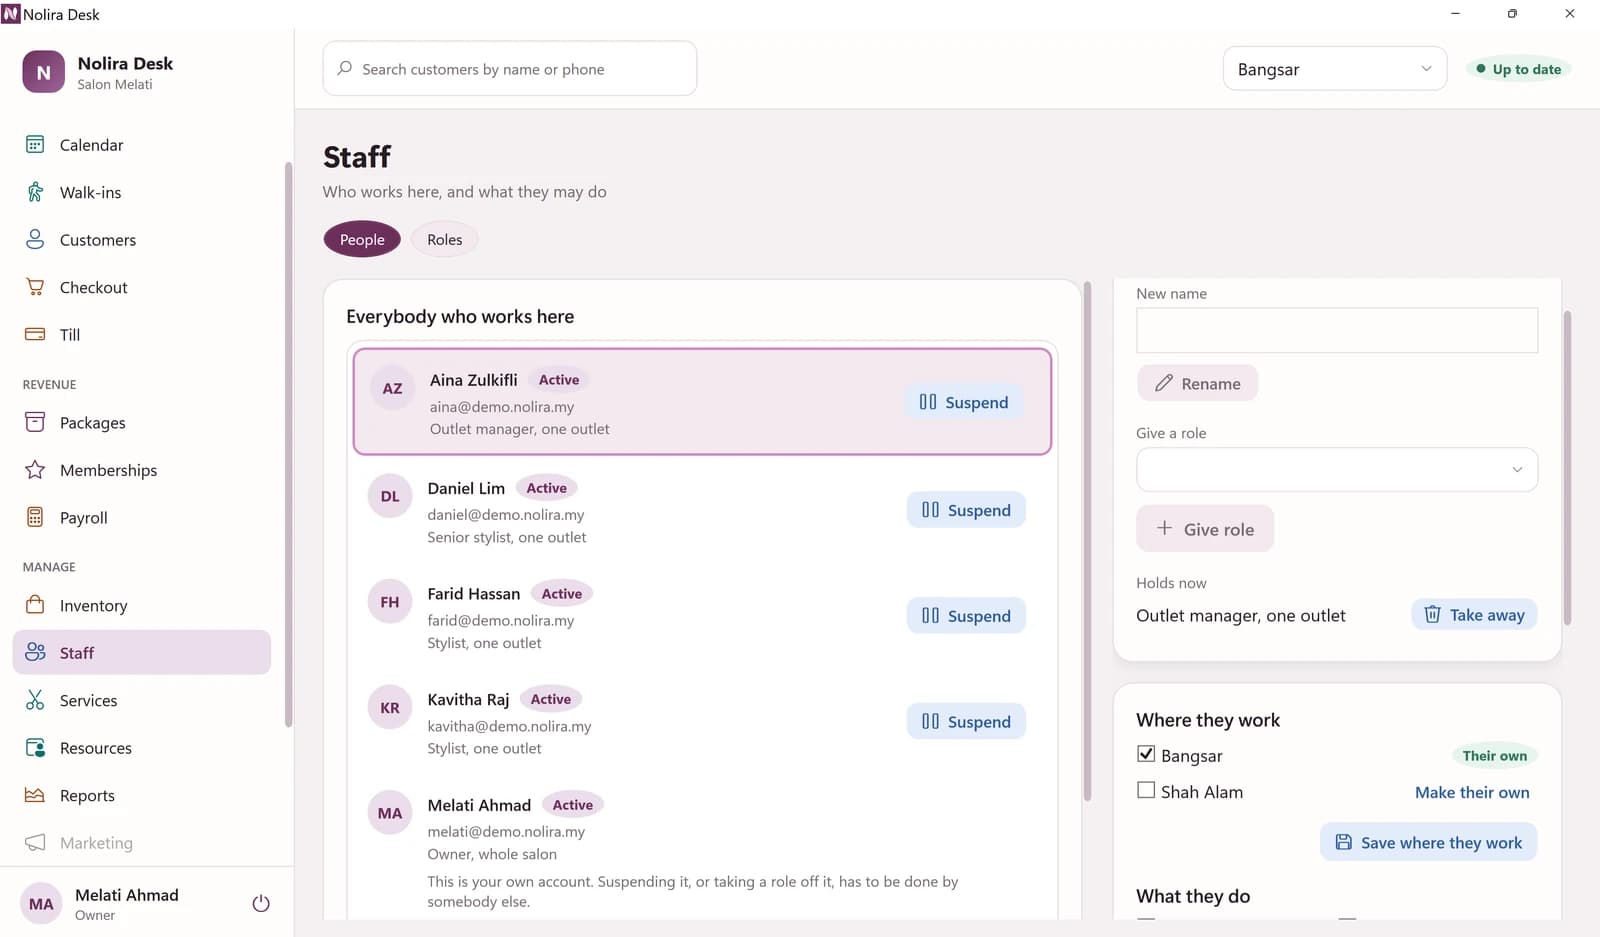
Click a person. On the right, give them a role, tick the outlets they work at, and tick the treatments they do. Someone with no treatments ticked cannot be booked.
What each role may do
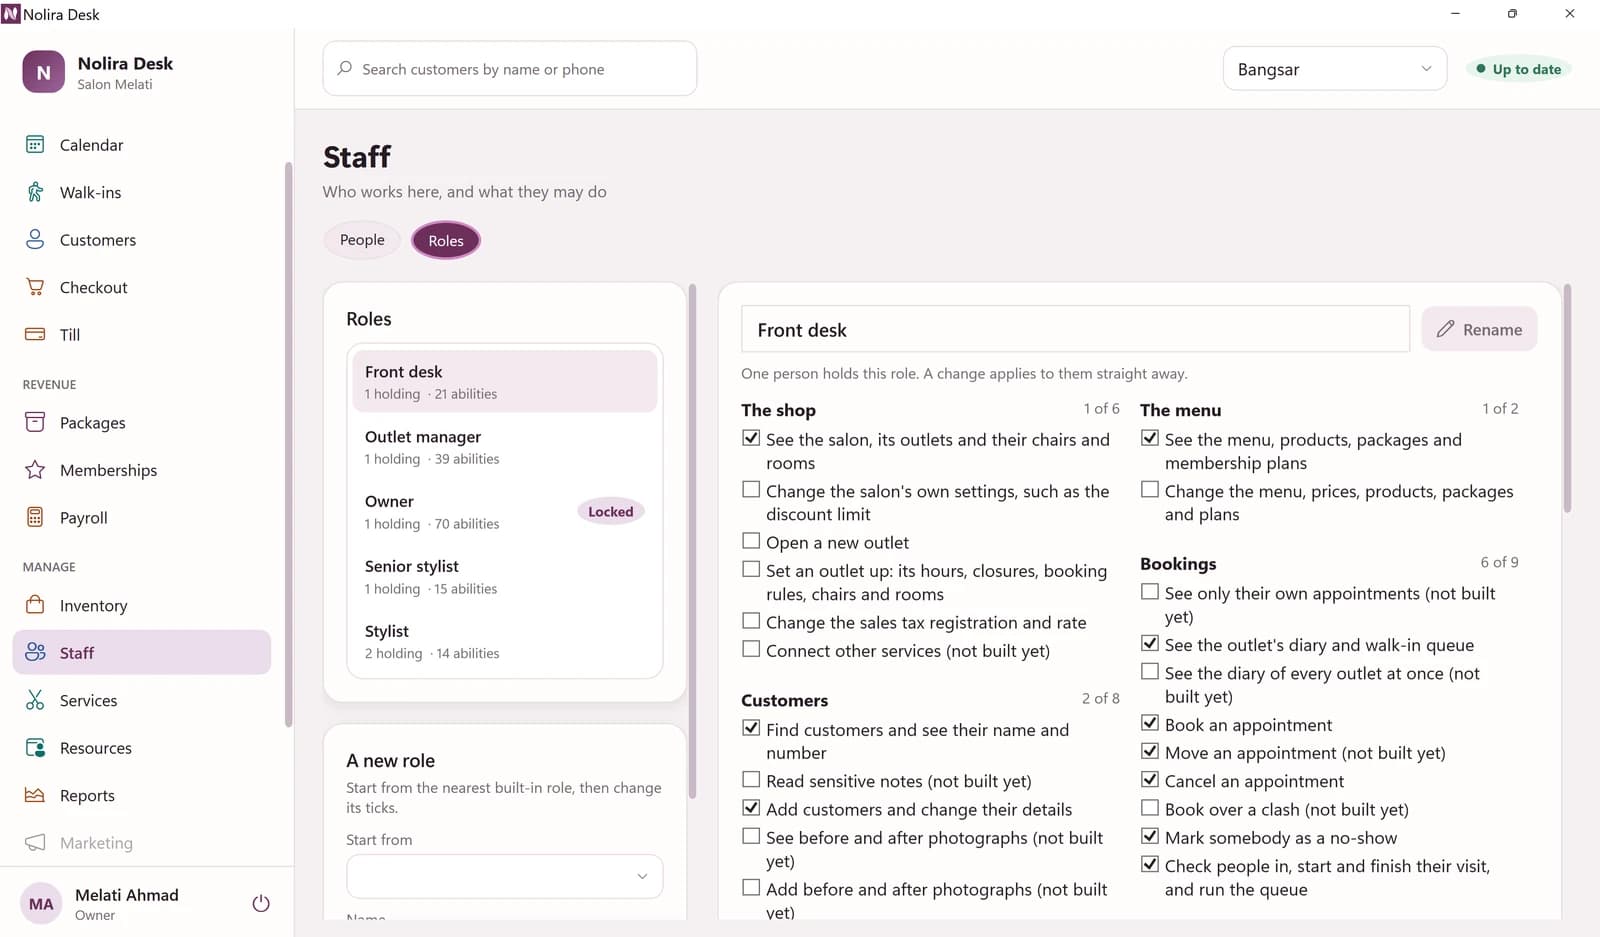
Click Roles. Choose a role and tick what it may do. A change applies to everyone with that role straight away.
Your menu of treatments
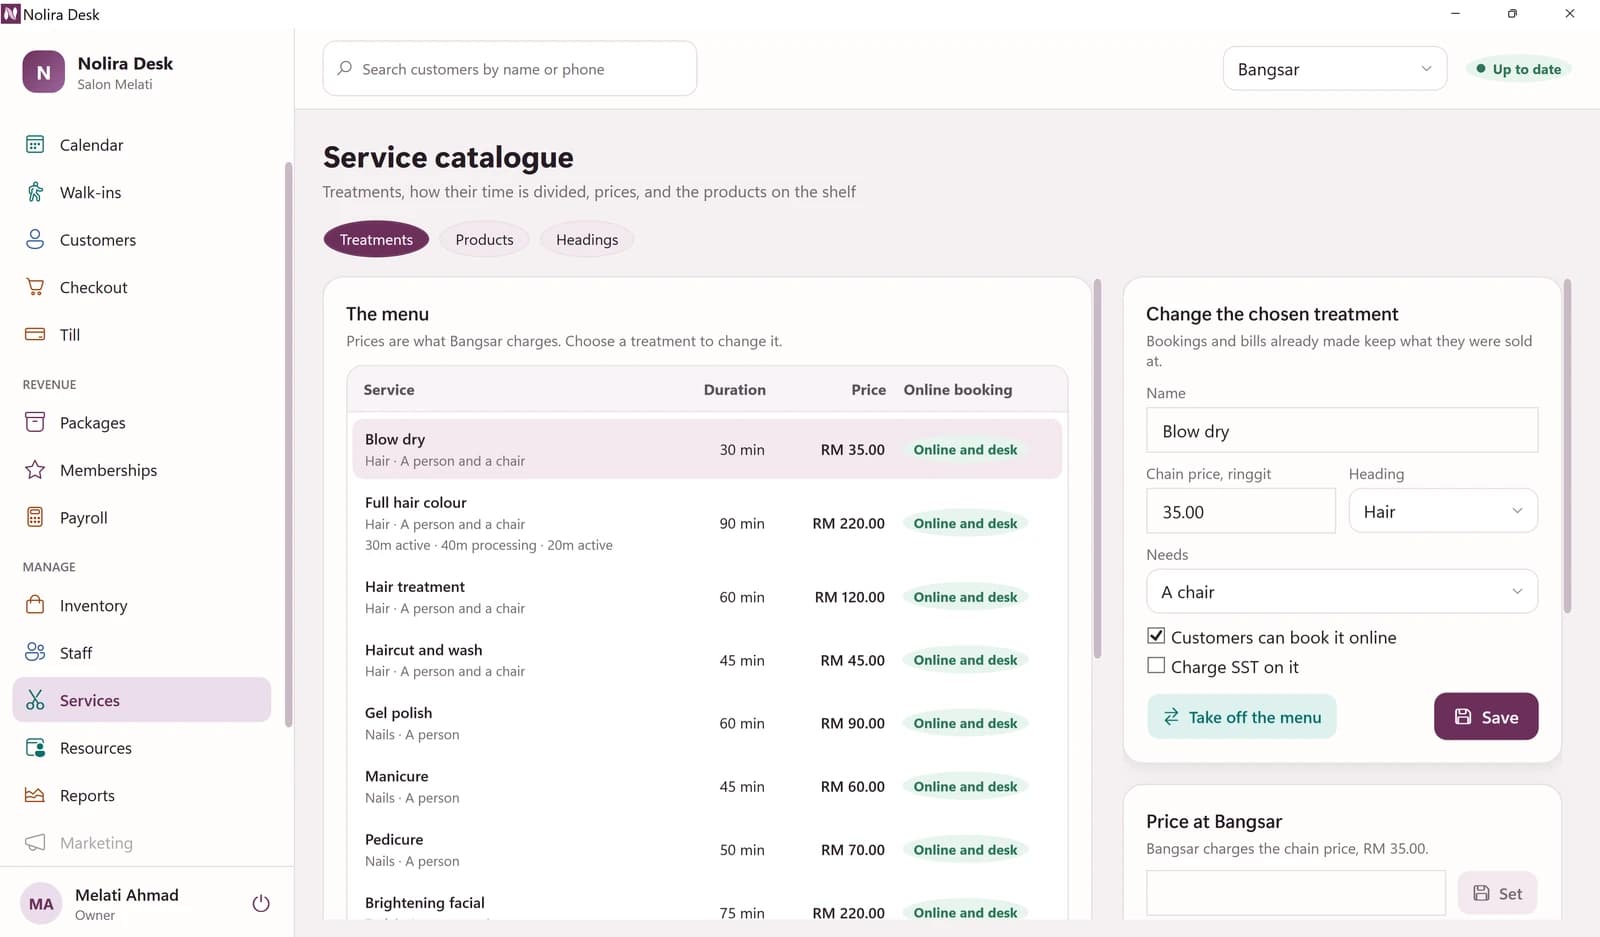
Click Services. Choose a treatment to change its price, how long it takes, and whether customers can book it online.
Products you sell
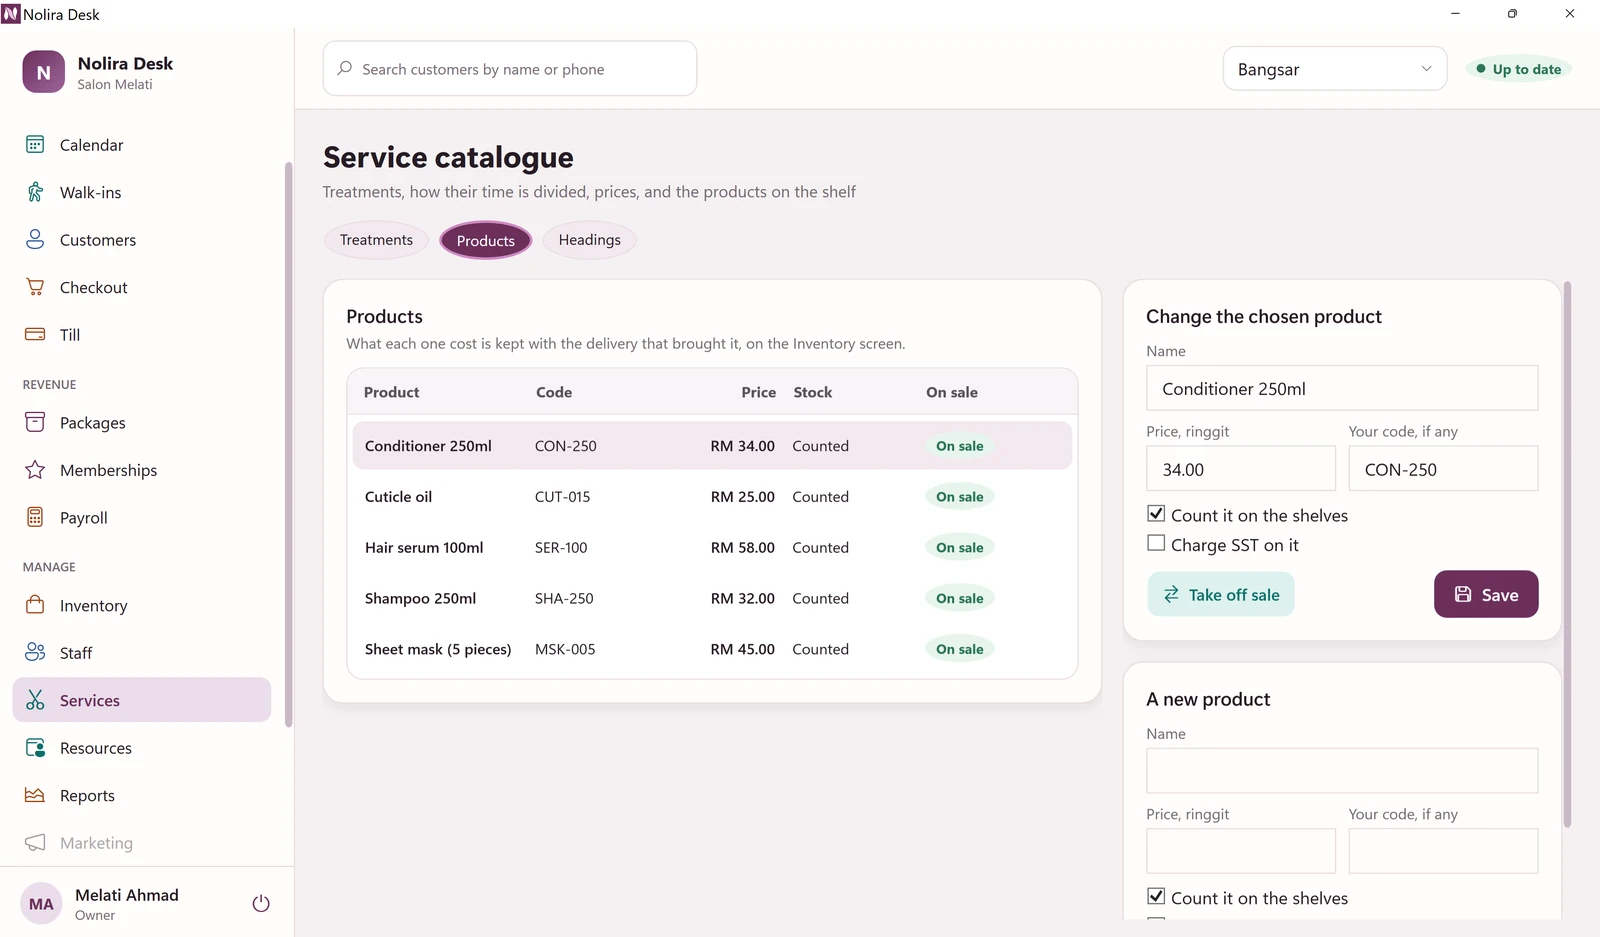
Click Products to add a product or change its price.
Headings on the menu
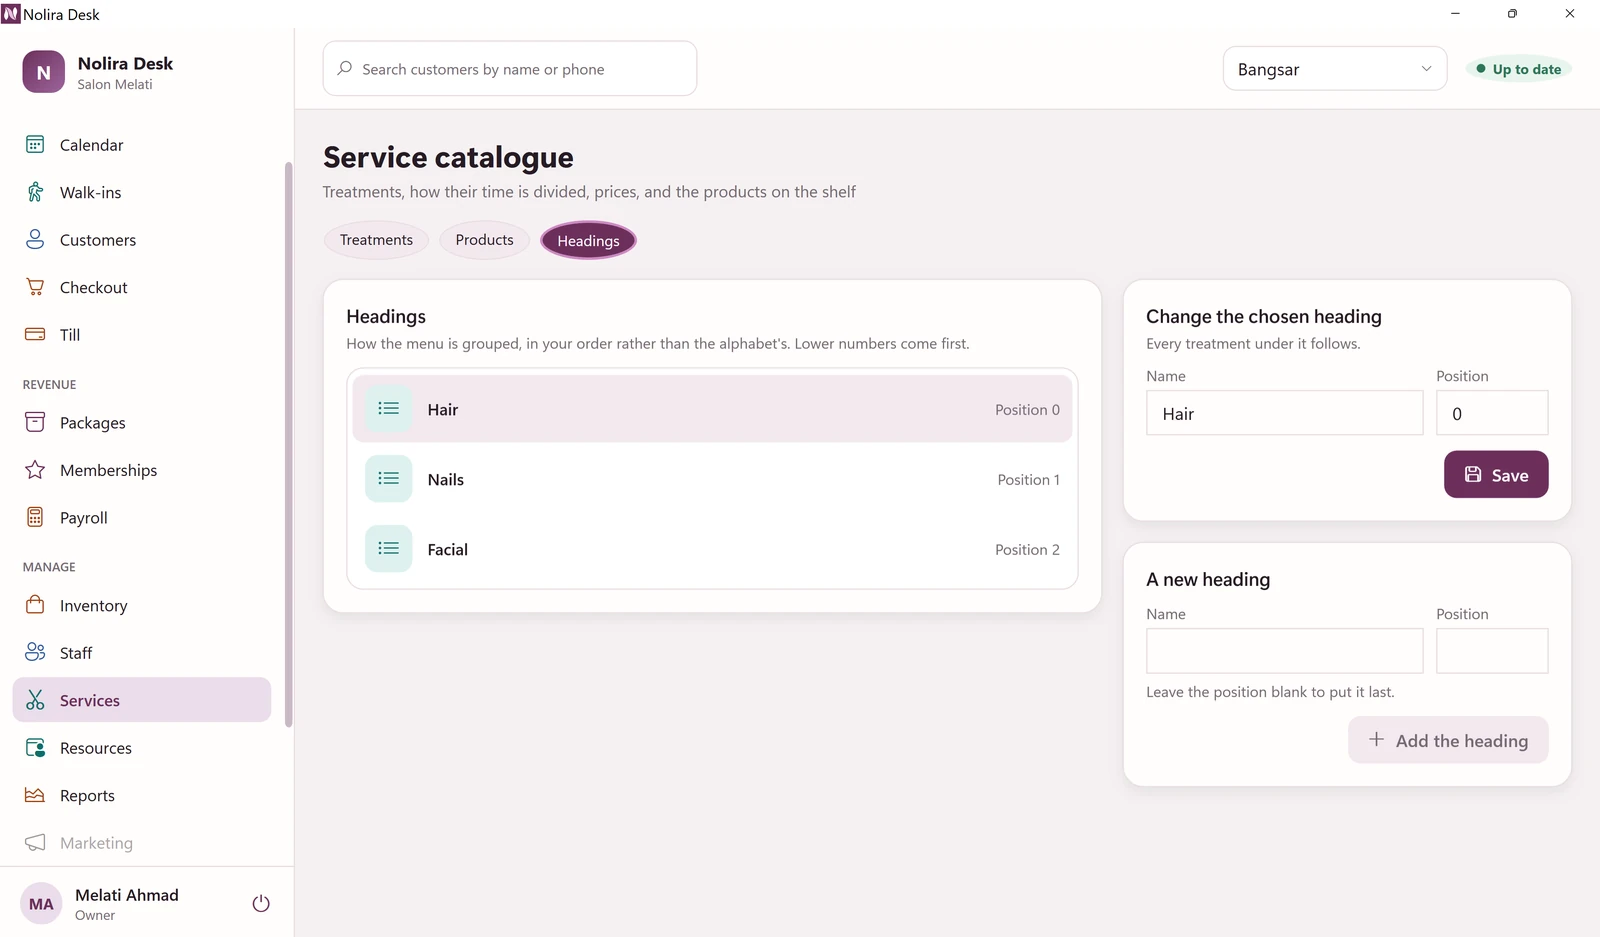
Click Headings to group treatments, for example Hair, Nails and Facial, in the order you want.
Chairs and rooms
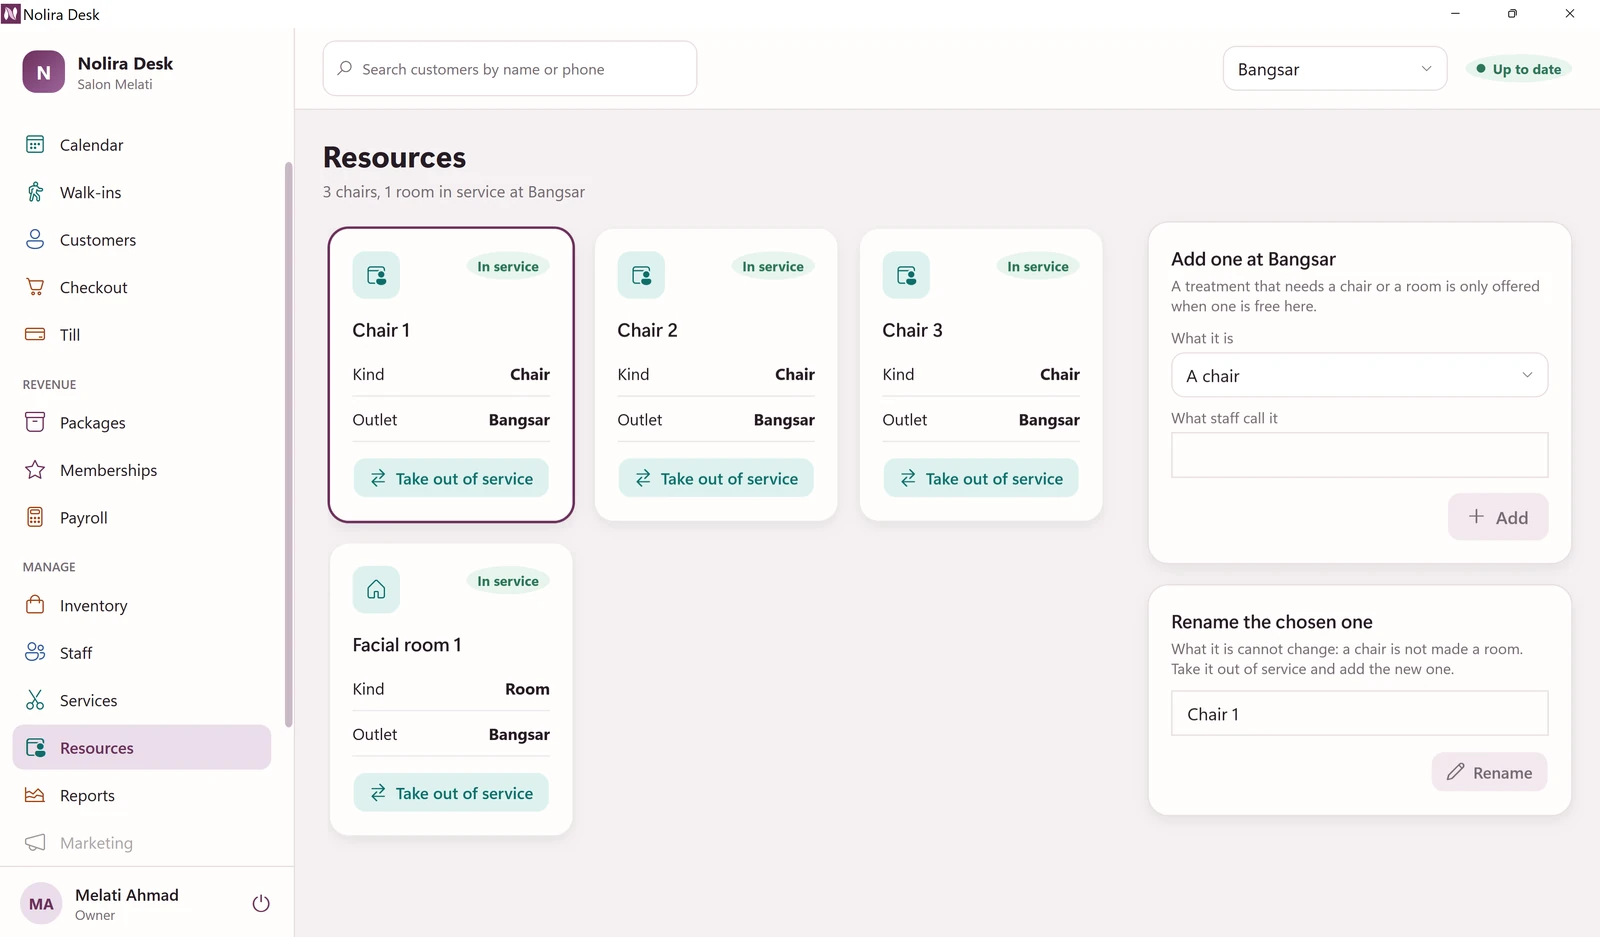
Click Resources. A treatment that needs a chair or a room is only offered when one is free. Add one, rename it, or take it out of service.
Reports
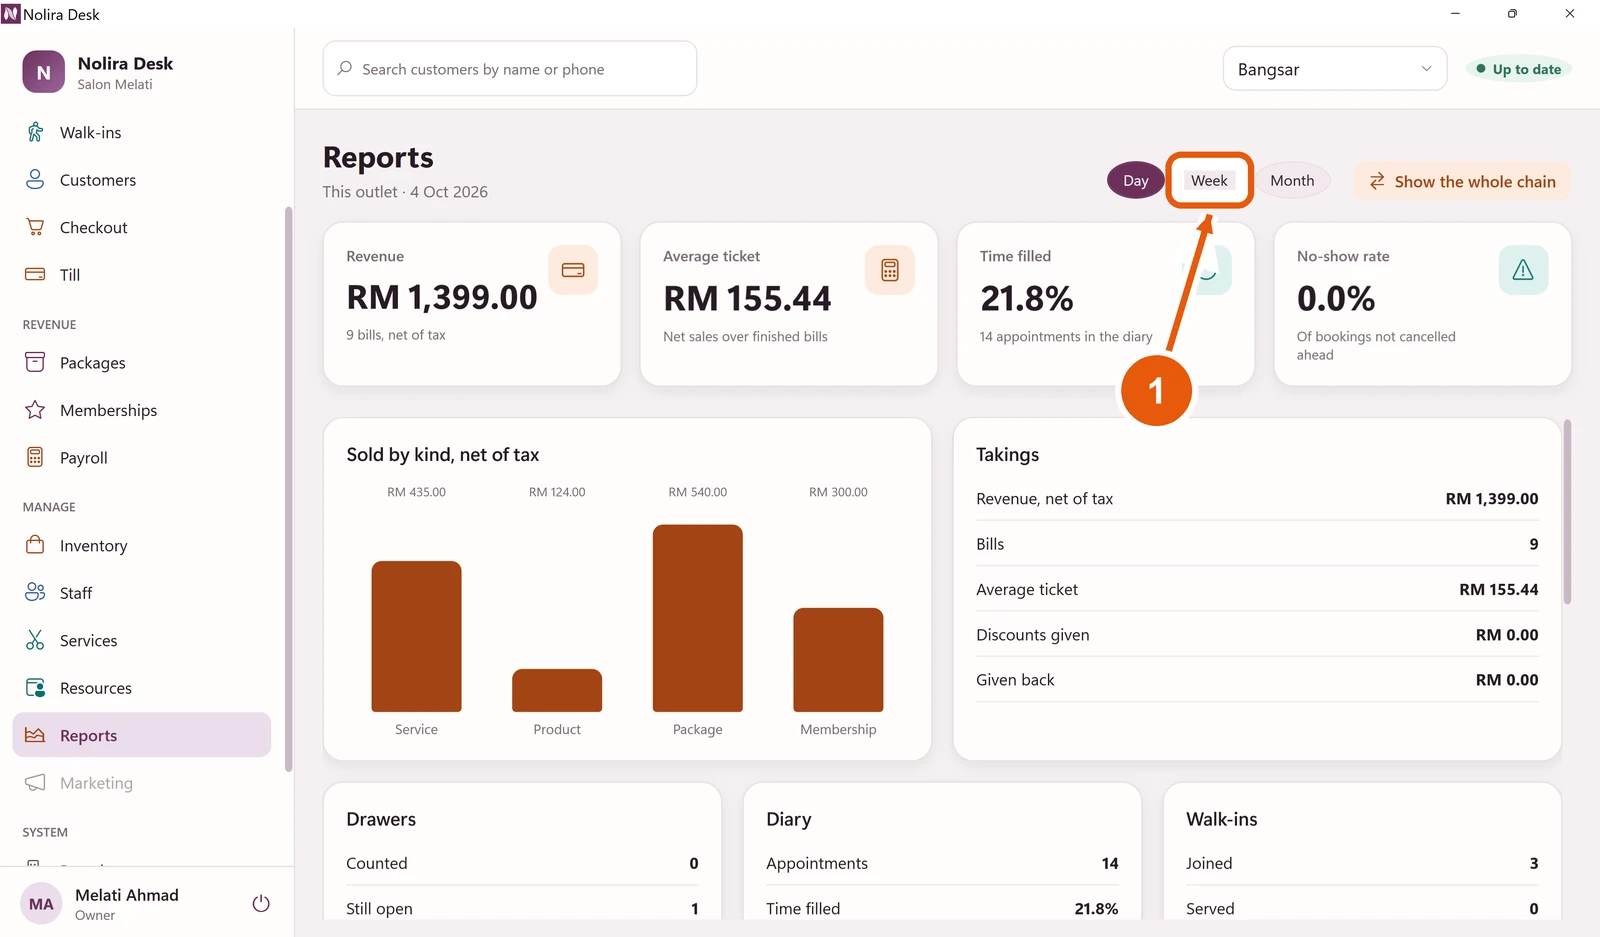
Click Reports to see takings, bills, the diary, walk-ins, stock and commission.
- 1
Choose Day, Week or Month. Show the whole chain adds every outlet together.
Outlets
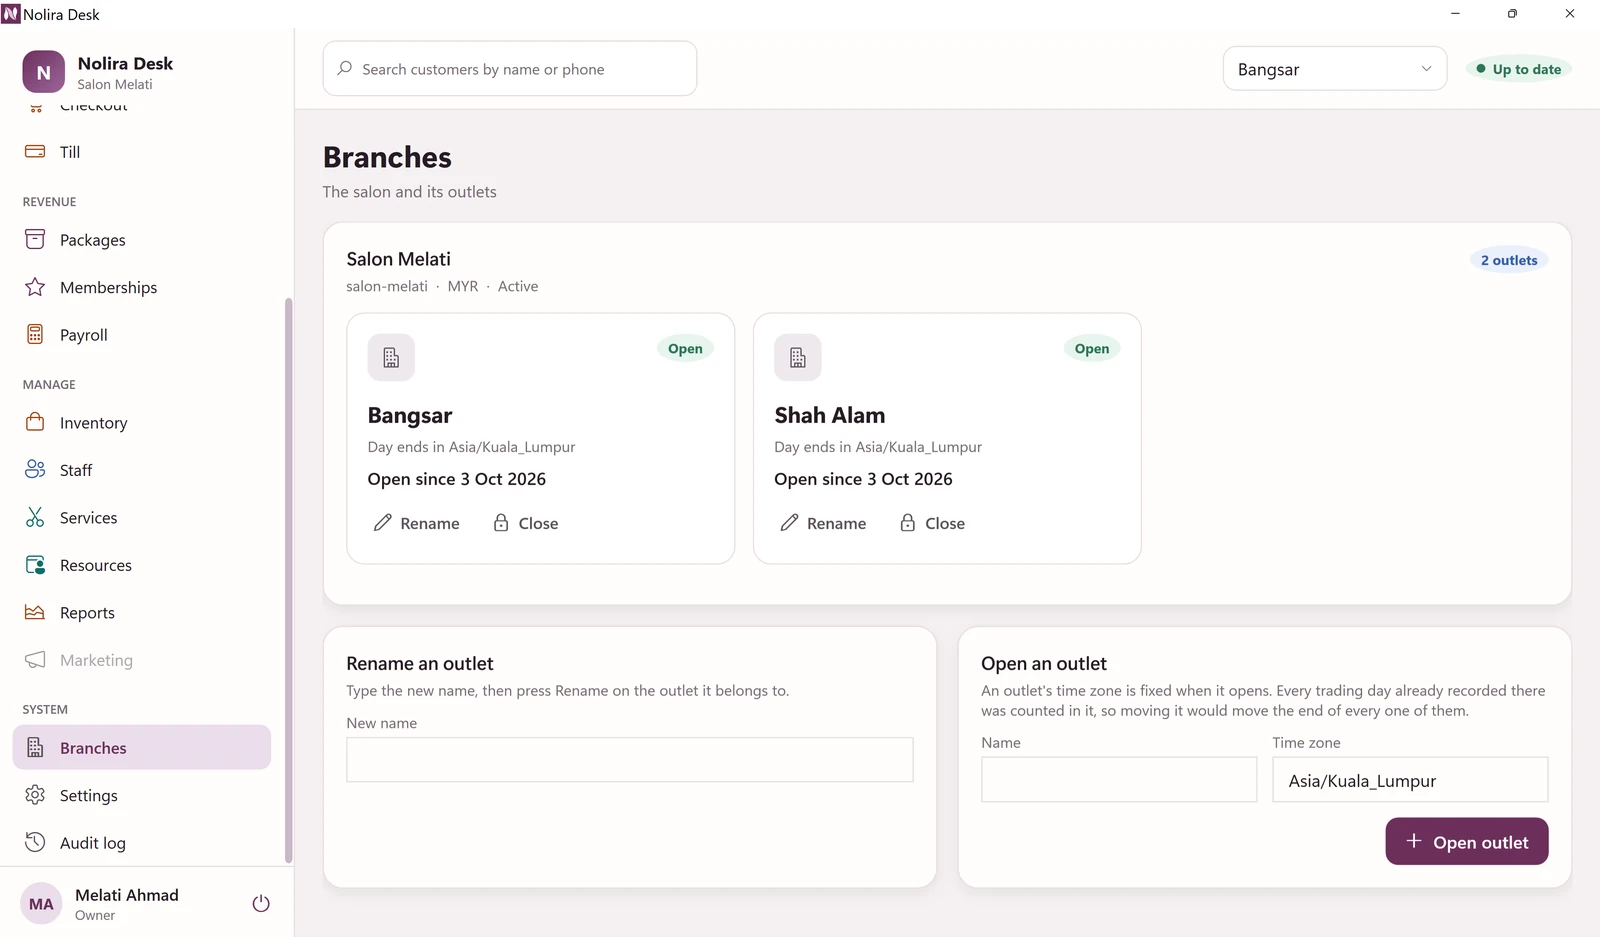
Click Branches to open a new outlet, rename one, or close one.
Opening hours and rules
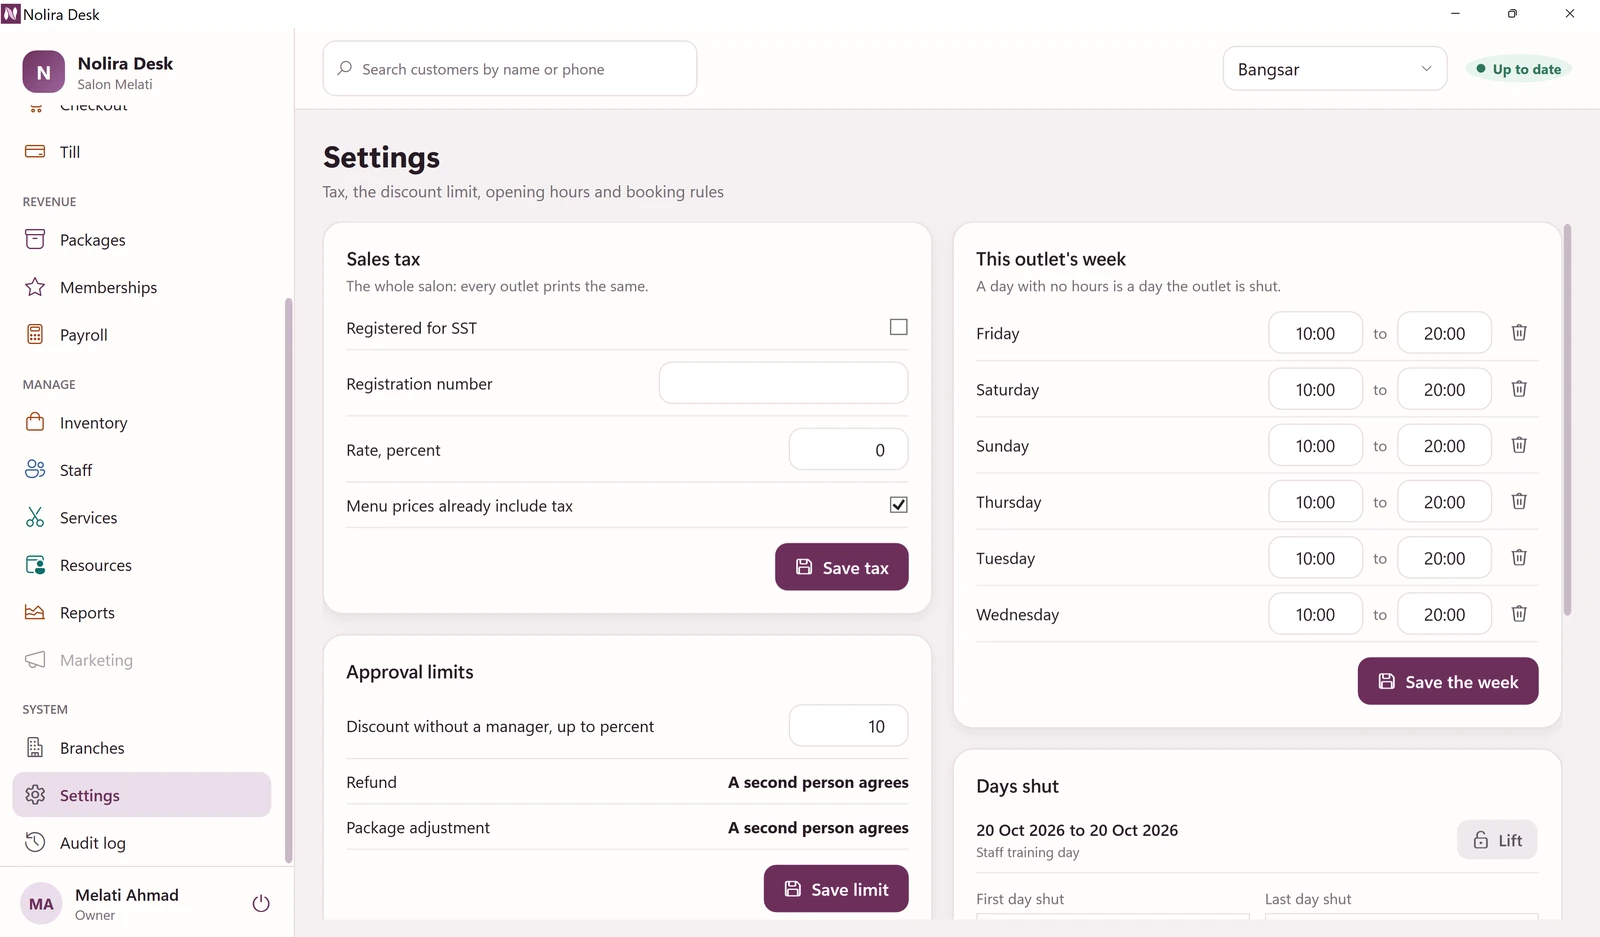
Click Settings. Set the sales tax, the largest discount the front desk may give without a manager, and the outlet's opening hours for each day.
Days you are shut
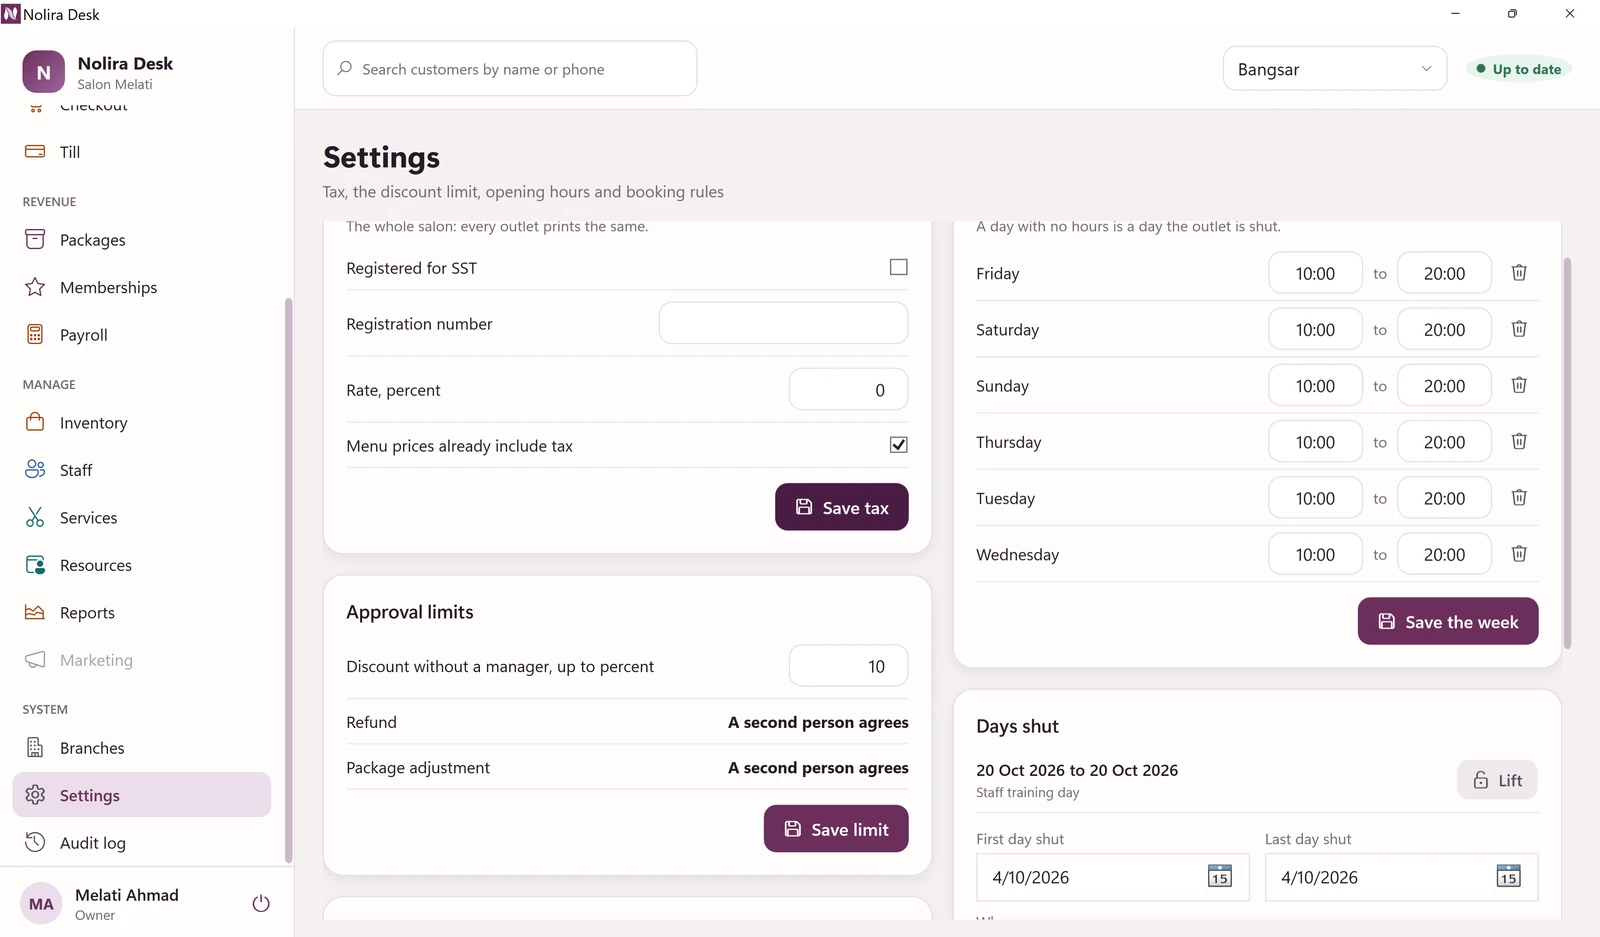
Scroll down Settings to Days shut. Add a holiday or a training day, and nobody can book on it.
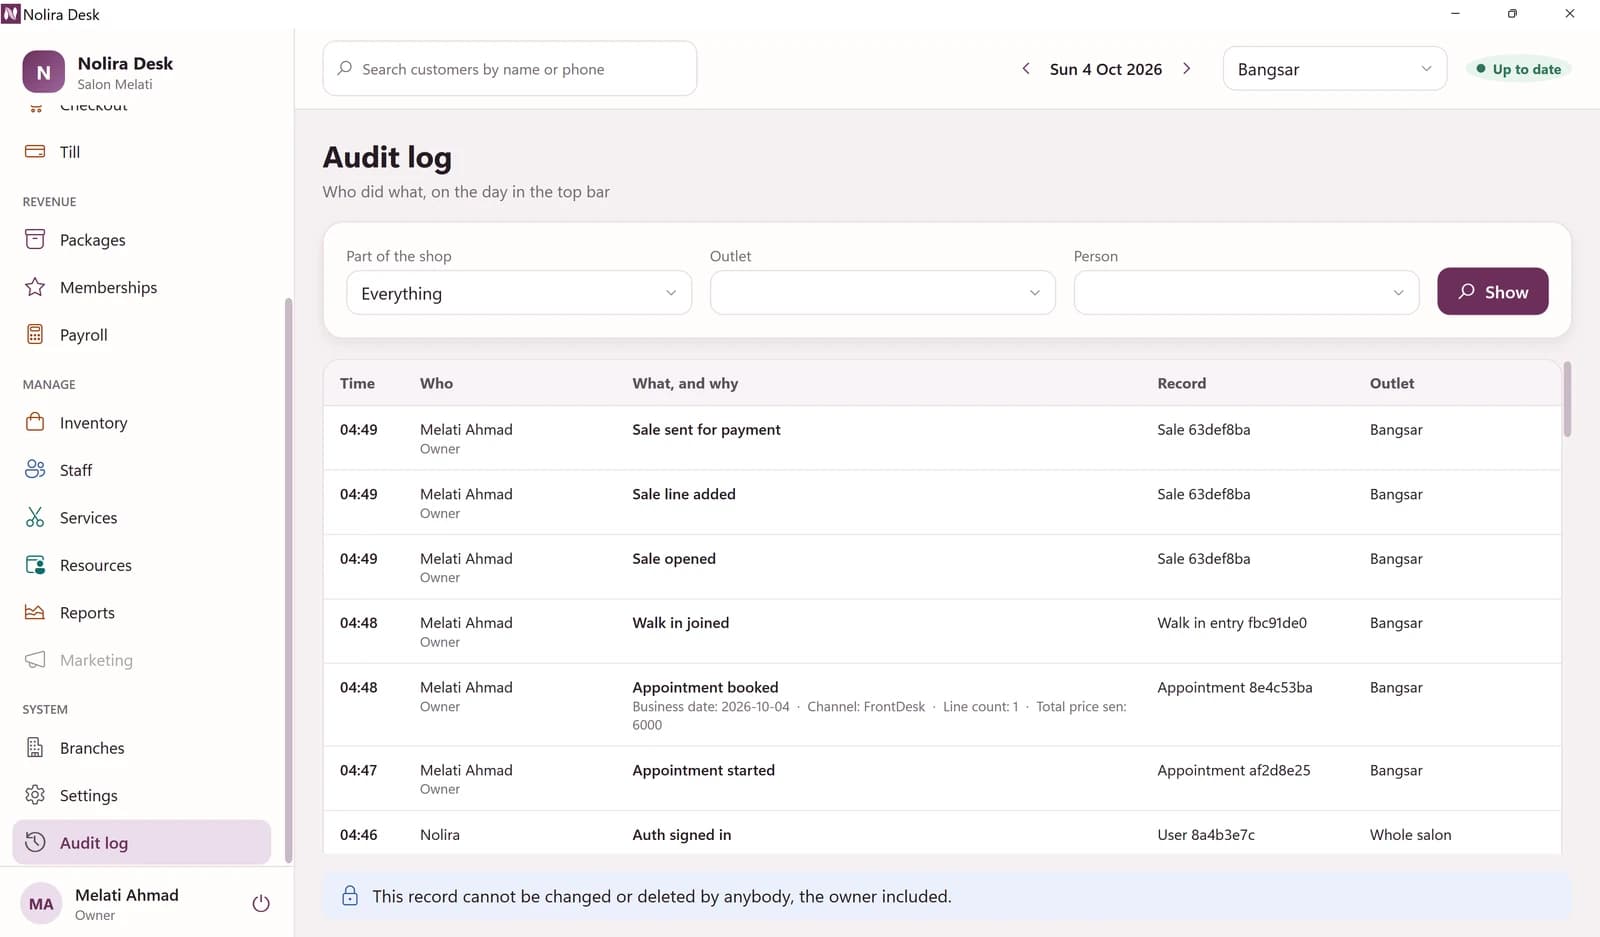
Who did what
Click Audit log to see every change made on the day in the top bar, who made it and why. Nobody can change or delete this record, the owner included.
Part 3
Nolira Team on iPhone
For staff and owners away from the counter. The buttons along the bottom are Today, Walk-ins, Till, Customers and Outlets.
- Sign in
- Today
- A visit
- Walk-ins
- Till and bills
- Approve a discount
- Customers
- A customer's details
- Outlets and your account
- Overview
- Approvals
- Signed-in devices
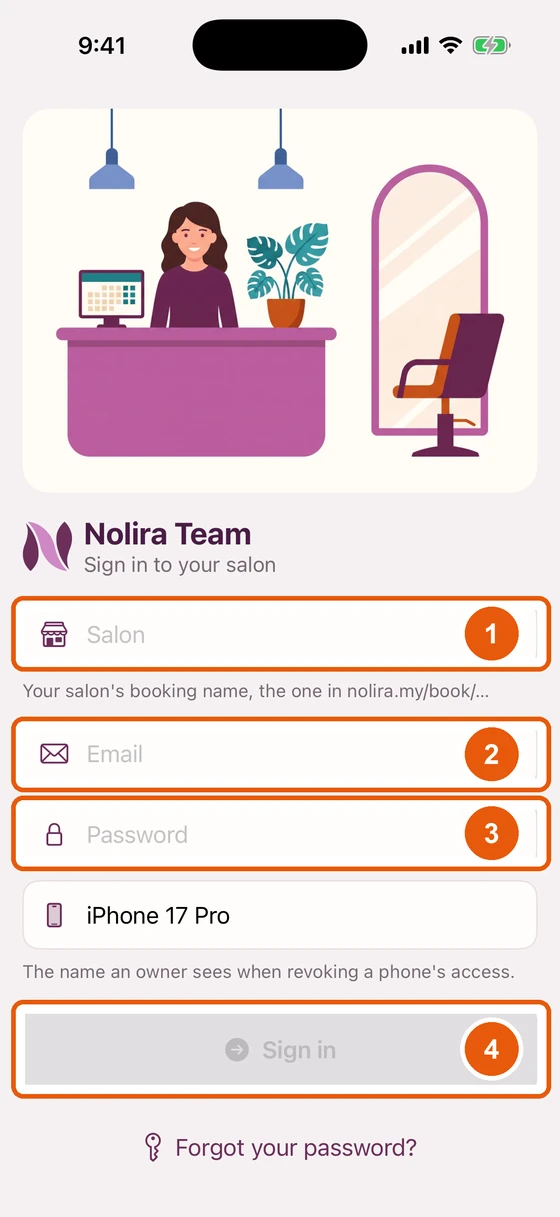
Sign in
- 1
Tap Salon and type your salon code.
- 2
Tap Email and type your email.
- 3
Tap Password and type your password.
- 4
Tap Sign in.
The phone's name, below the password, is what the owner sees in the list of signed-in phones. You can change it.
Today
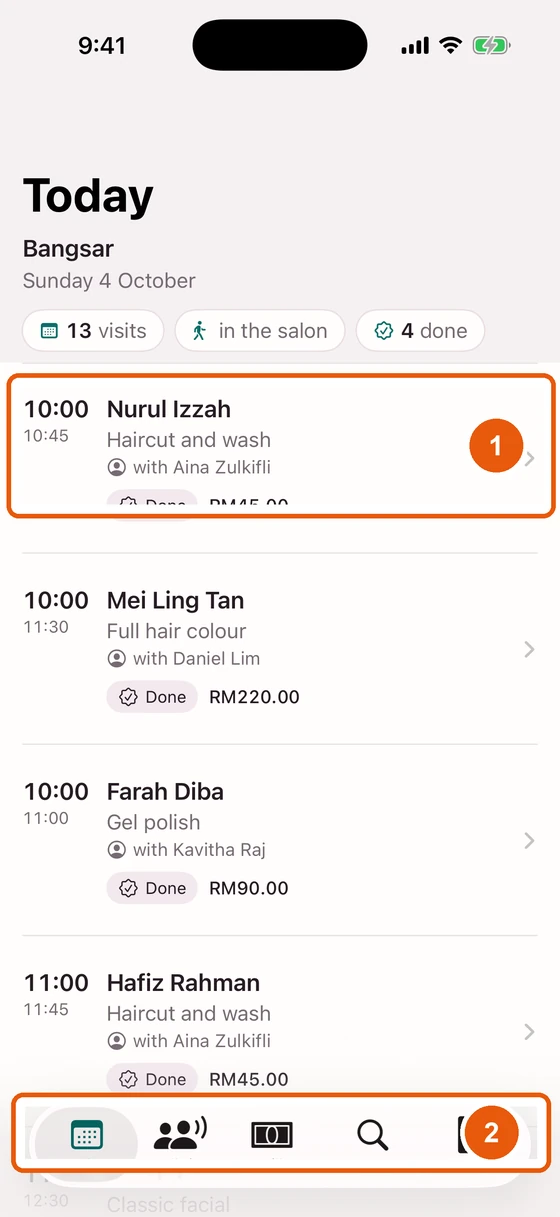
Today shows every visit at your outlet, in time order, with who is doing it and how it stands.
- 1
Tap a visit to open it.
- 2
Tap the buttons along the bottom to move between screens.
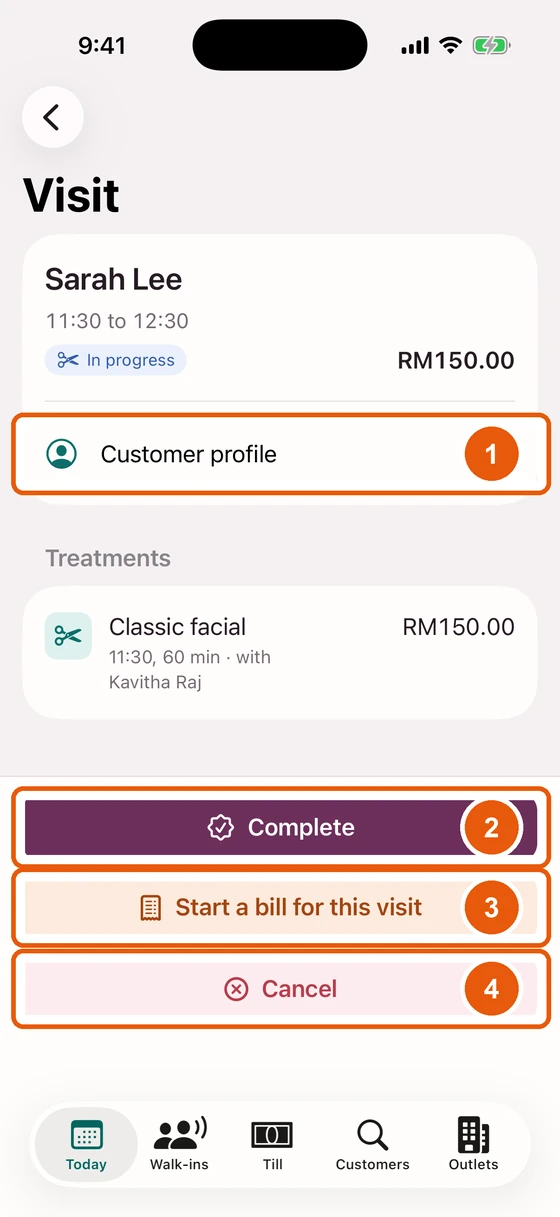
A visit
- 1
Tap Customer profile to see the customer's details and packages.
- 2
Tap the purple button to move the visit on. It says the next step, for example Complete.
- 3
Tap Start a bill for this visit to charge for it.
- 4
Tap Cancel if the visit is not going ahead.
Walk-ins
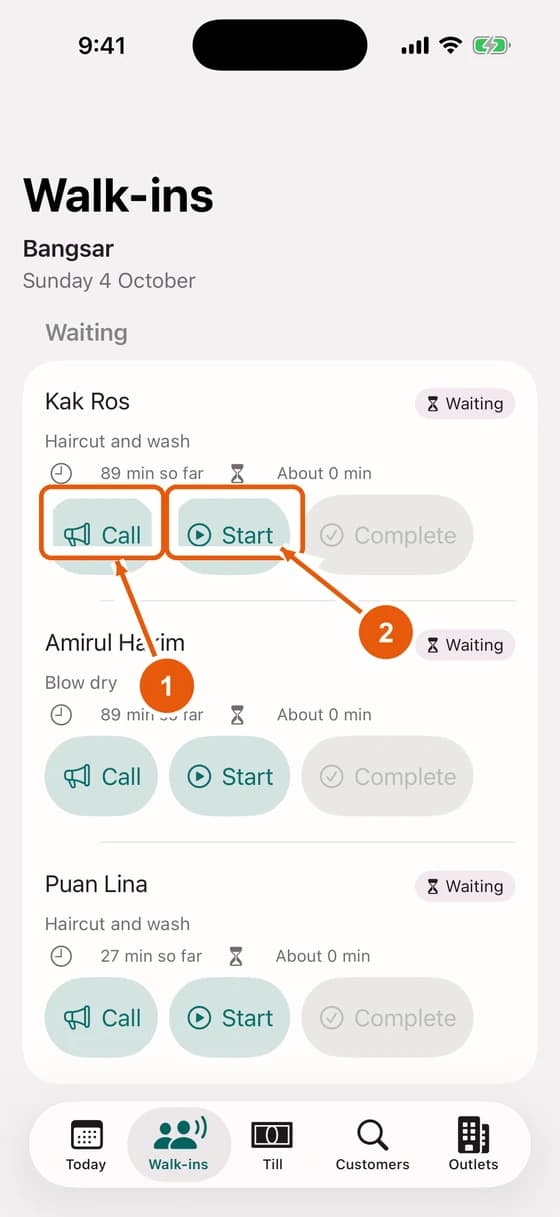
- 1
Tap Call when it is the person's turn.
- 2
Tap Start when the treatment begins. If nobody has been given the walk-in yet, the person they asked for, or whoever is free, is given it.
Till and bills
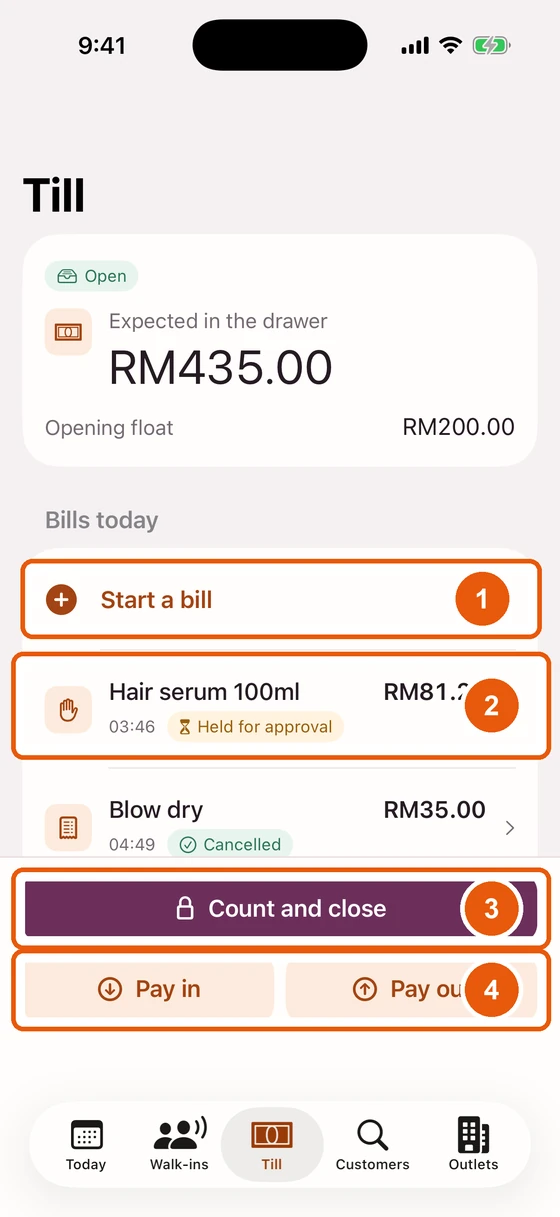
- 1
Tap Start a bill to charge a customer.
- 2
Tap a bill to open it. Held for approval means it waits for a manager.
- 3
Tap Count and close at the end of the day.
- 4
Tap Pay in or Pay out when money goes into or out of the drawer.
Approve a discount
A manager sees why a bill is held. If the discount is right, approve it so the front desk can take payment.
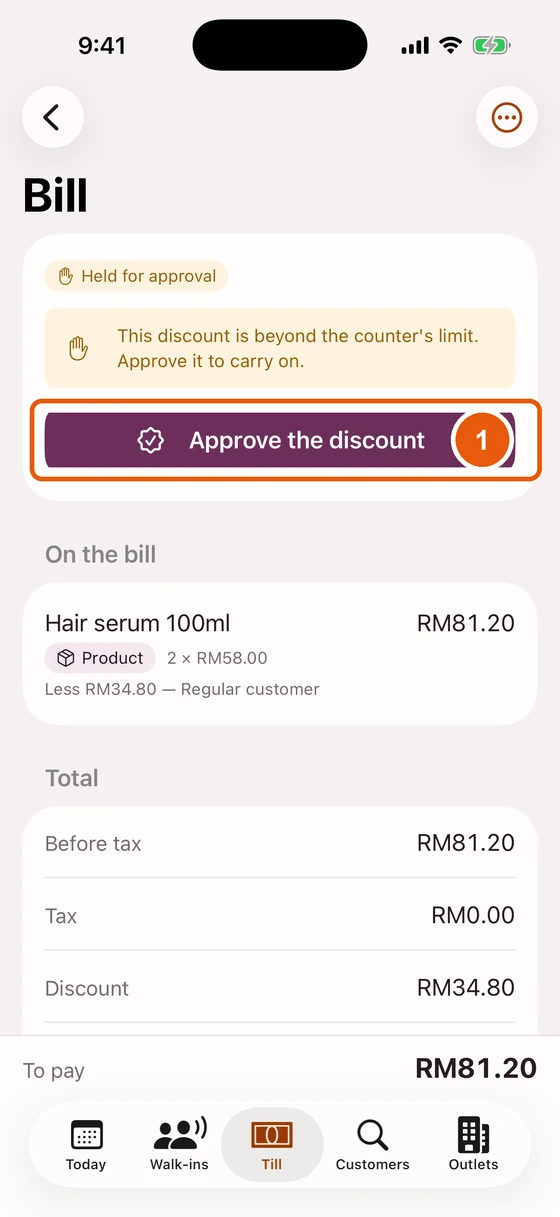
- 1
Tap Approve the discount.
Customers
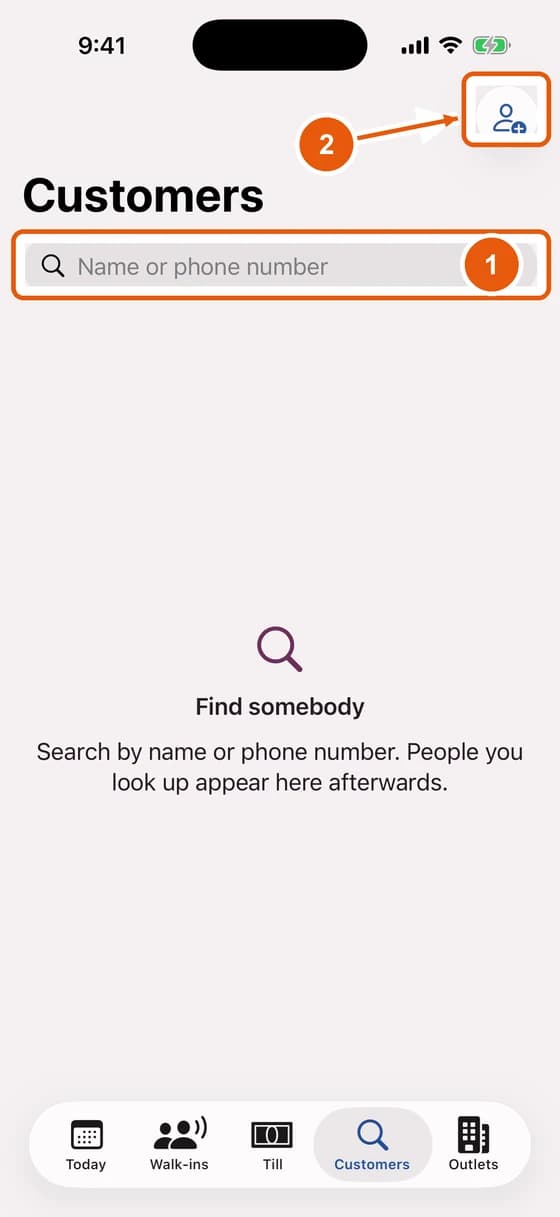
- 1
Type a name or phone number to find a customer.
- 2
Tap this button to add a new customer.
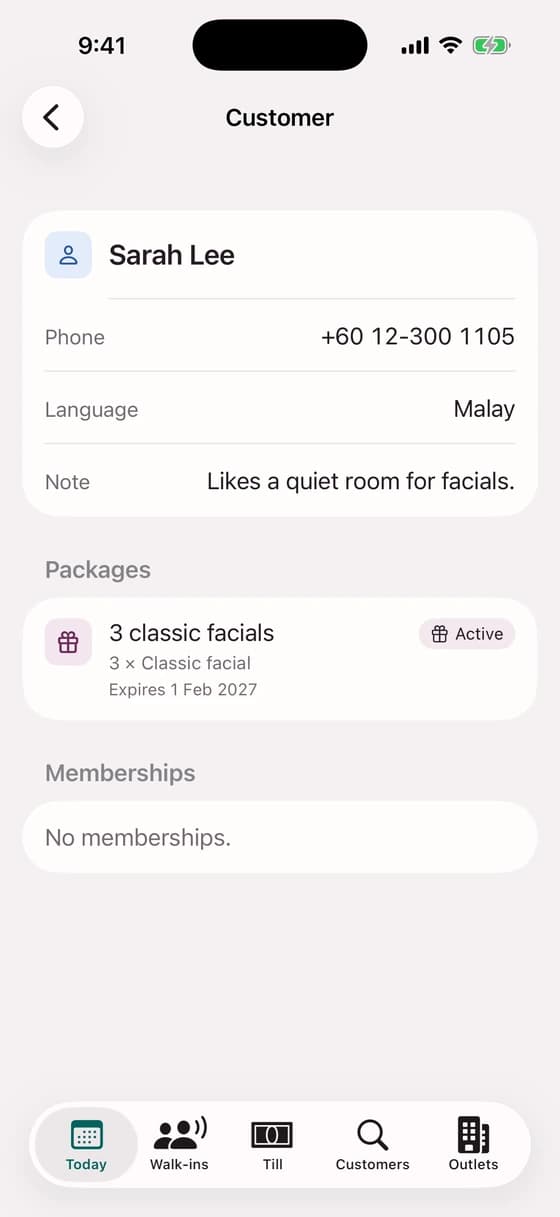
A customer's details
A customer's phone, language, note, packages and memberships, on one screen.
Outlets and your account
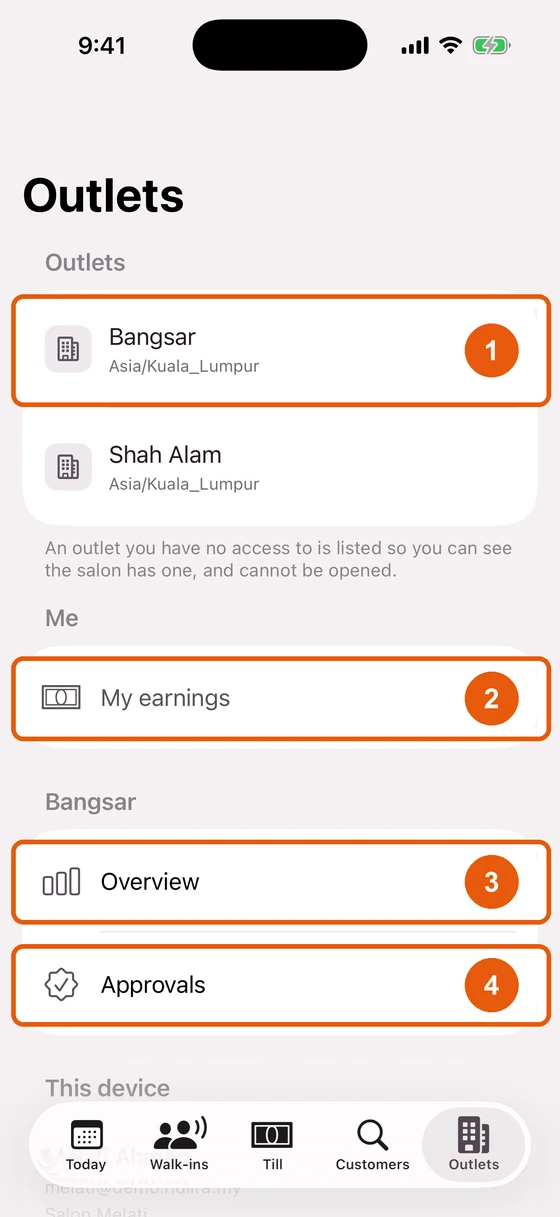
- 1
Tap the outlet you are working at.
- 2
Tap My earnings to see your commission this month.
- 3
Tap Overview to see today's takings. For owners and managers.
- 4
Tap Approvals to see what waits for you. For owners and managers.
To sign out, scroll to the bottom of Outlets and tap Sign out.
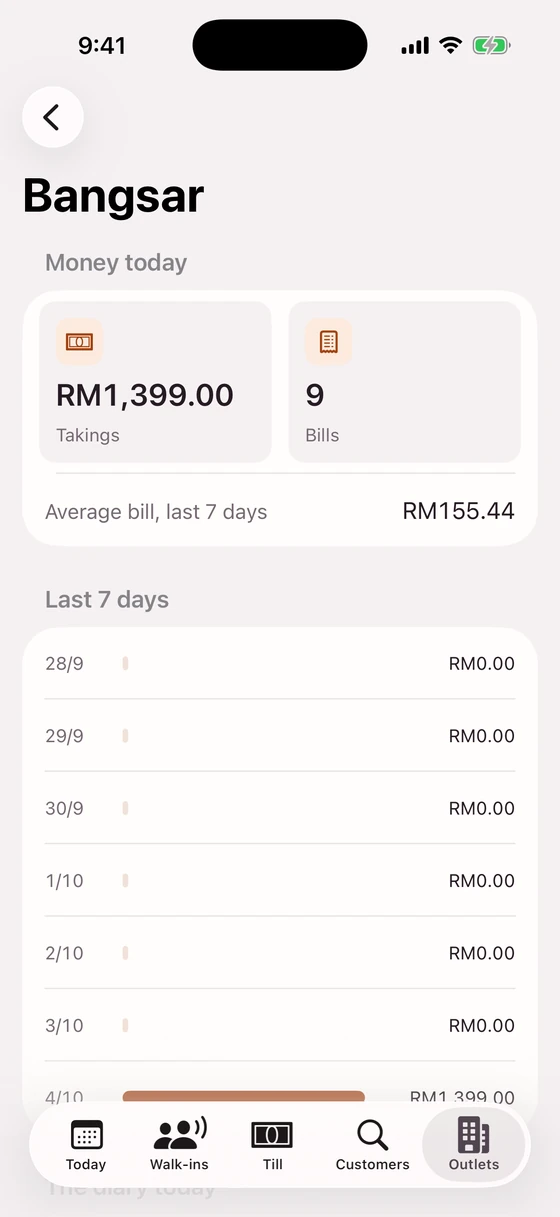
Overview
Takings and bills today, the average bill, and the last seven days.
Approvals
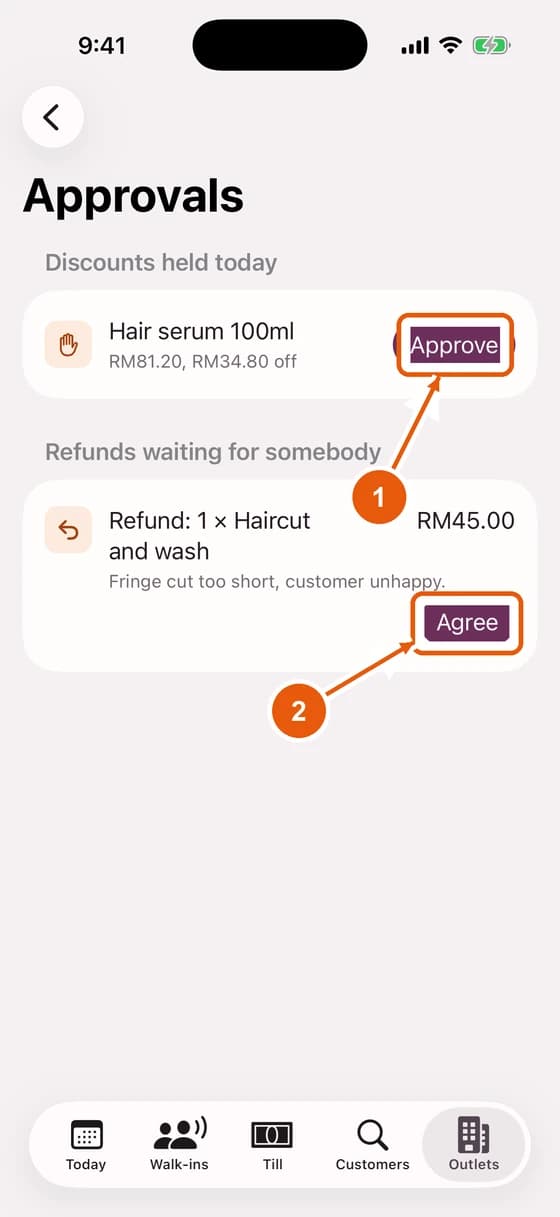
- 1
Tap Approve to allow a discount held at the till.
- 2
Tap Agree to allow a refund. Someone other than the person who asked has to agree.
Signed-in devices
Every phone and computer signed in with your account.
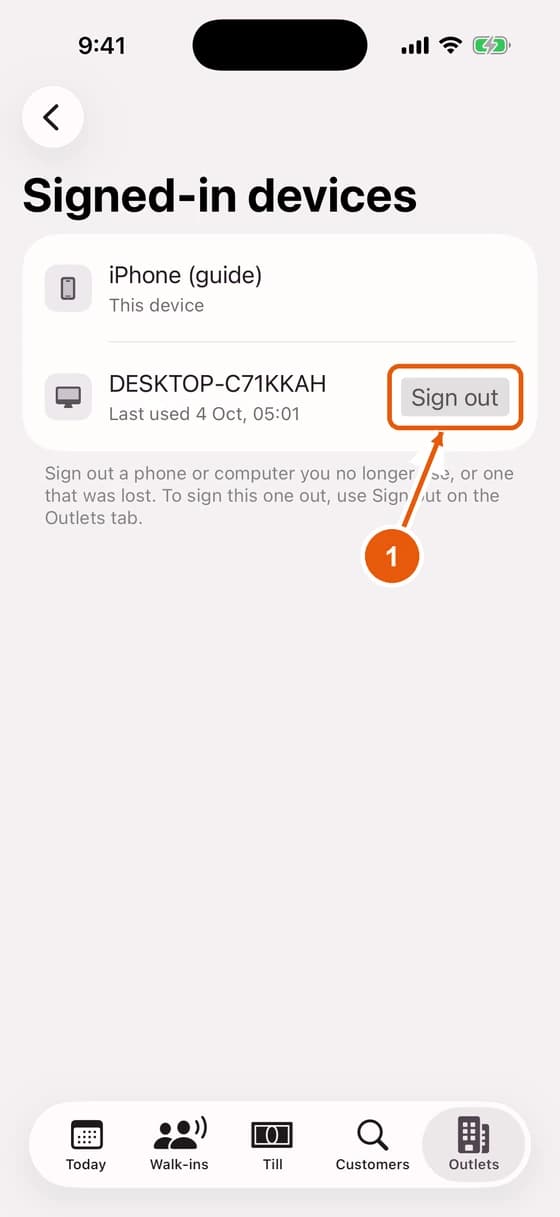
- 1
Tap Sign out beside a phone that was lost or is no longer used.
Part 4
Nolira Team on Android
The same as the iPhone app. The buttons along the bottom are Today, Queue, Till, Customers and More.
- Sign in
- Choose your outlet
- Today
- A visit
- The walk-in queue
- Till and bills
- Approve a discount
- Find a customer
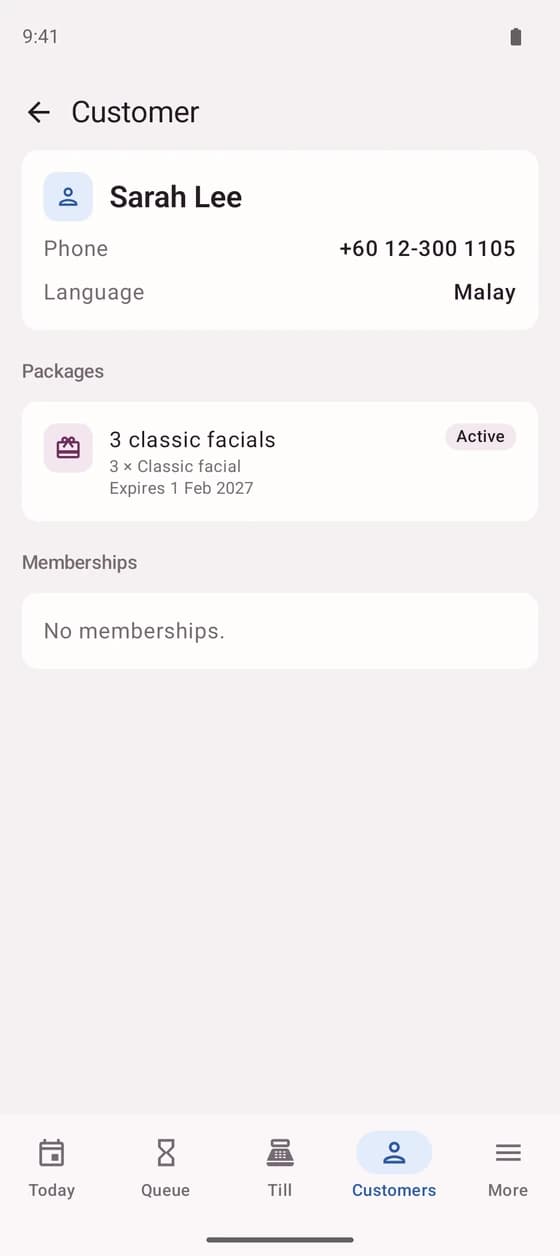
- A customer's details
- More
- Overview
- Approvals
- My earnings
- Signed-in devices
Sign in
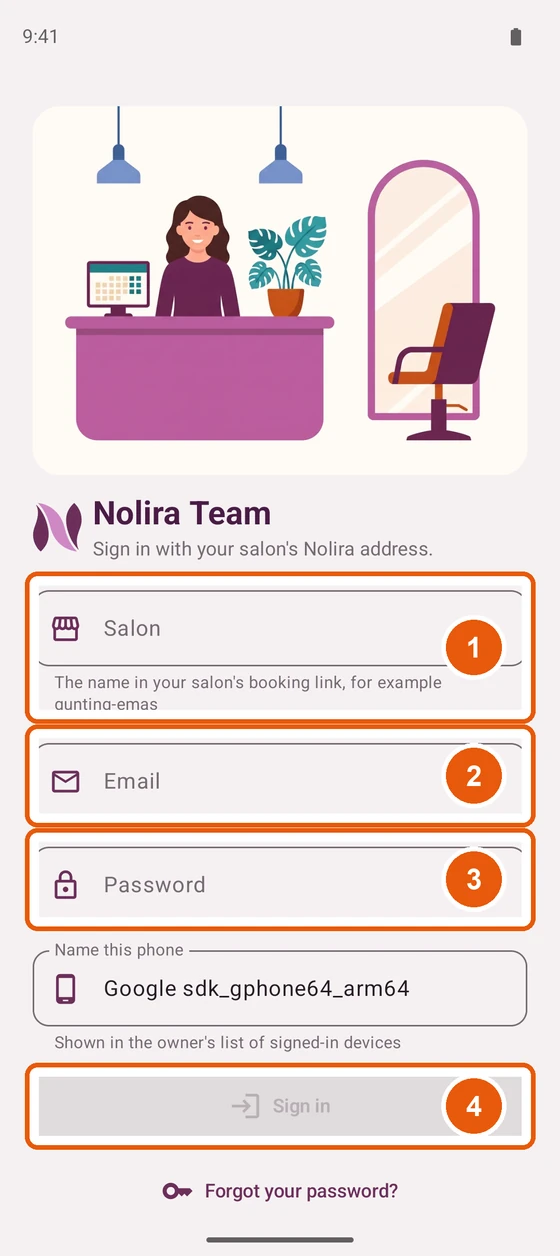
- 1
Tap Salon and type your salon code.
- 2
Tap Email and type your email.
- 3
Tap Password and type your password.
- 4
Tap Sign in.
Choose your outlet
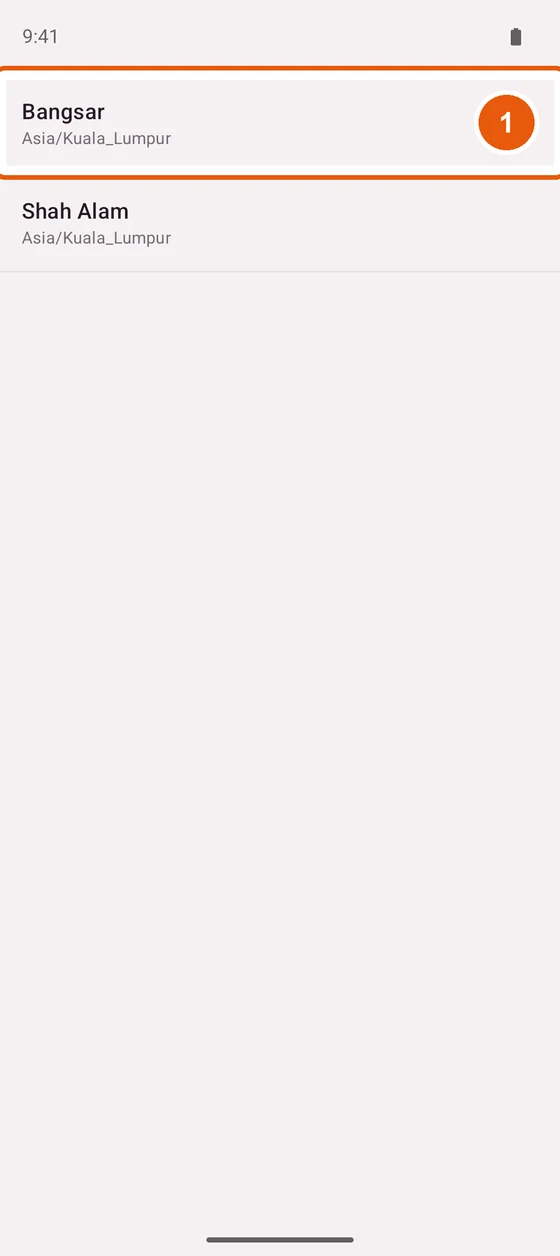
- 1
Tap the outlet you are working at today.
Today
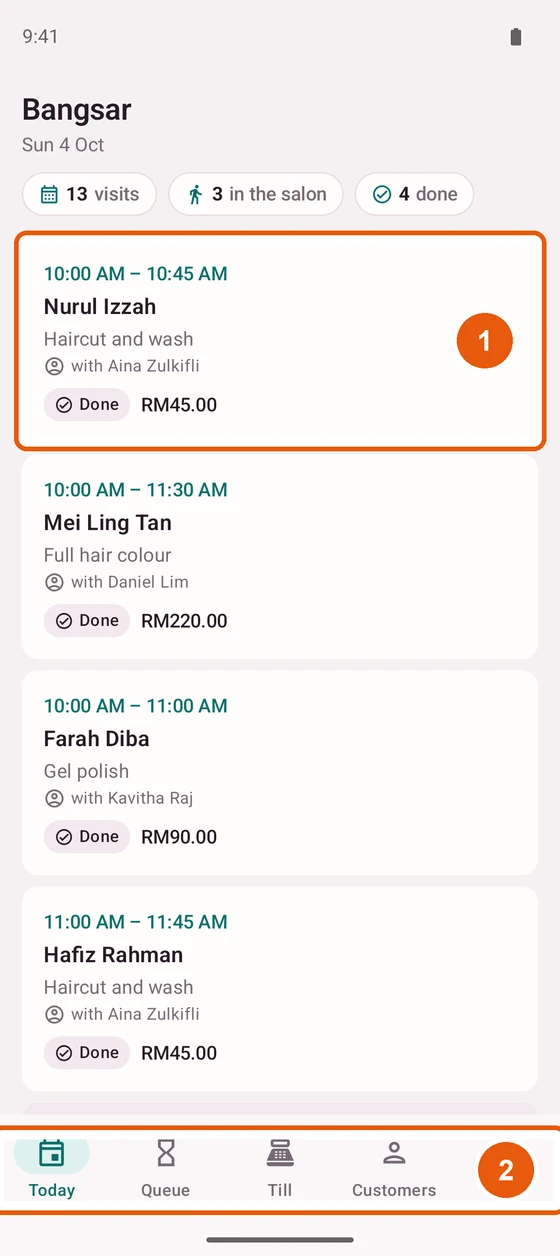
- 1
Tap a visit to open it.
- 2
Tap the buttons along the bottom to move between screens.
A visit
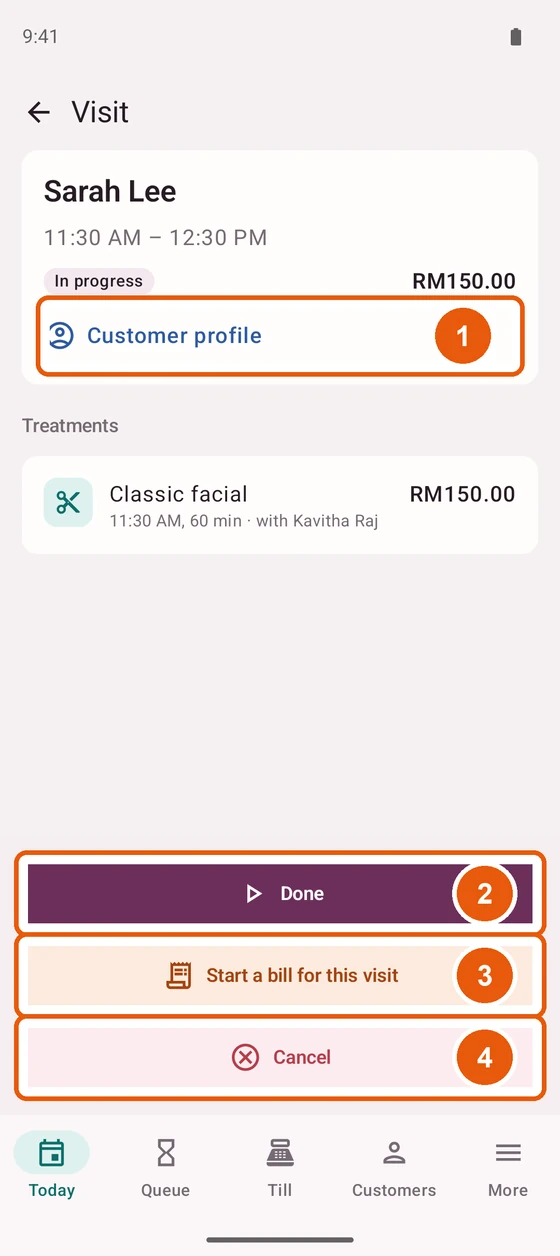
- 1
Tap Customer profile to see the customer's details.
- 2
Tap the purple button to move the visit on, for example Done.
- 3
Tap Start a bill for this visit to charge for it.
- 4
Tap Cancel if the visit is not going ahead.
The walk-in queue
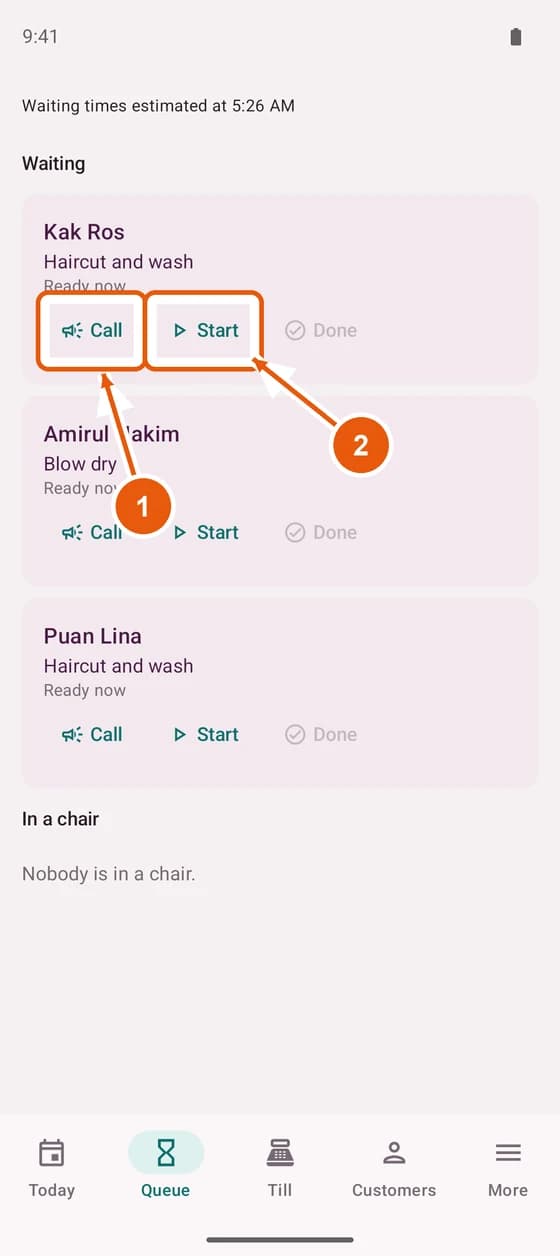
- 1
Tap Call when it is the person's turn.
- 2
Tap Start when the treatment begins. If nobody has been given the walk-in yet, the person they asked for, or whoever is free, is given it.
Till and bills
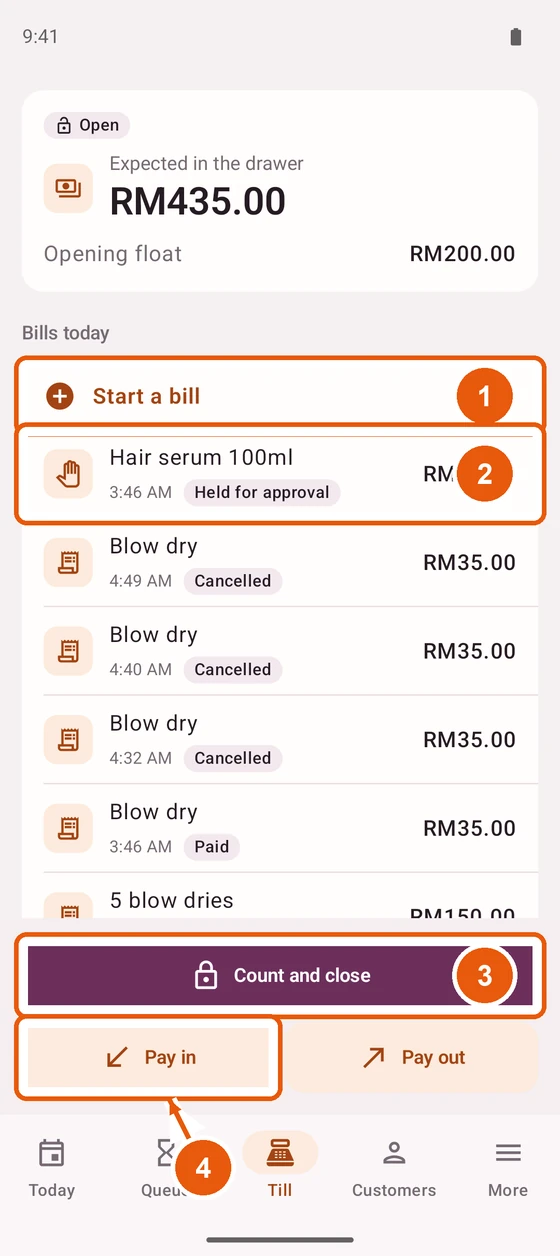
- 1
Tap Start a bill to charge a customer.
- 2
Tap a bill to open it.
- 3
Tap Count and close at the end of the day.
- 4
Tap Pay in or Pay out when money goes into or out of the drawer.
Approve a discount
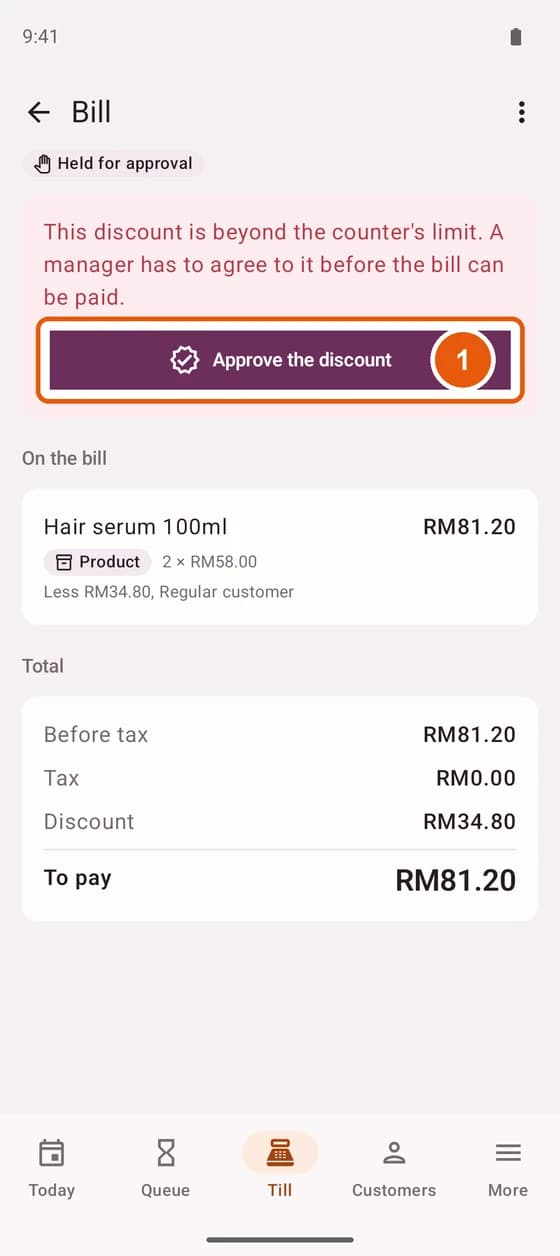
- 1
Tap Approve the discount.
Find a customer
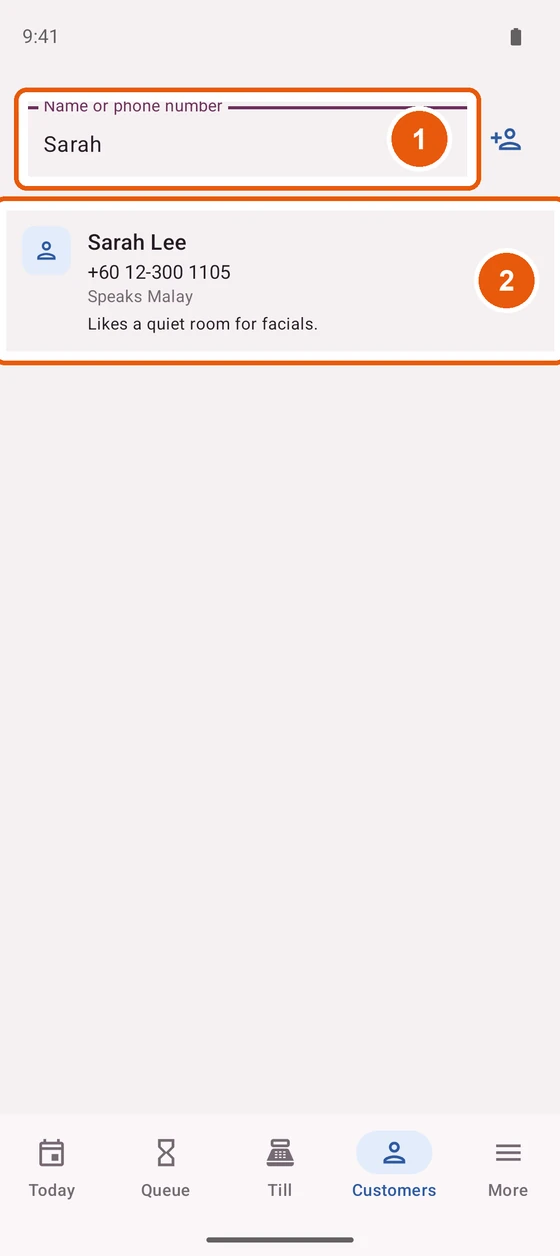
- 1
Type a name or phone number.
- 2
Tap the customer to see their details.
A customer's details
More
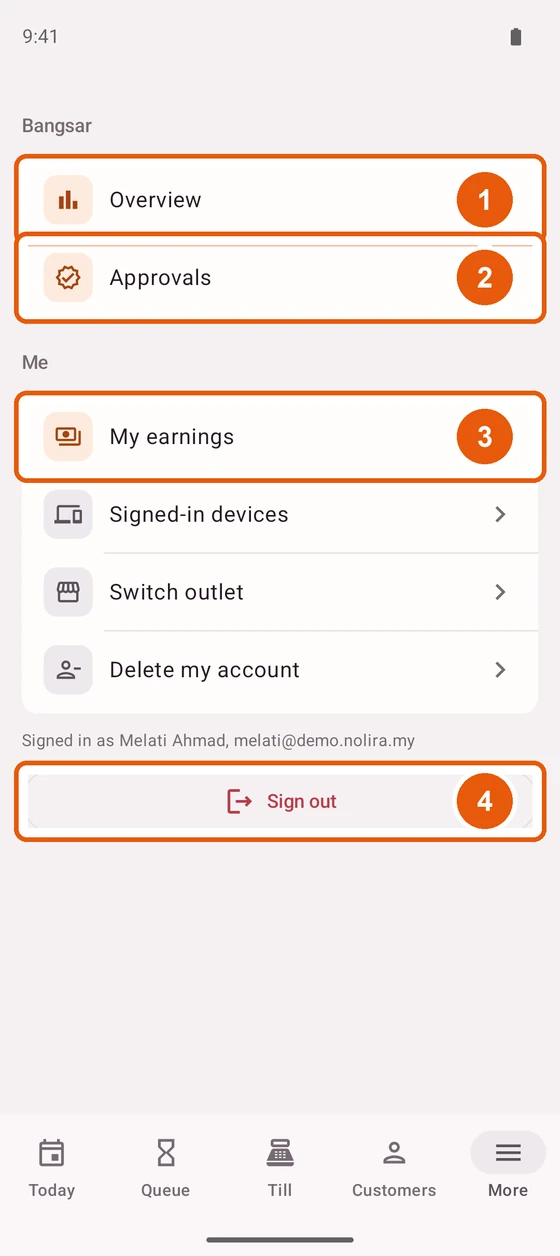
- 1
Tap Overview to see today's takings. For owners and managers.
- 2
Tap Approvals to see what waits for you. For owners and managers.
- 3
Tap My earnings to see your commission.
- 4
Tap Sign out to sign out of this phone.
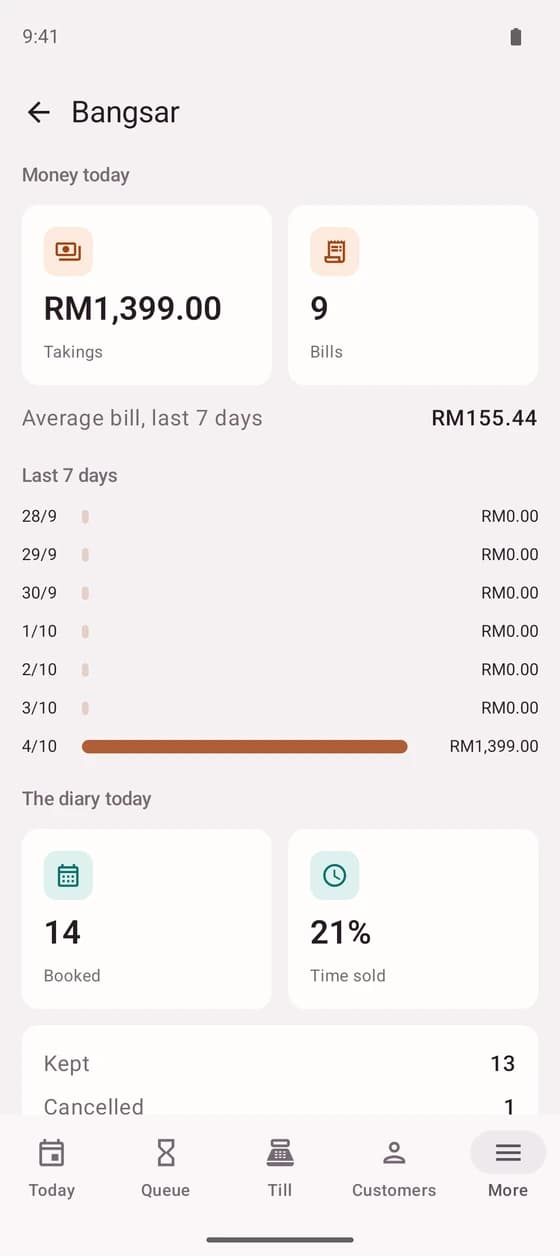
Overview
Approvals
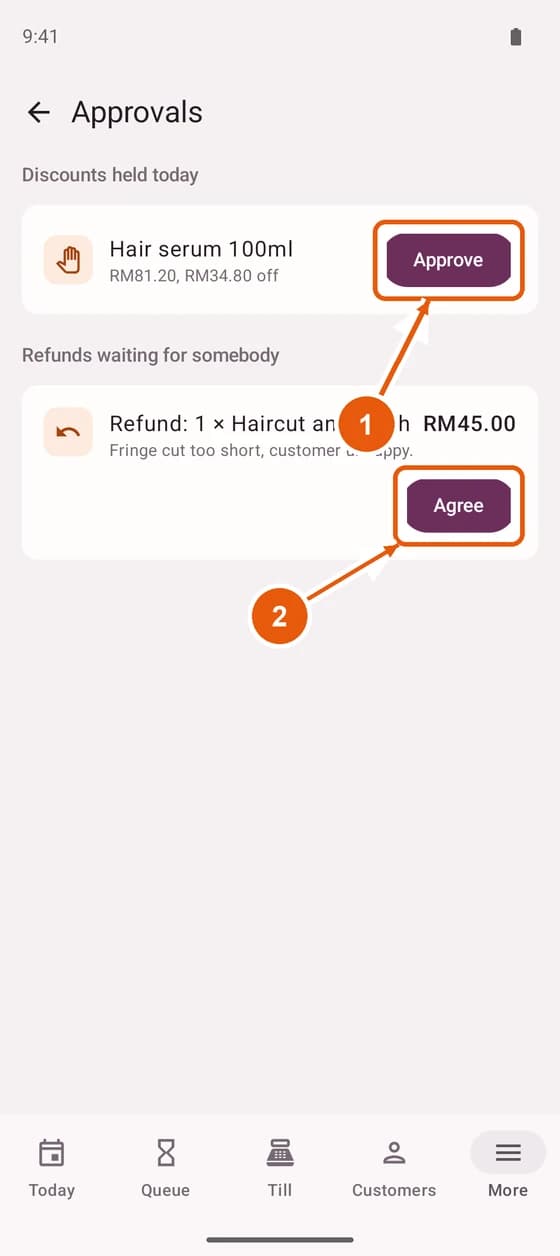
- 1
Tap Approve to allow a discount held at the till.
- 2
Tap Agree to allow a refund.
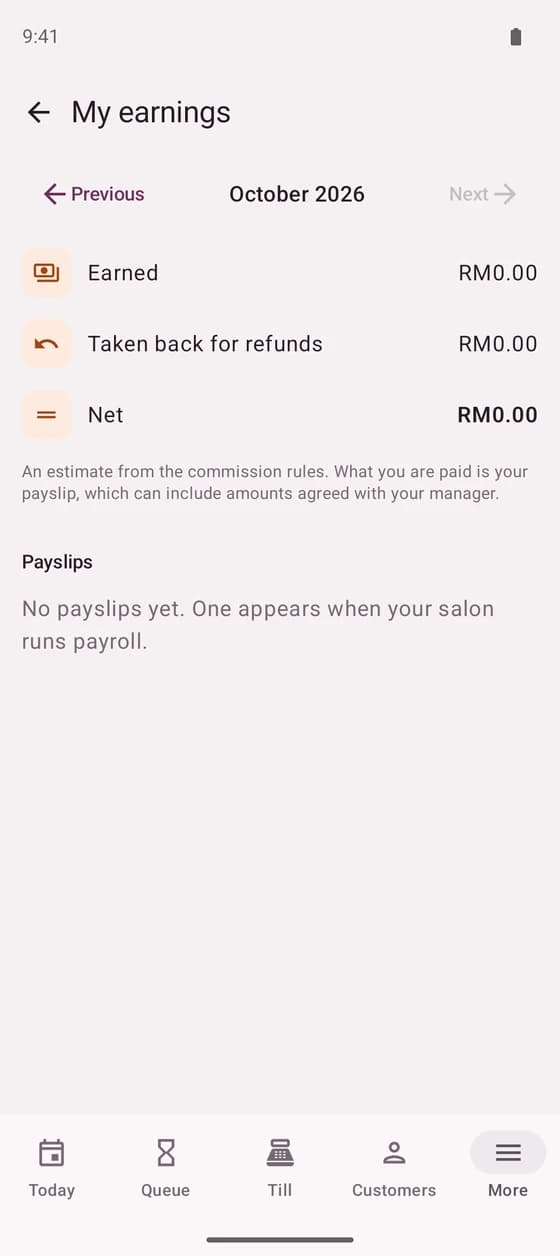
My earnings
An estimate of your commission this month. What you are actually paid is on your payslip.
Signed-in devices
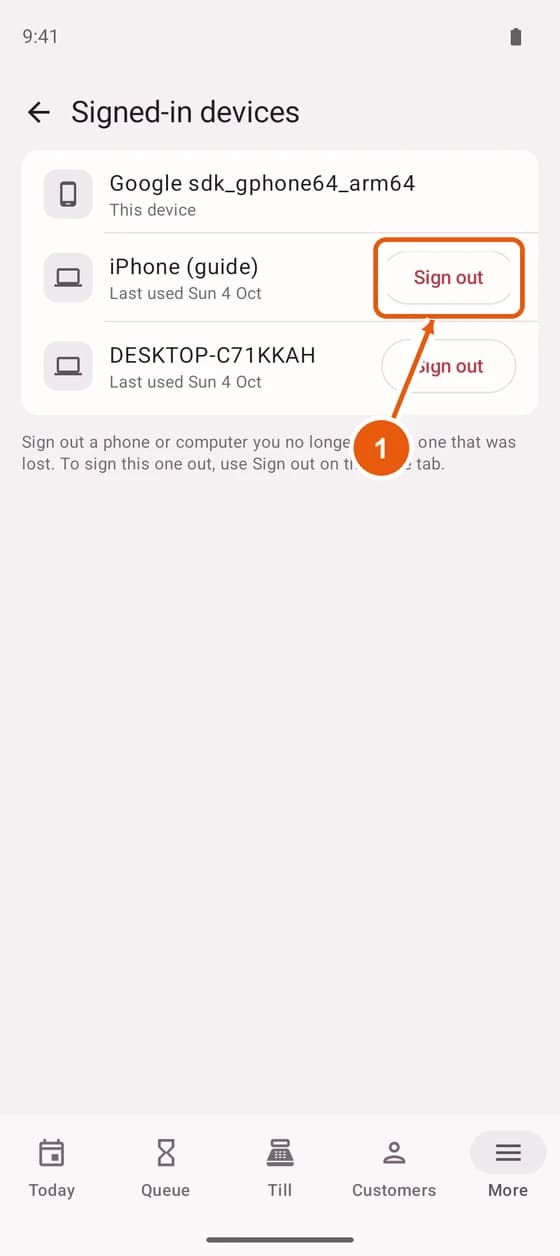
- 1
Tap Sign out beside a phone that was lost or is no longer used.
Part 5
When something goes wrong
The things people ask us most.
Common problems
- 1
I cannot sign in. Check the salon code first, then the email. If you forgot the password, use Forgot your password? on the sign-in screen.
- 2
A button is grey and does nothing. Something above it is not filled in yet, or your role does not allow it. Read the line under the form, or ask the owner.
- 3
Nobody can be booked for a treatment. In Staff, tick that treatment and the outlet for the people who do it, and check a chair or room is in service.
- 4
A phone was lost. Sign it out from Signed-in devices on another phone, or ask the owner to.
Still stuck? Email hello@nolira.my and a real person will answer.